
Version 5.9
In this Topic: Show
The purpose of this article is to provide some guidance on the subject of "order processing' or the basic work flow when using the Order Manager. The program is very flexible and can be configured to behave in many different ways, based on the setting of system parameters, so the examples outlined here may differ slightly from the way the Order Manager will be used in your environment.
The examples that are outlined below assume that:
System parameter ReviewAllOrders is set to TRUE
System parameter CheckInventory is set to TRUE
Orders can be entered several ways:
directly via the Internet from an Order Manager-licensed shopping cart system (depends on the shopping cart, refer to the Shopping Cart Matrix)
imported via a text file, using a properly formatted file from an Order Manager-licensed shopping cart system
imported via a text file using the Generic Import Template feature (requires a Generic Shopping Cart license from Stone Edge; other functionality requires the user to create and install an integration script according to the specifications found in the Developer's Guide)
order data is typed in via the Manual Orders screen (used for mail or telephone orders)
order data is entered via the Point of Sale interface, which is used by merchants that have walk-in customers a brick an mortar store setting (requires the Plus POS or Enterprise Editions of the program)
Orders, especially those that have been imported, should be reviewed for certain conditions before they are marked as Approved and sent to the pickers and packers. Examples of things that should be reviewed are outlined below.
Orders that appear to be fraudulent should not be Approved, in fact it may be advisable to Cancel and possibly Delete those orders.
use the [Validate] button next to the Sold To and Ship To address fields found on the Addresses tab of the Orders screen; refer to the Knowledge Base topic, Addresses Tab of the Orders Screen for more information
check the Address Verification Response (AVS) from the credit card gateway, or the CVV and CVV2 codes, all of which can be seen in the transaction field on the right-hand side of the Pricing tab of the Orders screen or in the transaction field on the Credit Card Terminal tab of the Orders screen
merchants should carefully review orders that originate in locations known for a high rate of fraud and also be on the lookout for suspicious email addresses; to facilitate the identification of fraudulent orders, obtain a subscription to MaxMind Fraud Prevention services and view an order's Fraud Score on the Addresses tab of the Orders screen
Orders containing items that are out of stock are potential candidates to remain Unapproved, temporarily. Consider the following:
A customer wants two widgets and the Order Manager shows 2 Ordered, 1 Shipped, 1 Needed, 0 On Hand on the Orders screen. Why is this important and what does it mean? By looking at the Shipped, Needed and On Hand columns, the merchant can see that one widget has been allocated (Shipped) to the order, but there are no more left in stock to complete the order. Therefore, the program determines that an additional unit must be backordered (Needed).
The merchant has the choice of shipping the single available widget now (partial shipment) or waiting until more widgets have been received from the supplier so that both widgets can be shipped to the customer at the same time (complete shipment).
If the merchant chooses not to ship the partial order, he can return the allocated widget to inventory by clicking the [Force] button, which will alter the value in the Shipped column to 0 and the Needed column to 2. Do not Approve this order until the shipment of widgets arrive from the supplier, and are received into the Order Manager's inventory. At that time, the merchant can then [Fill] the order that was waiting for two widgets and mark it as Approved. If he has another order that reflects a backorder for a single widget, he can then use the widget that was previously returned to inventory to fill this request by clicking the [Fill] button.
If the merchant chooses to ship the one available widget and Approves the order, the program will still know to backorder the additional widget, which will be processed (filled) in a new or subsequent order placed by the same customer when the widget becomes available.
Drop-shipping is name given to the practice of shipping products directly from a supplier rather than from the merchant's in-house inventory. If this practice will never be employed, skip this section.
Before marking an order as Approved, check the Drop Ships tab. If the name of the tab is in red text, it means that the order contains at least one product that is designated as a drop-ship inventory item. Click on the tab to review the drop-ship items and create and send the drop-ship purchase order to the supplier. Refer to the Knowledge Base topic, Drop Shipping Tab of the Orders Screen, for more information about this process.
By setting system parameter DropShipCheckQOH to TRUE, the program will prompt the user to decide if the order should be filled from existing stock rather than as a drop-ship order. This parameter is introduced in V5.929.
Some merchants capture payment for orders at the shopping cart, while others may choose to perform that function via the Order Manager. In either case, it is a good practice to review the payment status of an order before Approving it.
If traditional PayPal accounts or traditional checks are used to pay for the order, confirm that the funds have been received prior to Approving the order.
If the Order Manager will be used to perform real-time authorization and capture of credit card payments, eChecks, or debit card transactions, click on the Credit Card Terminal tab of the Orders screen to access the [Payment Terminal] button. The Payment Terminal is the common interface used throughout the program to process online transactions or record all payment information, including the logging of Purchase Order terms, cash and C.O.D payments.
Some shopping cart systems allow the customer to enter special order instructions or gift messages to be included with the shipment. The merchant can also record internal comments or notes when placing or reviewing an order. Click on the Comments & Instructions tab to see any additional information that may be associated with the order. When there is data in the fields on this tab, the name of the tab will be seen in red text.
Approving an order in Order Manager terms basically means that the order has been reviewed to rule out fraud, full payment has been received, the items are in stock and the order can be packed and shipped. In the case of orders containing items that are drop-shipped from a supplier rather than filled from stock, approving an order implies that a drop-ship purchase order has been created and sent to the supplier.
If any of the conditions mentioned in the previous paragraph are not satisfied, it is acceptable for the order to remain unapproved until such time as they are satisfied.
The program provides system parameters that allow the user to automatically mark manually-placed orders and POS orders as Approved, which in most cases can be a safe assumption, since the order is created by a staff member, rather than an invisible customer, as is the case with imported orders.
It is also possible to automatically approve orders upon import by using the Approval Rules feature, however, it is recommended that the user manually review all orders until they have become very familiar with the program. At that point in time, using Approval Rules and the Multi-Order Processor can greatly increase the number of orders that can be processed in a day.
To manually approve an order, click on the [Approve] button in the upper right hand corner of the Orders screen. When you are comfortable with the program and are ready to approve orders via the Multi-Order Processor, review the Knowledge Base topic, Multi-Order Processor Screen.
In Order Manager terminology, paperwork refers to the reports that are printed when orders are processed. There are several categories of order-related reports, one of which can be printed when an order is imported, while others can be added to a batch print queue or printed on an order by order basis. The order paperwork categories are:
Sales Receipts, also commonly known as Invoices
Packing Slips
Pick Lists - which can be printed at import; the standard Order Manager variety, not the Warehouse Manager PLS variety
Mailing Labels
Shipping Labels
Credit Slips
Standard reports are provided with the program, many of which also various formats or templates, which provide different kinds of data. The user or a third party can also create custom reports for situations that are not covered by the standard reports. Refer to the Knowledge Base topic, Creating and Editing Custom Reports and Custom Report Maintenance for more information.
System parameters are used to store the user's report template preference and the number of copies of each that should be printed. Refer to the Knowledge Base topic, Report Parameter Group and the Store Setup Wizard, Reports section for more details.
When an order is approved by clicking the [Approve] button on the Orders screen, the user has the opportunity to print the paperwork immediately, print it later (add it to the batch printing queue) or choose not to print any of the paperwork at that time. It is possible to print the paperwork at a later time by using the [Print] button on the Orders screen or when using one of the Packing screens that is able to print order paperwork. Refer to the Knowledge Base topic, Approval Options Screen, for more information about the actions that can be performed at that screen.
There are three possible screens to use for packing orders with the Order Manager, the Pack Orders screen, the Pack & Ship screen and the QuickShip screen. The Packing screen is very limited in its capabilities, while the Pack & Ship and Quickship screens are able to print order paperwork, including shipping labels if one of the integrated shipping software solutions has been configured (UPS Online Tools, FedEx ShipManager or Endicia DAzzle for USPS). Refer to the Store Setup Wizard, Shipping section for more information. Tracking numbers obtained from any of these applications are immediately recorded in the Order Manager tables. It is also possible to use an external shipping system, such as UPS Worldship, by means of an ODBC connection to the Order Manager's store data file. Refer to the Shipping section of the Knowledge Base to read more about the integrated and external shipping solutions that can be used with the Order Manager.
This is the recommended method to follow until you have become very well acquainted with the program and its features. The Orders screen is where the user can review all, or a subset of orders, and perform a variety of actions related to those orders, before or after they have been Approved for shipping.
While the program offers great flexibility in the sequence in which the user may perform the actions that are available at the Orders screen, it is imperative that a shipping label is not printed via the [Print Shipping Label] button on the Shipping & Tracking tab of the Orders screen prior to the order being marked as Approved, Doing so will cause the accounting data in Order Manager to be inaccurate.
The following flowchart depicts the most simplistic sequence of events when processing orders in Single Order Mode. It assumes that this is a very small operation ( less than 50 orders per day) and all of the steps are being performed by a single individual, at a single workstation, processing a single order at a time. Orders are being manually reviewed at the Orders screen with the All Pending (not approved yet) Quick Filter applied, which produces a set of order records that have not yet been approved and processed. When the work flow process has been completed for all of the orders in the currently viewed set, the process can be repeated from the beginning any number of times until the end of the business day.
If the program has been configured to send order status updates and tracking emails to customers, and if new tracking data is available, that function can be performed by clicking the [Process Tracking Numbers] button on the Shipping & Fulfillment tab of the Maintenance Menu. at any given time throughout the day. If no new tracking data is present, the [Process Tracking Numbers] button will not be visible. This procedure is not represented in the flowchart below.
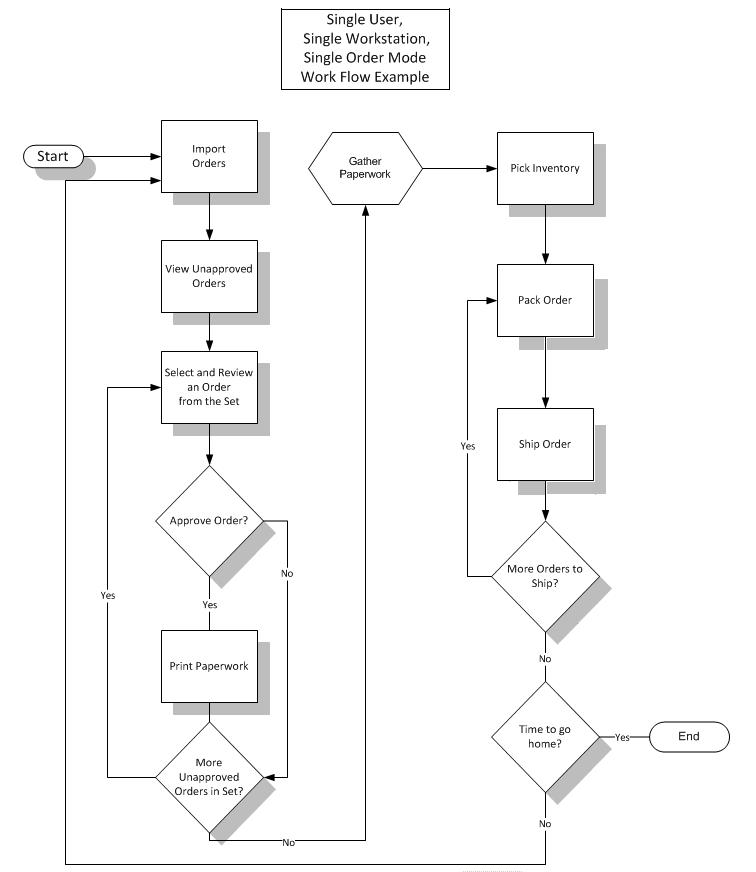
Figure 1: Single Order Processing Mode
Refer to Knowledge Base Topic, Work Flow Scenarios, User Scenario One for a more detailed step-by-step example.
This method is for more experienced users of the program, which allows orders to be processed in a batch, rather than one by one. The Multi-Order Processor screen is where batch processing of orders takes place. Just as with the Orders screen, the user can use a Quick Filter or other criteria fields to create a list of orders to be processed. Once that list is populated on the screen, it is also possible to select only a few of those orders to process.
The user controls which orders will be affected and which processes will be performed against the chosen orders by making on-screen selections. Multiple actions can be performed in the same batch processing cycle. For example, the list may contain 10 orders and we may only want to choose five of those orders to be processed in a batch cycle.
In addition to selecting the orders, we can tell the program to collect payment (credit card transactions), create any drop-ship purchase orders that are needed, send the customer a confirmation email, add the paperwork (invoice or packing slips) to the batch print queue and finally, mark all five of those orders as Approved. When the [Process Orders] button on the Setup & Process tab is pressed, the program will begin the batch processing cycle and execute the given instructions against the orders in that batch. When the current processing cycle has been completed, depending on the filtering criteria that was used to create the list of orders at this screen, the orders which were processed in that cycle may no longer be visible, if the selection criteria no longer applies them.
Using the Multi-Order Processor and adding the paperwork to the batch print queue avoids the possibility of that the shipping label will be printed prior to the order being Approved.
Notice that the Process Tracking Numbers procedure is not directly connected to the rest of the work flow. The reason behind this is that Process Tracking Numbers can only be run after new tracking data is present in the Order Manager, and it can be run multiple times throughout the day. It does not need to be run at any precise point in the work flow, although the pack and ship steps must have been completed at least once before it can run; therefore, it is not directly connected to the other steps in the flow chart. This procedure also assumes that the program has been configured to send order status updates to the Web and tracking emails to customers. To execute the procedure, click the [Process Tracking Numbers] button on the Shipping & Fulfillment tab of the Maintenance Menu.. If no new tracking data is present, the button will not be visible.
Refer to Status Updates Feature: Basic Requirements and the Email section of the Store Setup Wizard for more information about configuring those features.
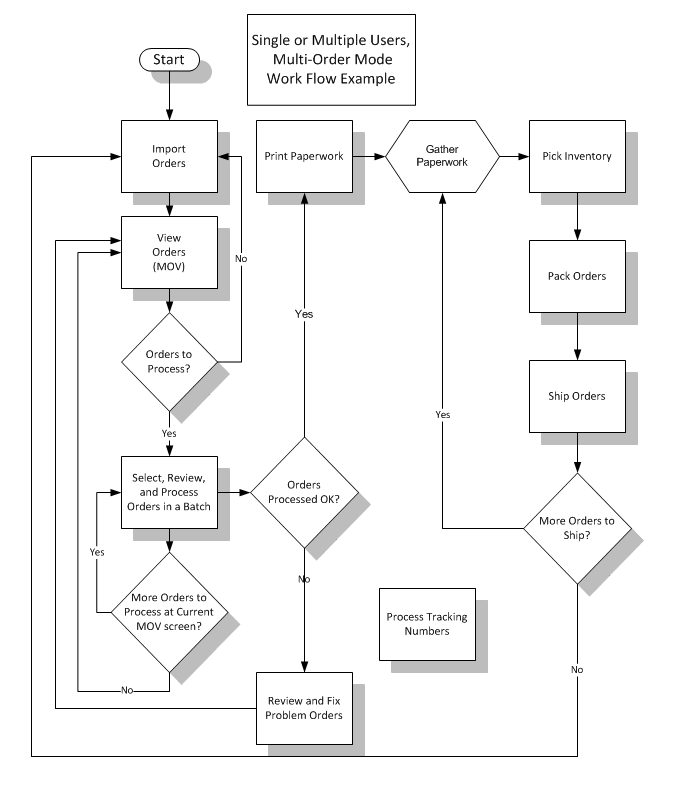
Figure 2: Multi-Order Processing Mode - Single or Multiple Users
Refer to Knowledge Base Topic, Work Flow Scenarios, User Scenario Two, for a more detailed step-by-step example.
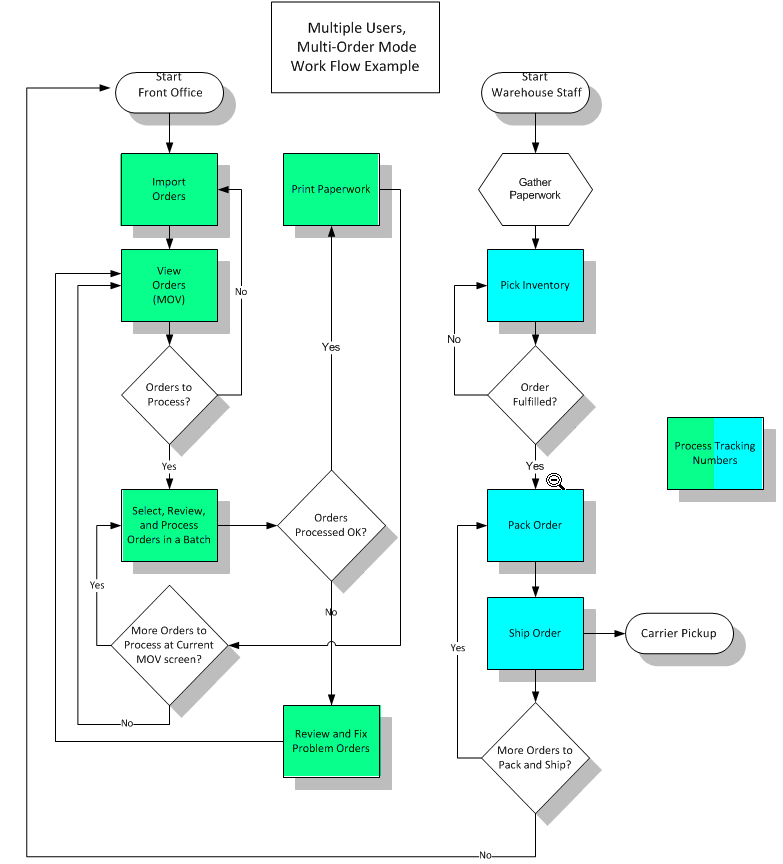
Figure 3: Multi-Order Processing Mode - Multiple Users, Multiple Workstations
Processes in green represent tasks performed by front office staff and those in blue represent tasks normally performed by warehouse staff
![]()
Created: 3/18/11
Modified: 11/25/13
Go to Top