
Version 5.9
In this Topic: Show
The Multi-Order Processor screen is used to process a group of orders in a batch, as opposed to processing a single order at a time, as is the case at the Orders screen. There are several ways that the list of orders displayed at this screen can be filtered by the user. Once a list of orders has been produced, the user can still limit the scope of any actions to a subset of the orders that are displayed at this screen.
The program provides a set of Quick Filters which are designed to limit the types of orders that are displayed at the Orders or Multi-Order Processor screens.
Some of the types of actions that can be performed at this screen are: approving orders, pre-authorizing or capturing credit card payments, setting actual ship dates, placing drop-ship orders, adding printed order paperwork (invoices, packing slips or shipping labels) to the batch print queue, and sending confirmation or cancellation email to customers, to name a few.
The Multi-Order Processor screen can be accessed from the Main Menu, by selecting the Multi-Order View link in the Orders section of the screen or by clicking the ![]() button at the top of the Orders screen.
button at the top of the Orders screen.
![]() Click the Show
link next to "In This Topic"
at the top of this page to see a series of links in outline form,
which can be used to quickly jump to that section of the topic.
Click the Show
link next to "In This Topic"
at the top of this page to see a series of links in outline form,
which can be used to quickly jump to that section of the topic.
In addition, major topics may provide a brief synopsis of a field's purpose or direct the reader to the appropriate section of the topic by scrolling over the image. To return to the previous location within the same page, right-click the mouse and select [Back].
If clicking a field directs the reader to a different Knowledge Base topic, it will open in a new tab or window, leaving the currently viewed topic open. The browser's settings determine whether a new tab or window is opened.

Figure 1: Multi-Order Processor Screen - default view, Setup and Process Tab
this section of the screen is used to filter, or select, a group of orders for processing
use a Quick Filter to add several orders to the batch grid at one time
use the Order Manager Order Number or Shopping Cart drop-down and Web Order # information to add a specific order to the batch grid
this section of the screen provides the number count of orders, belonging to each of the categories listed, in the current batch grid
the red, yellow and green dots to the right of the summary reflect the condition of the order in terms of dot formulas (stop lights) that the user has created; refer to the Knowledge Base topic, Dot Formulas for more information
the Selected Order section shows the dot formula status of the currently selected order in the grid; in Figure 1, the currently selected order is 1001 and it does not match any dot formula in the system
The following columns will appear on the left hand side of the screen when the Main, Addresses, Comments & Instructions, Shipping, Custom Order Fields, Payment or Transactions tabs are clicked, in addition to the information that is specific to those areas.
this tab contains the basic order information for the selected batch of orders which are displayed in grid format
the basic order information includes:
the Order Manager Order Number
the Web Order # (the number assigned to the order by the shopping cart system from which it originates)
the Date the order was placed
the payment method that was used to purchase the products
the original price total of the order, the final price total of the order
the Balance (if one is still outstanding)
whether the order has been approved, cancelled or marked as complete within the Order Manager
the reasons that the order may not have been automatically approved and needs to be manually reviewed
the current order status
the name of the originating shopping cart
the email address of the buyer
the Order Manager Order State, if any has been applied to the order
this tab contains the Bill To and Ship To address information related to each order that is displayed in the batch grid
for the orders that are currently displayed in the batch grid, the information found on this tab includes the following:
the Payment Method
the Acct # or Check Number
Expiration Date
Balance
Original Order Total, Final Order Total
Original Product Total, Final Product Total
Original Tax
Tax Rate, if the item is Taxable
Tax is calculated by the Point of Sale system
Original Shipping costs, Final Shipping costs
Original Discount, Revised Discount, the Type of Discount, the Discount Percentage
Original Surcharges, Revised Surcharges, Surcharge Details
Original Coupon, Revised Coupon, Coupon Description, whether the coupon is approved
Name on the Card, the Bank Name, the AVS and CVV2 codes
for the orders that are displayed in the batch grid, the information found on this tab includes the following:
Order #
Date the order was placed
AVS and CVV2 codes
Description of the transaction
Amount of the transaction
Type of transaction
Acct #
Expiration Date of the credit card used for the transaction
Name on the credit Card
Bank Name
Notes related to the transaction
Approval Code for the transaction (if one was used)
the information included on this tab includes:
the SKU
Product Description
Unit Price
the quantity Ordered, the quantity Shipped, the quantity Needed, the quantity Packed, the quantity Returned, quantity On Hand
the Extended Price of the line item
the Order Manager Status of the item
whether the product has been Discontinued
Options 1-10 or Freeform Options
the actual Date Shipped, Expected Date Shipped, the Date the order was placed
the Cost per Unit
whether the product is being drop-shipped
the dimensions of the box that is needed to ship the product
a QuickBooks value for the item, if one was supplied when the product was imported from a text file (ShopSite)
the External Auction ID or External SaleID
the Location of the product in the merchant's warehouse
the Web SKU, or SKU of the product at the web site (if it was changed during order import)
this tab is the default view when the Multi-Order Processor screen is opened
this is where the user tells the program of any additional functions to be performed when the selected batch is processed
additional information that the program needs to know before it can begin the batch processing cycle is:
if the program should attempt to fill orders with backordered items or ignore orders that contain backordered products
in what mode should the credit card processing should be performed (capture, sale or authorization)
should it set the actual or expected ship dates for the orders
should some or all of the paperwork for the orders in the batch grid be added to the batch print queue
if it should send emails to customers or suppliers, what email template should be used
Other Functions, which are independent of the batch processing cycle, can be performed en masse against a group of orders having been selected by a check mark in their 'OK' column are:
changing the Order Status to a new value
sending an email to all of the customers for the selected orders (marketing purposes)
![]()
These buttons affect all of the action columns in the Multi-Order Processor screen, as described below.
clicking this button will result in the orders in the batch grid being sorted in ascending order based on the values in the selected column heading, such as Order Number, Pay Method, etc.
only available when the Main, Addresses, Shipping, or Payment tabs are selected
clicking this button will result in the orders in the batch grid being sorted in descending order based on the values in the selected column heading, such as Order Number, Pay Method, etc.
only available when the Main, Addresses, Shipping, or Payment tabs are selected
![]()
Figure 13: Buttons at the bottom of the Multi-Order Processor Screen
this button is used to log a payment as received in the Order Manager for the selected order; no automated payment system transaction is involved, the payment information is simply manually recorded in the Order Manager tables
the Enter Amount of Payment Received screen is opened
clicking this button will result in the orders in the batch grid being sorted in ascending order based on the values in just the OK column
the end result is that all of the orders in the grid, that have the OK box checked, will be grouped together at the top of the grid
clicking this button will result in the orders in the batch grid being sorted in descending order based on the values in just the OK column
the end result is that all of the orders in the grid, that have the OK box checked, will be grouped together at the bottom of the grid
clicking this button will result in the orders in the batch grid being sorted in ascending order based on the values in just the $ Column
the end result is that all of the orders in the grid, that have the $ box checked, will be grouped together at the top of the grid
clicking this button will result in the orders in the batch grid being sorted in descending order based on the values in just the $ column
the end result is that all of the orders in the grid, that have the $ box checked, will be grouped together at the bottom of the grid
clicking this button will result in the orders in the batch grid being sorted in ascending order based on the values in just the DS column
the end result is that all of the orders in the grid, that have the DS box checked, will be grouped together at the top of the grid
clicking this button will result in the orders in the batch grid being sorted in descending order based on the values in just the DS column
the end result is that all of the orders in the grid, that have the DS box checked, will be grouped together at the bottom of the grid
clicking this button will result in the orders in the batch grid being sorted in ascending order based on the values in just the X column
the end result is that all of the orders in the grid, that have the X box checked, will be grouped together at the top of the grid
clicking this button will result in the orders in the batch grid being sorted in descending order based on the values in just the X column
the end result is that all of the orders in the grid, that have the X box checked, will be grouped together at the bottom of the grid
There are many parameters that can be used to set default program behaviors when using the Multi-Order Processor. Please review them carefully before changing the default settings. More information can be found in the Knowledge Base topic, Multi-Order Processor Parameter Group.
Select an entry in the Quick Filter drop-down list
Click the [Search] button, which opens the Search for Orders screen, where the user can specify a wide variety of criteria for building the list of orders; click the [Begin] button and respond to the program's prompt about clearing the list before adding the matching orders
Entering a value in the Order Manager Order Number field or selecting an entry from the Shopping Cart drop-down along with the Web Order # and clicking [Enter], will result in that single order being added to the list of orders in the grid
Once the list of orders has been created, the user may manually check the orders and actions that are to be performed, or they can use the buttons provided at the bottom of the screen.
The next step is to click on the Setup & Process tab and choose any additional processing options:
Check the Try to fill the order check box if the program should attempt to fill any backordered items on the orders before processing the order. To process orders that may still contain backordered items, check the box labeled Include orders that still have Backorders? box at the bottom of the tab.
If payment check boxes have been selected in the $ action column, choose the appropriate mode that the program should use, Capture, Pre-Authorize or Sale. The program can only operate in one payment mode at a time. The user should use the filters to batch like orders together.
If the program should set the actual ship date during the batch processing, select a date via the Calendar icon or manually type a date into the Set date to: field
Order paperwork can be added to the batch print queue during the batch processing cycle by over-typing the zeros in the Invoices, Packing Slips, Mailing Labels fields with the desired number of copies of each.
To print a shipping label via one of the integrated shipping carriers, check the box labeled Shipping Label. This requires the use of one of the integrated shipping software solutions which must already be configured via the Setup Wizard before the program can print a shipping label.
If a confirmation email is to be sent to each customer, choose a template from the drop-down list, which will also automatically check the Send this email template box.
Once these choices have been made, click the [Process Orders] button to start the batch processing of the orders that were previously selected.
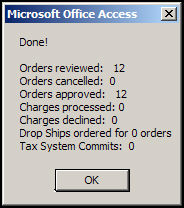
While the program is processing the selected orders, there will be a blue progress bar in the lower left-hand corner of the screen. When processing has been completed, the program will display a summary of the results.
An alternate method for sending bulk email to customers is through the Multi-Order Processor screen, as opposed to the Customer Export Setup screen. The Multi-Order Processor screen offers additional filtering criteria for producing the target list of orders, beyond those that are available at the Customer Export Setup screen.
The Multi-Order Processor screen can be accessed from the Main Menu, by selecting the Multi-Order View link in the Orders section of the screen or by clicking the ![]() button at the top of the Orders screen.
button at the top of the Orders screen.
Choose one or more of the following methods to build a list of orders:
Select an entry in the Quick Filter drop-down list
Click the [Search] button, which opens the Search for Orders screen, where the user can specify a wide variety of criteria for building the list of orders; click the [Begin] button and respond to the program's prompt about clearing the list before adding the matching orders
Entering a value in the Order Manager Order Number field or selecting an entry from the Shopping Cart drop-down along with the Web Order # and clicking [Enter], will result in that single order being added to the list of orders in the grid
Once the list of orders has been created, check the "OK" column of each of the orders in the list for which an email message is to be sent.
Click on the Setup & Process tab and select the email template to be used from the Send this email template drop-down list. The Send this Email template check box will be marked automatically.
Click [Send Bulk Email for 'OK' Orders].
![]()
Created: 2/23/11
Modified: 7/11/13
Go to Top