
Version 5.9
In this Topic: Show
The QuickShip screen is one of several screens that can be used to ship items, most commonly when the business is large enough to have a dedicated shipping workstation. The user is able to print shipping labels from the major shipping carriers at this screen, provided the appropriate integrated software solution has been enabled in the Order Manager.
The Quick Ship screen does not require the user to confirm that the items being placed in the shipping container belong to the currently viewed order. This results in faster packing, but the program will not record packing information for those orders processed at this screen.
To record packing data for each order, use the Pack Orders or Pack & Ship screens to confirm items as they are placed in the shipping container. The Pack Orders screen is not able to print shipping labels.
To use the QuickShip screen, set system parameter, PackingAllowQuickShip is set to TRUE. Refer to Knowledge Base topic, Set System Parameters, for instructions. QuickShip will then be accessible through the Main Menu.
This topic describes the Quick Ship screen only. To read more about the other packing screens, refer to the Related Topics at the end of this article.
![]() Click the Show
link next to "In This Topic"
at the top of this page to see a series of links in outline form,
which can be used to quickly jump to that section of the topic.
Click the Show
link next to "In This Topic"
at the top of this page to see a series of links in outline form,
which can be used to quickly jump to that section of the topic.
In addition, major topics may provide a brief synopsis of a field's purpose or direct the reader to the appropriate section of the topic by scrolling over the image. To return to the previous location within the same page, right-click the mouse and select [Back].
If clicking a field directs the reader to a different Knowledge Base topic, it will open in a new tab or window, leaving the currently viewed topic open. The browser's settings determine whether a new tab or window is opened.

Figure 1: Quick Ship screen
select the status label that should be assigned to the order when it is finished being packed and a shipping label has been printed
refer to Knowledge Base topics, Status Updates Feature and Status Events for more information
This section of the screen works much like the Multi-Order Processor screen in that the user can build a list of orders by entering selection criteria in one or more of the following fields:
type in or use a barcode scanner to enter a specific order number to the Orders section of the screen
if a barcode scanner is configured, scan the barcode on the order's invoice or packing slip
to only see orders that came from a certain shopping cart, select that cart from the drop-down list
enter the number of an order as it was assigned by the shopping cart in this field
use this in conjunction with the Shopping Cart drop-down list
use this button to change the destination address information
opens the Edit 'Ship To' Address screen
verifies the address against the Endicia servers (USPS partner)
the program can be configured to verify addresses on import when system parameter, VerifyAddressesAtImport is set to TRUE
requires an open internet connection
put the cursor in the telephone field and click this button to place a call to that number
requires a phone to be connected to the PC
if the merchant has purchased a subscription for this service, this field will contain the result or click the button if fraud scores are not obtained during the import process
refer to system parameters, CheckMaxMindAtImport, MaxMindKey, and ShowMaxMindButton
when the cursor is located in the billing or destination email address fields and this button is clicked, the program will initiate the sending of an email to that address
the Send Email screen is opened
if a shipping method has already been assigned to the order it will appear here
to change the existing shipping method, choose another method from the drop-down list
if an electronic scale is in use and the package is on the scale, this field displays the actual weight of the items and the packaging materials
do not include the unit of measure, only the
if a scale is not used, this field will contain the weight value that is set in the product's inventory record
enter the value of the package for customs purposes
refer to system parameters, DAZzleValuePercentage or PackingValuePercentage to set a default value for this field
if the user has defined one or more boxes as inventory items, they will be listed in this drop-down list; if the box definition contains dimensions, they will be populated in the Size-inches field
choose the box that is being used to ship the items from the drop-down list
this list of boxes is not related to any shipping carrier's box or package types
this field is primarily for customs purposes (international shipments)
system parameter DefaultDescriptionofGoods can be used to set a default value for this field
checking this box indicates that the package should be delivered on a Saturday
check with the shipping carrier for service availability and cost
if the Order Manager has been configured to use an electronic scale, this button with the image of a scale and the [0] Button will be visible
when a package is placed on the scale, the program will enter the value displayed on the scale in the Weight field
clears the previous weight reading from the scale and changes it to zero
an electronic scale must be configured in the Order Manager for this button to be visible
Select the name of the packer from the drop-down list.
Optional: Choose a status label to be assigned to the orders when they have been packed. In this example, the status label of Shipped was selected. Depending on how the status events system is configured at your installation, this may not be the best label to use. It might be better to create a custom status label of "Packed" instead.
Build the list of orders to be packed and shipped. In this example, the Approved Orders with No Date Shipped Quick Filter was used to create the list of orders. Additional orders could be added to the list by using the other criteria fields in the Build List of Orders section of the screen.
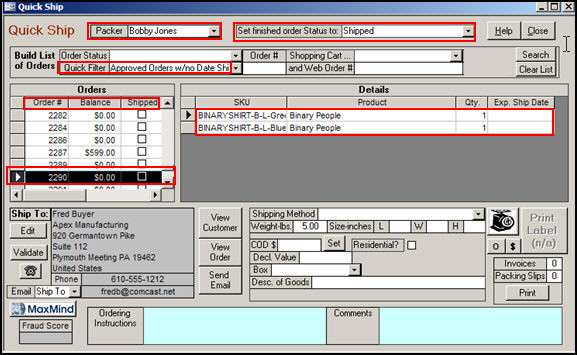
Figure 2: Quick Ship screen showing a group of orders ready to be packed
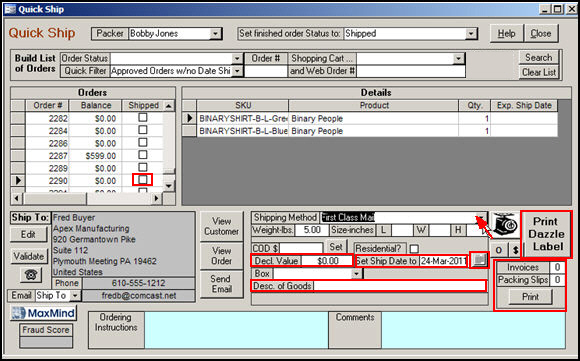
Figure 3: Quick Ship screen - after a shipping method has been assigned to the order
A shipping method of First Class Mail has been selected, which relates to a USPS shipping method that is defined within the Order Manager; therefore, the Print Label button indicates that a shipping label will be printed through Endicia's DAZzle integrated shipping software.
If it is desirable to include an invoice or packing slip with the package, enter a value in those fields and click the [Print] button.
Notice that the program has automatically entered a date in the Set Ship Date field. To change that value, over-type the date or use the [Calendar] button.
Since the order is not being sent to an international address, the Declared Value and Description of Goods fields do not need to be completed.
When all of the items are in the box and it is sealed, click the [Print DAZzle Label] button and affix the shipping label to the package.
Order #2290 will then have a check mark in the Shipped column of the Orders section of the screen.
Created: 3/24/11
Modified: 1/9/12
Go to Top