
Version 5.9
In this Topic: Show
Assemblies are special inventory SKUs which are comprised of two or more individual inventory products used to create a finished product. However, the individual components an Assembly can be sold by themselves as well as part of an Assembly.
This screen is accessible from the Assemblies link on the Inventory & Suppliers tab of the Maintenance Menu.
The process involves the definition of an inventory record, identifying its components and building the Assembly SKU. When an Assembly SKU is built, the QOH of its component parts decreases while the quantity on hand of the Assembly increases, effectively transferring inventory from the component SKUs to the Assembly SKU. Likewise, when an Assembly SKU is "broken-down", the inventory counts of the component SKUs increase, as the QOH of the Assembly SKU decreases. The cost per unit of the Assembly SKU can be derived from just the parts or it can include the cost of the parts plus labor, packaging and handling fees, etc.
To define an Assembly SKU, first create a normal inventory record via the Inventory screen. Then open the Work with Assemblies (Assemblies) screen to add the components that will be part of the Assembly SKU, and finally "build" the Assembly in the inventory system.
Unlike a Kit SKU, orders for an Assembly SKU will never show the individual components as line items, and the quantity on hand and cost information is tracked by the Assembly SKU, itself, not by its component SKUs. Another difference between Kits and Assemblies is that it is possible to breakdown an Assembly SKU into its parts in order to satisfy order demands for the individual components if necessary. Kits do not have any cost or QOH values associated with them; that information is tracked or obtained from the individual component SKUs instead.
Just as with Kits, it is a best practice to create a new Assembly SKU if the component part list should change after the finished Assembly has been sold. Until that time it is fine to alter the component list of the Assembly SKU.
![]() Click the Show
link next to "In This Topic"
at the top of this page to see a series of links in outline form,
which can be used to quickly jump to that section of the topic.
Click the Show
link next to "In This Topic"
at the top of this page to see a series of links in outline form,
which can be used to quickly jump to that section of the topic.
In addition, major topics may provide a brief synopsis of a field's purpose or direct the reader to the appropriate section of the topic by scrolling over the image. To return to the previous location within the same page, right-click the mouse and select [Back].
If clicking a field directs the reader to a different Knowledge Base topic, it will open in a new tab or window, leaving the currently viewed topic open. The browser's settings determine whether a new tab or window is opened.

Figure 1: Work with Assemblies Screen - default view when first opened
These buttons tell the program which action is to be performed. The other fields that appear on the screen varies depending on the radio button that is selected. Choose one of the following:
if Assemblies are to be built (up to the value in the Qty to Build field) click this radio button
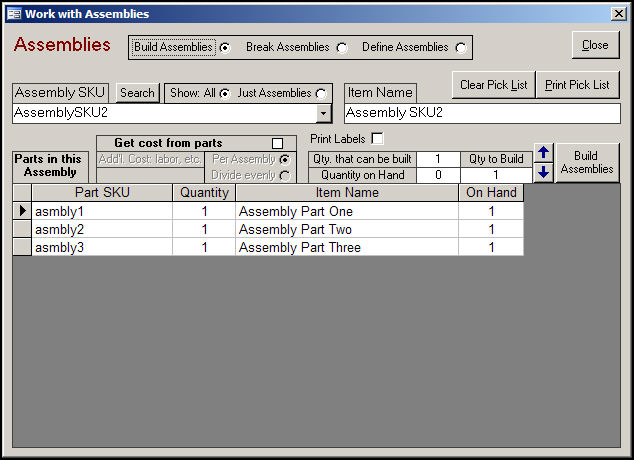
Figure 2: Work with Assemblies screen - Build Assemblies radio button selected
if an Assembly will be broken-down into its component parts, click this radio button
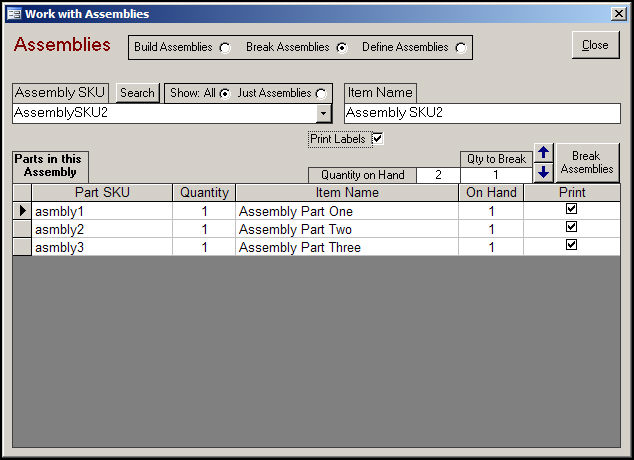
Figure 3: Work with Assemblies Screen - Break Assemblies radio button selected
if an Assembly is to be created or edited, click this radio button
do not edit the contents of an Assembly once the finished product has been sold; if different parts will be used, create a new Assembly SKU rather than editing the existing Assembly SKU
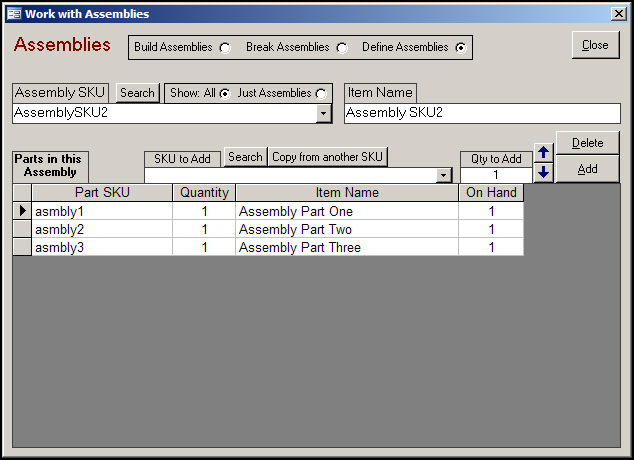
Figure 4: Work with Assemblies Screen - Define Assemblies radio button selected
enter or select an inventory record in the SKU to Add combo box and click this button to have it Added to the Assembly
once Added, it will be listed in the Parts in this Assembly section of the screen
this button is only visible when the [Define Assemblies] radio button is selected at the top of the screen
enter the name of an existing Assembly SKU or select one from the drop-down list
if the selected SKU is an existing Assembly SKU, its list of components will be displayed in the Parts in this Assembly section of the screen
once the desired Qty to Build has been set, click this button to have the program "build" that number of Assemblies
if the Print Labels check box has been selected, the program will also print barcode labels for the number of Assemblies that have been "built"
this button is only visible when the [Build Assemblies] radio button is selected at the top of the screen
this button is only visible when the [Build Assemblies] radio button is selected at the top of the screen
click this button to clear all pick list data from the current session
click this button to exit from the Work with Assemblies (Assemblies) screen
this button is only visible when the [Define Assemblies] radio button is selected at the top of the screen
opens the Find a Product (Search Inventory) screen and select another Assembly SKU from which the program will copy components to the new Assembly SKU
this button is only visible when the [Define Assemblies] radio button is selected at the top of the screen
select a component from the Parts in this Assembly section of the screen and click this button to remove it from the Assembly
once deleted, the component will no longer be listed in the Parts in this Assembly section of the screen
this field is only visible if the [Build Assemblies] radio button is selected at the top of the screen
if this box is checked, the fields immediately below it will become active, allowing the user to add additional expenses into the cost of the Assembly
otherwise, the cost of the Assembly will be obtained from the total cost of the parts by default
FIFO must be enabled to see the cost information here
enter a value in this field that will be added to the total cost of the parts to arrive at the total cost of the Assembly
select this radio button to have the program add the full value in the Add'l Cost: labor, etc. field to each Assembly
this radio button is mutually exclusive with the Divide evenly radio button
select this radio button to have the program divide the value in the Add'l Cost: labor, etc. field by the number of components and add the result to the cost of each Assembly
this radio button is mutually exclusive with the Per Assembly radio button
this field displays the arbitrary item name assigned to the selected component's inventory record; it can not be edited at this screen
in this section of the screen, the program will list all of the component parts of the Assembly SKU
the information about each component is displayed in the following columns:
shows the inventory SKU of the component
shows the number of units of the component that are needed to complete the Assembly
shows the arbitrary name that was assigned to the component SKU
shows the current quantity on hand for each of the components, which is used to calculate the number of Assemblies that can be built
this column is only visible when the [Break Assemblies] radio button is selected at the top of the screen
indicates the components for which the program will print barcode labels
to prevent the printing of a component's barcode label, manually un-check the corresponding box in this column
this check box is only visible when [Build Assemblies] or [Break Assemblies] radio button is selected at the top of the screen
this box must be checked prior to clicking the [Build Assemblies] or [Break Assemblies] buttons
checking this box will also check all of the component's boxes in the Print column in the Parts in this Assembly section of the screen, and the program will print barcode labels for each one when the [Build Assemblies] or [Break Assemblies] buttons are clicked
this box must be checked in order to print barcode labels; to avoid printing barcode labels for one or more components, un-check the corresponding box in the Print column
do not un-check this box and then manually check the individual component's box in the Print column of the Parts in this Assembly section of the screen - the program will not produce a barcode labels report
this button is only visible when [Build Assemblies] radio button is selected at the top of the screen
do not use this button until after the [Build Assemblies] button has been clicked to create an assembly
clicking this button to send a pick list of the components required to create the Assembly to the printer
this field shows the current quantity on hand of the currently selected Assembly SKU (the number that have already been built and are in stock)
depending on which radio button is selected at the top of the screen (Build Assemblies, Break Assemblies, Define Assemblies), this field will be labeled Qty to Add, Qty to Build or Qty to Break
enter the desired number of Assembly SKUs to build, break or add, or use the up and down arrows to change the value in this field
this button is only visible when [Build Assemblies] radio button is selected at the top of the screen
this field cannot be edited; the program determines this number based on the definition of the Assembly SKU and the quantity on hand of each component that is required to create it
this button opens the Find a Product screen (aka Search Inventory) where the user may enter criteria and search for an inventory record that will be entered into the Assembly SKU combo box
this button is only visible when [Define Assemblies] radio button is selected at the top of the screen
click this button to open the Find a Product (Search Inventory) screen and choose an inventory item that will be entered into the SKU to Add combo box in preparation of being added to the Assembly SKU
click on one of the buttons to view all inventory records or just those that are defined as Assemblies
this button is only visible when [Define Assemblies] radio button is selected at the top of the screen
type the name of an existing SKU or select one from the drop-down list to add it as an Assembly component
Go to the Inventory screen from the Main Menu or the Maintenance Menu, Inventory & Suppliers tab, [Inventory] activity.
Click the [Add] button to create a new record for a SKU that will be designated as an Assembly in a later step. While it is possible to select an existing inventory record and define it as an Assembly, the recommended practice is to create a new SKU whenever a new combination of products will constitute an Assembly.
The minimum fields on the Product Info tab that need to be completed before the new inventory record can be saved are as follows:
Click the [Save] button to create the new inventory record.
Click [Close] to exit the Inventory screen.
Go to the Work with Assemblies screen by clicking the [Assemblies] activity on the Inventory & Suppliers tab of the Maintenance Menu.
Select the [Define Assemblies] radio button.
The [Show: All] radio button should already be selected.
Select the product SKU (inventory record) that was just created in the previous section from the Assembly SKU combo box, or use the [Search] button to locate the correct inventory record and enter it into the combo box. The Item Name field will be populated with the name that was previously assigned to the inventory item, at that time.
Next, enter or select an inventory item that will be part of the Assembly in the SKU to Add combo box. The adjacent [Search] button can also be used to add a SKU to the SKU to Add combo box.
Once a SKU has been entered in the SKU to Add combo box, enter the number of units of the selected component that are needed for the Assembly in the Qty field.
Click the [Add] button. The component SKU will be listed in the Parts in this Assembly section of the screen.
Repeat steps 4 through 7 as many times as necessary until all components have been added to the new Assembly SKU.
Go to the Work with Assemblies screen by clicking the [Assemblies] activity on the Inventory & Suppliers tab of the Maintenance Menu.
The [Build Assemblies] radio button should be selected.
Select the Assembly SKU (inventory record) that was just created in the previous section from the Assembly SKU combo box, or use the [Search] button to locate the correct inventory record and enter it into the combo box. The Item Name field will be populated with the name that was previously assigned to the inventory item, at that time.
Next, enter or select an inventory item that will be part of the Assembly in the SKU to Add combo box. The adjacent [Search] button can also be used to add a SKU to the SKU to Add combo box.
Once a SKU has been entered in the Assembly SKU combo box, the program will calculate the number of Assemblies that can be built from the existing QOH of all components, which will be displayed in the field of the same name.
Decide how the program should determine the cost of the assembly:
leave the Get cost from parts box unchecked to have the cost equal the sum of the cost of all of the components
check the Get cost from parts box and enter an additional value that should be added to the cost of each Assembly or divided equally among all of the Assemblies that are about to be built
FIFO must be enabled to see the cost, and information from the oldest unit is displayed at this screen
If the program should print barcode labels for each of the Assemblies being built, click the [Print Labels] check box.
Choose the number of Assemblies to build, up to the value of the Qty. that can be built field, and enter that number in the Qty to Build field. The Up and Down arrows can also be used to alter the contents of the Qty to Build field.
Click the [Build Assemblies] button. The program will calculate the new quantity on hand figures for the Assembly SKU and each of its individual components and the displays on this screen will be updated.
Click the [Close] button to exit the Work with Assemblies screen.
Go to the Work with Assemblies screen by clicking the [Assemblies] activity on the Inventory & Suppliers tab of the Maintenance Menu.
The [Break Assemblies] radio button should be selected.
Select the Assembly SKU (inventory record) to be broken-down into its components from the Assembly SKU combo box, or use the [Search] button to locate the correct inventory record and enter it into the combo box. The Item Name field will be populated with the name that was previously assigned to the inventory item, at that time.
If barcode labels should be printed for each of the component SKUs, so they can be sold individually, check the [Print Labels] box.
Once a SKU has been entered in the Assembly SKU combo box, the program will display the current QOH of the selected SKU in the Quantity on Hand field.
Based on the available QOH of the Assembly SKU, enter the number of Assemblies that should be broken into their components in the Qty to Break field.
Click the [Break Assemblies] button.
Click the [Close] button to exit the Work with Assemblies screen.
Created: 5/31/11
Revised: 10/22/12
Go to Top