
Version 5.9
In this Topic: Show
The Manual Orders screen is accessed by the [Manual Entry] link in the Orders section of the Main Menu, and was formerly titled, Enter Orders Manually. This screen allows the merchant to manually enter orders that are received by mail, fax or phone.
If the merchant has a brick and mortar store with walk-in customers, the Point of Sale system offers a more sophisticated, cash register-like interface for entering and processing orders.
The Point of Sale system is only available with the PlusPOS and Enterprise editions of the program. Refer to The Point of Sale book of the Knowledge Base's Table of Contents or the Order Manager User Guide for more information about that feature.
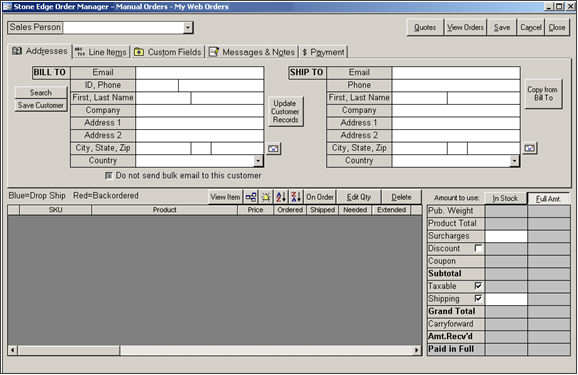
Figure 1: Manual Orders screen
For the purpose of explaining this screen, let's break it into three sections:
Top - which contains the Sales Person drop-down list and some action buttons in the upper right-hand corner
Middle - which contains up to five tabs, Addresses, Line Items, Custom Fields, Messages & Notes, and $ Payment
Bottom - which will eventually be populated with order information as the tabs in the middle section are completed, and it also contains a series of action buttons above the list of line items
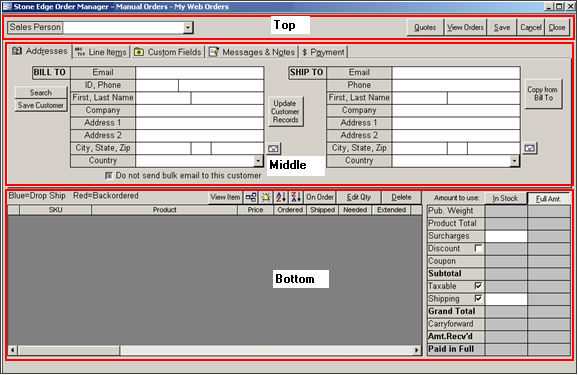
Figure 2: Manual Orders screen - illustration
The Manual Orders screen has a Sales Person drop-down list in the upper left-hand corner, where the user can assign a salesperson to the order. To make use of this field, the Security System must be enabled and a list of sales people must be created via the List Maintenance feature of the program. Once the list has been created, the drop-down list will be populated with the names of the sales people.
To automatically have the program select the user that is currently logged into the program as the Sales Person, set system parameter ManualOrdersSetToCurrentUser to TRUE.
There are several other system parameters that affect the use of the Sales Person field within the Manual Orders screen as well in other locations of the program. Some of them are:
AllowEditSalespersonForManualOrders - Determines whether you can edit the salesperson associated with a manual order at the View Orders screen.
AllowEditSalespersonForPOSOrders - Determines whether you can edit the salesperson associated with a POS order at the View Orders screen.
AllowEditSalespersonForWebOrders - Determines whether you can edit the salesperson associated with a Web order at the View Orders screen.
DefaultToLastSalesPerson - If TRUE, when you open the POS form, the system will pre-select the last sales person that used the POS form on the same computer.
FillBOsKeepOriginalSalesperson - If TRUE, when backorders are filled in a new order, the salesperson from the original order will be copied to the new order. If FALSE, the current user will be entered there.
ManualOrdersRequireSalesPerson - If TRUE, a Sales Person must be selected before a Manual Order can be saved.
Parameters are also documented in the Knowledge Base articles for each parameter group. See the System Parameter book in the Knowledge Base's Table of Contents. The parameter group for a given parameter can be determined by viewing the Set System Parameters screen.
The upper right-hand corner of the screen contains buttons that allow the user to save the current order as a [Quote], open the [View Orders] screen, [Save] the current order, [Cancel] the current order or [Close] the Manual Orders screen.
A brief explanation of each button follows:
Quote - rather than saving the information as an order, the program offers the ability save it as a quote instead. Refer to the Knowledge Base article, Quotes, for more information.
View Orders - this button will close the Manual Orders screen and launch the View Orders screen; if the information on the Manual Orders screen has not yet been saved as an order or quote, the program will prompt the user as to how it should handle the information that had been entered on this screen before switching to View Orders.
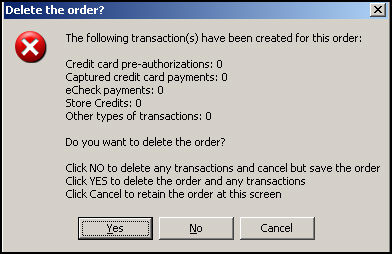
Figure 3: Delete the order? prompt
The choices are:
No - cancel and delete any transactions but save the other order information
Yes - delete the transactions and the order
Cancel - retain the order information at this screen and continue to create the order
Save - this button will save the information entered at this screen as an order. If no payment information has been entered, the program will prompt the user for permission to save the order without that information. The choices are;
OK - to save the order without payment information
Cancel - to close the dialog box and return to the order so that payment information can be entered
Cancel - the program will prompt the user for the action it should take regarding the information that has been entered to this point. Refer to Figure 3. The choices are:
No - cancel and delete any transactions, but save the other order information
Yes - delete the transactions and all of the other order information
Cancel - retain the order information at this screen and continue to create the order.
Close - the program will prompt the user for the action it should take regarding any information that has been entered to this point. Refer to Figure 3. The choices are:
No - cancel and delete any transactions, but save the other order information
Yes - delete the transactions and all of the other order information
Cancel - retain the order information at this screen and continue to create the order.
There are five possible tabs that can be seen in the lower half of the Manual Orders screen: Addresses, Line Items, Custom Fields, Messages & Notes and $ Payment. They are in a left to right sequence, representing the normal progression of data entry for most manual orders. It is not necessary, however, for each and every field on all of the tabs to be filled in. For example, the user can opt to omit all Messages & Notes fields. In addition, the Custom Fields tab will only be visible if the user has configured a custom order field in the program. Refer to the Knowledge Base article, Configuring Custom Fields for more information. Each tab is discussed in more detail, below:
This is where the order's customer billing and shipping information is entered. There are also several other related functions that can be performed when an order is being placed for an existing customer, such as viewing their existing customer record, or viewing notes and any order history associated with the customer. This is the tab that is the default view when the Manual Orders screen is opened.
Data can be typed directly into the text boxes with white backgrounds and the program also offers some shortcuts for data entry as well.
For example, type the customer's email address into the Email field and hit [Enter]. If there is a customer record in the program that is associated with that email address, the program will populate the BILLTO section of the screen with the information from that customer record and ask the user to confirm that this is the correct person.
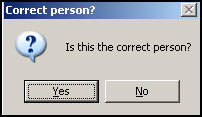
Figure 4: Correct Person? prompt
If the user responds NO to the prompt, the program will clear most of the information that was auto-filled in the BILL TO section and instruct the user to enter a different email address for this customer. Email addresses should be unique across customer records.
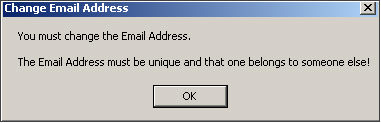
Figure 5: Change Email Screen
If the user responds YES to the prompt, the message box will close and the user can proceed with placing the order.
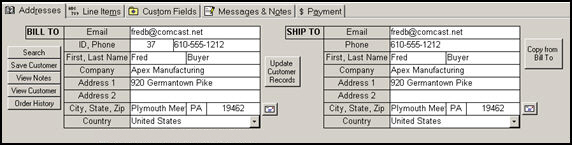
Figure 6: Addresses tab
Other information, such as the customer ID or phone number, can also be used to quickly lookup an existing customer record in the same fashion. Phone numbers should also be unique across customer records. When adding new customer information here, the program does not consider the value of the CustomerSearchField1-4 fields when determining what constitutes an existing customer.
If the email address, customer ID or phone number is not available, it is possible to locate an existing customer's record using other data by clicking the [Search] button to the left of the BILL TO section of the screen. Then simply type the data that is known into the appropriate field or fields and click the [Begin Search] button.
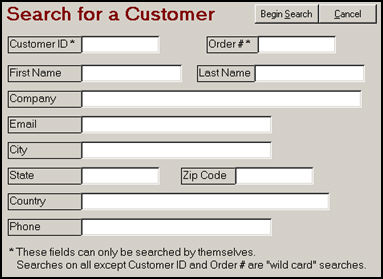
Figure 7: Search for a Customer screen
The program will compile a list of matching records in the Select Customer screen, from which the correct customer record can be chosen. Select the row and click [OK] to close the Select Customer screen and this customer's information will be added to the BILL TO section of the Addresses tab.
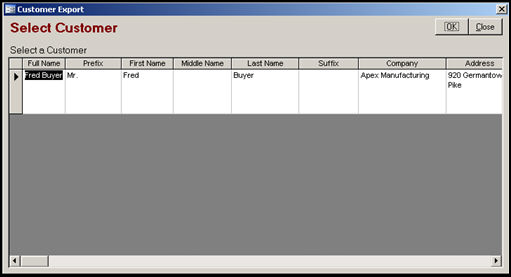
Figure 8: Select Customer screen
If a USPS ZipCode is entered in the Zip field, and the user clicks the Envelope icon ![]() , the program will fill in the City and State fields by looking it up through the Endicia Servers. Click [OK] to accept the proposed values.
, the program will fill in the City and State fields by looking it up through the Endicia Servers. Click [OK] to accept the proposed values.
Once back at the Addresses tab, if the billing and shipping addresses will be the same, click the button on the upper right-hand side of the screen, labeled [Copy from Bill To], and the program will populate the SHIP TO fields with the same information entered in the BILL TO section. Refer to Figure 6. Otherwise, enter the shipping information manually.
Another program feature is the ability to verify an address prior to processing the order. Click the envelope icon ![]() next to the Zip Code field of the BILL TO and SHIP TO sections of the screen to validate the address information against the USPS (Endicia) servers, if desired. Refer to Figure 6.
next to the Zip Code field of the BILL TO and SHIP TO sections of the screen to validate the address information against the USPS (Endicia) servers, if desired. Refer to Figure 6.
For this discussion, please refer to Figure 6. Notice the series of buttons at the left of the BILL TO section of the screen, and the [Update Customer Records] button in the center of the screen. We have previously discussed the [Search] button and will now cover the remaining action buttons on this tab.
[Save Customer] - click this button to immediately save the customer information that has been entered on the screen as a new customer record. An ID number will be assigned and that field will be updated on the screen
[View Notes] - if there are any Notes associated with the existing customer record, they can be viewed by clicking this button; if there are no Notes for this purchaser, this button will not be visible
[View Customer] - this button opens the View Customers screen for the current customer; this button will not be visible if there is no existing customer record for the purchaser
[Order History] - this button opens the RFM Data for Selected Customer screen where the Recency, Frequency and Monetary information of previous orders placed by this customer can be viewed
[Update Customer Records] - if a change is made to the purchaser's information at this tab while a new order is being placed, and the change should be made permanently in the customer record as well, click this button; the program will offer the option of changing the customer information in some or all previous orders as well as in the customer record via the Revise Customer and Sold To Addresses screen
Directly below the BILL TO section of the screen there is also a check box labeled, Do not send bulk email to this customer. Mark this box if this customer should not receive email from any bulk mailings that might be performed. This box corresponds to the box labeled Do not mail to this customer on the View Customers screen. If either of the boxes are checked on one of the forms, the other form will reflect that status as well. The value of this field will also be propagated to the Customer record if an address is being added or changed and the order is saved, without clicking the Update Customer Record button.
The Line Items tab is used to select the products that will be added to the order.
There are four ways to add a product SKU to an order:
Select it from the [SKU] drop-down list of products; refer to Selecting a SKU on the Line Items tab in Appendix A at the end of this article for additional information about controlling the way the program will handle product attributes.
Click the [Add New SKU] button to create an inventory record for a new item
Use the [Search SKUs] button; refer to the Search SKUs (Find a Product) Knowledge Base article for more information
Use the [Multi-Select] button; refer to the Multi-Select Knowledge Base article for more information
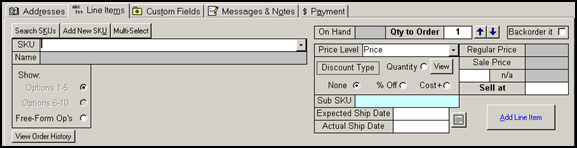
Figure 9: Manual Orders screen - Line Items tab
Click one of the radio buttons in the Show: section of the screen to see various option attributes that are associated with the SKU.
When a SKU has been selected, the right-hand side of this tab will display information about the SKU as well as allow the merchant to set pricing or shipping dates for the item:
On Hand - this field is read-only and is calculated by the program if the system parameter, CheckInventory, is set to TRUE.
Qty to Order - this field is edit-able; over-type the value in the text box or use the up and down arrows to adjust the value as needed
Backorder it - check this box to tell the program that it should place an order for this item with the supplier (vendor)
Price Level - select a level from the drop-down list that is to be used for this item; requires that Price Levels have already been defined in the program; see the Knowledge Base article for more information.
Discount Type - assign the kind of discount, if any, that should be given for the item; discounts can be based on a volume level (Quantity), a percentage off the regular price or the cost of the item plus a set value; use the [View] button to see any quantity discounts that have been defined for this item in its inventory record on the Pricing tab; refer to the Knowledge Base article, Discounts for more information
Sub SKU - this box will only be seen if system parameter, ManualOrdersBuildSubSKUs is set to True. If it is set to False, there will be drop-down lists from which the user can choose the product attributes, such as size or color, next to the Show: Options box.
Expected Ship Date - type in a date or use the Calendar icon to enter the date that the item is expected to be shipped
Actual Ship Date - type in a date or use the Calendar icon to enter the date that the item was actually shipped
Regular Price - this field is not edit-able, it is determined by the value that is entered in the field of the same name in the product inventory record
Sale Price - this field is not edit-able, it is determined by the value that is entered in the field of the same name in the product inventory record; the label of this field will change to Cost if the Discount type of Cost+ is chosen.
n/a - indicates that there is no discount applied to the order; the label of this field will change to "discount" if a percentage off discount is being applied to the order or "markup" if the Cost+ discount type is selected
Sell at - enter the price that the item will be sold for in this field, if desired
Lastly, when all of the previously mentioned product information has been entered or selected, click the [Add Line Item] button to have the item appear in the bottom portion of the Manual Orders screen
If the order is being placed by a returning customer, as is the case shown in Figure 9, there will be an additional button below the Show: section of the screen that can also be used to quickly enter data for repeat orders:
View Order History - click this button to open the RFM Data for Selected Customer screen and see a summary of the customer's previous orders or just their latest order; it is possible to update the new order with data from previous orders by clicking the appropriate buttons to the right of the Shipped to address section of the RFM Data for Selected Customer screen:
Copy Detail - copies the item details from the selected order to the new order that is being placed
Copy Ship To - copies the Ship To data from the previous order to the new order that is being placed
Copy Both - copies both the order details and the shipping address from the previous order to the new order that is being placed
This tab will only be visible if the user has configured at least one custom order field within the program. Refer to the Configuring Custom Fields Knowledge Base article for more information.
In the following screenshot, we see that two custom order fields have been created. My Custom Order Field 1 is configured as a simple text box, while the second, Another Custom Order field, is configured as a combo box (note the drop-down arrow). The data in these fields will also be visible on the Custom Order Data tab of the View Orders screen, and the data can be edited there, as well.
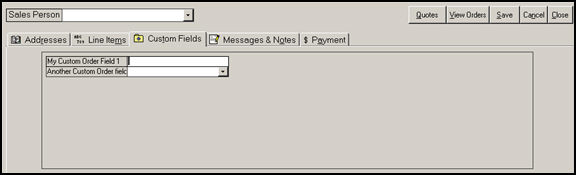
Figure 9: Custom Fields tab when a custom order field has been defined
Additional information, such as gift messages, order instructions, comments, or a note to print on the receipt can be entered at this tab. These four fields correspond to the fields of the same name that are found on the Comments & Instructions tab of the View Orders screen. The data entered into the Misc. Notes field will be added to the Notes Tree that is displayed on the Notes tab of the View Orders screen.
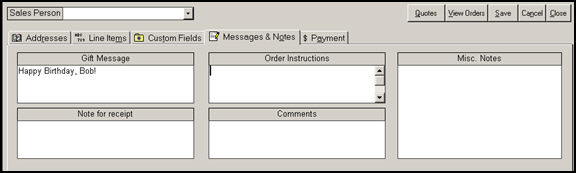
Figure 10: Messages & Notes tab of the Manual Orders screen
This tab is where the merchant can select or set other miscellaneous properties related to the order and process the payment information.
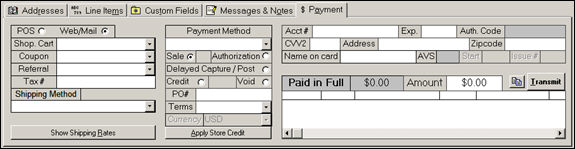
Figure 11: $ Payment tab of Manual Orders screen
Starting with the left-most side of the screen, there are several buttons and drop-down lists as follows:
POS or Web/Mail radio button - choose whether this order should be considered to be a Point of Sale (walk-in) or a Web/Mail order. This will affect the sales tax that is charged on the order. POS orders use the sales tax value that is stored in the Misc. tab of Point of Sale Setup screen, which is accessed from the Setup Functions tab of the Maintenance Menu, while imported orders use the Sales Tax table that is found in the Setup Wizard. The latter is able to support multiple tax rates for orders that are shipped to destinations outside the tax nexus of the merchant's physical business location.
Shop. Cart - allows the user to associate a manual order with one of their shopping carts.
Coupon - this is where the user can select a coupon to be applied to the order; it requires that Coupons are pre-defined in the program
Referral - select a referral source, as defined by the List Maintenance feature of the program
Tax # - this is a place where the merchant can record the tax-exempt ID number of a customer; the program does not use this field for any purpose
Shipping Method - select one of the pre-defined shipping methods to be assigned to this order
Show Shipping Rates - click this button to use the rate shopping feature for the shipping software that is configured in the program (UPS, USPS or FedEx); enter customer shipping address information to the order prior to using this button
The middle section of the $ Payment tab contains controls that affect the payment for the order:
Payment Method drop-down list - select one of the pre-defined Payment Methods which will be used to process the order, such as MasterCard, Cash, COD
if the form of payment is a credit card, select the Sale, Authorization, Delayed Capture/Post, Credit or Void radio buttons to indicate the type of transaction to be performed when the Transmit button is clicked
PO# - enter a Purchase Order number, if provided by the customer
Terms - select a pre-defined means of making a payment, such as Net30; use the List Maintenance feature to create a list of terms that the program can accept
Apply Store Credit - click this button to use the customer's available store credit to pay for the order
The right-most section of the $ Payment tab contains fields that contain the customer's credit card information, the payment status of the order as well as the details of any payment transactions which have been executed or logged for this order
Details - the fields in this section of the screen will be populated with information specific to the selected Payment Method
Balance Due - this section reflects the current state of payment for the order, it can also read Paid in Full or Credit Due
Save button - click this to record payment information for the order, usually Cash transactions; the button will not be active if it does not apply to the method
List Box - this box is not labeled, but it contains a list of any payment information processed for this order (Date, State, Description, Amount etc.)
As information is added to the order via the tabs in the middle section of the screen, the bottom of the screen will display the order details, such as the line items SKU and descriptions, whether they are in stock, their prices and payment information.
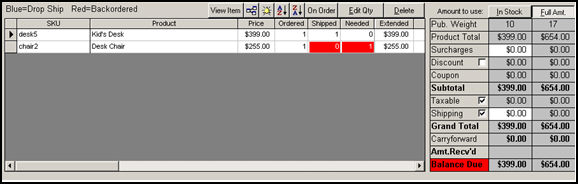
Figure 12: Manual Orders screen - line item and price details section
Select a line item from the list and use the action buttons to:
View Item - reveal more information about that product; opens the item's inventory record
![]() - View related cross-sell items of the selected product
- View related cross-sell items of the selected product
![]() - View any messages that are associated with the selected product
- View any messages that are associated with the selected product
![]() - Select a column to sort the line items in ascending or descending order
- Select a column to sort the line items in ascending or descending order
On Order - see if the selected item is already on order with a supplier
Edit Qty - change the number of units, of the selected item, that will be purchased on this order
Delete - remove the selected product from the order
In Figure 12, two lines items have been added to the order, desk5 and chair2. Desk5 is the line item that is currently selected, as denoted by the arrow in the left-most column. Chair2 has a red background in the Shipped and Needed columns, indicating that the merchant will fill the order for this non-drop ship item by placing an order with the supplier (backordered). The merchant may have this item in stock, but has decided to obtain the item from the supplier instead.
In the left-hand side of the bottom portion of the screen, there are many columns of information about the items that can be viewed by using the horizontal scroll bar at the bottom of the list. The following types of information are available:
SKU - the arbitrary value that the merchant has assigned to a particular product; abbreviation for Stock Keeping Unit
Product - the name or description that is assigned to the inventory item
Price - the regular price that the merchant has set for the product
Ordered - the quantity of the given item that is added to the corder
Shipped - the quantity of the given item that has been allocated to the current order
Needed - the additional number of units of the given item that must be acquired to complete, or "fill" the current order for the product
Extended - the mathematical product of the Price and the Ordered fields
Status - if the Status Events feature of the program is being used, this field will indicate the current status of the item for this order
Unit Weight - the actual weight of the item; does not include estimate of weight of any additional packaging
Drop Ship - denotes that the product will be shipped from the vendor to the merchant's customer
Options (1-10) - contains a value that describes the product's attributes, such as size or color
Freeform Options - an alternate location in the program that a merchant can use to record product attribute information, rather than the Option 1-10 fields
In the right-hand side of the bottom portion of the screen, there is information about the costs associated with the current order. The user can choose whether to process a payment for either the full amount or only for items that are in stock. The button labels also serve as headers for each column as they relate to the values in each row below:
Amount to Use - click one of the buttons at the top of either column ( In Stock or Full Amt) to apply the current payment method only to the items that are presently in stock or for all of the items on the order.
Pub. Weight - displays the weight of the item that is published on the web site; it may include estimated packaging costs; the user may choose to display the product's actual weight instead by setting system parameter ManualOrdersDisplayWeight to Actual Weight
Product Total - the total (extended) price for the items in the order
Surcharges - any additional charges that the merchant may charge for this purchase
Discount - a reduction in price that the merchant has selectively chosen to apply to this customer's purchase; usually based on volume purchases; can be a set dollar amount, a percentage of the entire order or the cost of the item plus a flat dollar amount
Coupon - any pre-defined reduction in price that the merchant as applied to this customer's order; coupons are generally temporary by nature, only being honored for a specific date range
Subtotal - the total of all product prices, prior to shipping costs and sales tax being calculated
Taxable - the amount of sales tax that will be applied to this order
Shipping - the cost of shipping the products to the customer
Grand Total - the total price that the customer will be charged for the current order
Carryforward - if the customer has credit from a previous order, and the program is configured to carry that amount forward to subsequent orders, the amount that is available is displayed in this field.
Amt. Received - this field will contain the amount of payment that the merchant received from the customer at the time the transaction was processed
Paid in Full or Balance Due - this row indicates the total amount owed by the customer; the value will change after the payment information has been processed ($Payment tab, Payment Terminal button); if there is no balance due, the label will read "Paid in Full"
The way that products with attributes/options will be displayed on the Line Items tab, and will be eventually added as a line items at the bottom of the Manual Order screen, depends on the settings of several system parameters. The possible combinations are described as follows:
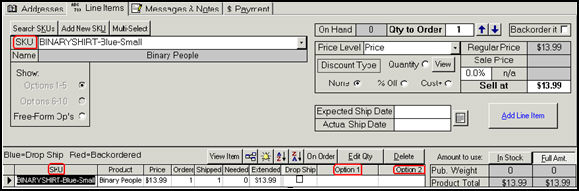
If the system parameters ManualOrdersBuildSubSKUs and BuildSubSKUs are set to FALSE:
the SKU drop-down list on the Line Items tab of the Manual Orders screen will contain all expanded SKUs, which can be cumbersome to scroll through if there are a large number of items in the inventory
type in the beginning characters of the SKU to jump to that point in the list and speed the search
select the applicable item from the drop-down and click the [Add Line Item] button.
the expanded SKU is added to the SKU field on the order and nothing is added to the Option1 and Option2 fields of the order, as shown in the figure below:
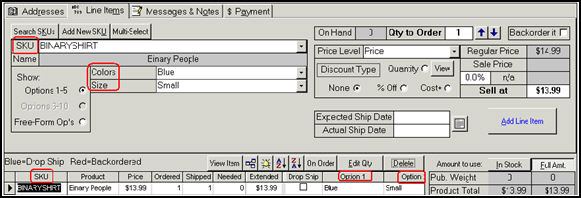
If the system parameter ManualOrdersBuildSubSKUs is set to TRUE and BuildSubSKUs is FALSE:
the SKU drop-down list on the Line Items tab of the Manual Orders screen will only display parent SKUs in the SKU drop-down box; all sub-SKUs will be hidden
select the parent SKU from the list and then select any attributes (color, size, etc.) for the item from those drop-down lists
click the [Add Line Item] button and the program will add the parent SKU to the order in the SKU field and the options will be seen in the Option1, Option2.., etc. fields on the order as shown in the figure below:
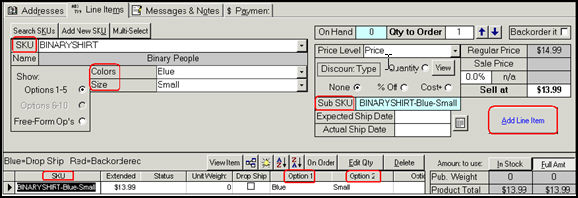
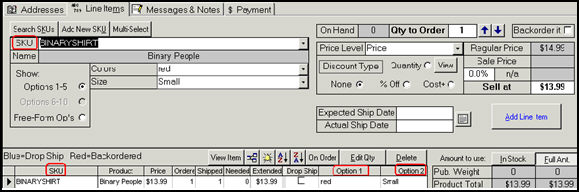
If the system parameters ManualOrdersBuildSubSKUs and BuildSubSKUs are both set to TRUE:
the SKU drop-down list on the Line Items tab of the Manual Orders screen will only display parent SKUs in the SKU drop-down box; all sub-SKUs will be hidden
select the parent SKU from the SKU drop-down list and select the attributes from the options drop-down lists (in this example, Colors and Size)
the program will match the item being ordered to an existing inventory record, which will be displayed in the SubSKU field, beneath the Discount Type
when the [Add Line Item] button is clicked, the matching SubSKU is entered into the SKU field on the order and the options are also listed in the Option1, Option 2...etc. fields as shown in the figure below:
If an attribute is typed into the option drop-down list and the program does not find a match, it will warn the user and add the parent SKU to the SKU field on the order and the options will be added to Option1, Option2,...etc. fields.

Click [OK] to see the result:
Note: The ManualOrderSKUFieldType system parameter (in the Manual Order parameter group) determines whether the SKU field is a text box or a combo box (i.e. drop-down list). For stores with thousands and thousands of SKUs, a drop down list is not practical; it takes a long time for the program to build the list. In this case, set the parameter to TextBox.
Created 9/13/10
Modified 7/3/14
Go to Top