
Version 5.9
In this Topic: Show
The Order Manager builds and maintains a customer list as new orders are imported from a shopping cart or orders are entered manually. The View Customers screen provides an interface to manage the data associated with each customer.
It is also possible to import customer information from a text file, and tailor the way that the program attempts to match new customer information, on incoming orders or customer records, to existing customer records when using the Customer Matching feature. Both of these topics are outside the scope of this article. Please refer to the links provided for more details about each one.
The View Customers screen can be accessed from:
Main Menu> Customers > [View]
Main Menu> Orders> [View] > [Addresses tab] > [View Customer Info]
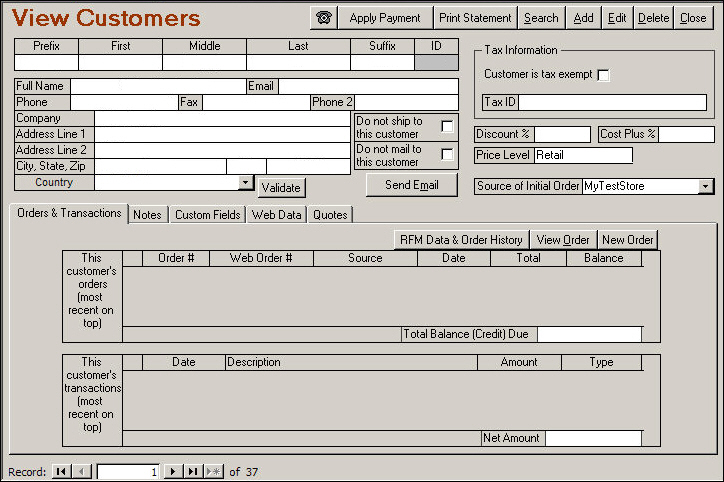
Figure 1: View Customers screen
Use the navigation arrows at the lower left-hand side of the screen to scroll between customer records.
In the upper right-hand corner of the screen there is a row of "action" buttons that perform various functions against the currently viewed Customer record.
The [Telephone] button ![]() can be used to call the customer by placing the cursor in the phone number field on the Customer record and clicking the button. This feature requires system parameter ShowPhoneButtons to be set to TRUE or the button will not be visible. There must also be a phone line connected to the workstation for the feature to work.
can be used to call the customer by placing the cursor in the phone number field on the Customer record and clicking the button. This feature requires system parameter ShowPhoneButtons to be set to TRUE or the button will not be visible. There must also be a phone line connected to the workstation for the feature to work.
The [Apply Payment] button allows the user to record payments made against one or more orders. See the example, Apply Payment, for more details.
The [Print Statement] button opens a customer filter form that allows the user to select the customer or customers for whom statements should be printed. See the example, Print Statement, for more details.
The [Search] button opens the Search for Customers window where the user can search for a customer by a variety of data, such as company name, address, email address, contact name, balance information or items that they have purchased, to name a few. Searches on any of the text fields on that screen are "wild card" searches. Field labels that are marked by an asterisk can only be searched by themselves (you can only specify criteria in one field). See the example, Search for Customers, for details.
The [Add] button opens a blank customer record. Complete the fields on the main upper portion of the screen and click [Save] to create a new customer record. See the example, Add Customer Records, for more details.
Use the [Edit] button to change information related to an existing customer record. Refer to the example, Edit Customer Information, for more details.
The [Delete] button will remove the customer record from the database. Use this button with caution as there is no way to reverse its action. See the example, Delete Customer Records, for more details.
The [Close] button will cause the program to exit the View Customers screen.
In the middle of the screen there are two additional buttons and two check boxes:
If checked, the [Do not ship to this customer] box will cause program to issue a warning to the user when an order for this customer is being packed, thereby allowing them the opportunity to stop the shipment. If system parameters PackingAllowIfDoNotShip or QuickShipAllowIfDoNotShip are set to TRUE, the user will still have the option to ship the package. If CancelOrdersFromDoNotShipTos is set to TRUE, all orders from that customer will be cancelled by the program. Do not confuse this parameter setting with the DoNotShipTo list of the List Maintenance feature that pertains to Approval Rules, which provides another method for weeding out orders from undesirable sources.
The [Do not mail to this customer] box allows the user to exclude this customer from any bulk e-mailings. The [Do not ship to this customer] box must also be selected for the customer to be excluded from bulk e-mailings.
If the [Do not mail to customer] box is checked, the corresponding check box, [Do not send bulk email to this customer], on the Addresses tab of the Manual Orders screen will also be automatically checked when placing an order for the customer. Also, if the check box on the Addresses tab is unchecked and the order is saved, the [Do not mail to customer] check box on the Customer record is also unchecked by the program.
The [Send Email] button opens the Send Email (Enter Subject and Message) screen, which allows the user to send an email, based on any of the email templates in the Select Template list, to any of the email addresses that are associated with the current customer record. This includes the email addresses of contacts that are added via the Contacts tab, not just the address in the one email field that is found on the main View Customers screen. Refer to the section, Contacts Tab, for more details.
The [Validate] button will cause the program to contact the Endicia.com servers (USPS partner) to verify the street address that is entered on the customer record.
In the upper right-hand side of the screen there are other miscellaneous settings such as:
Tax Information - check the [Customer is Tax Exempt] check box and enter a Tax ID in the field provided, if the customer should not be charged sales tax.
Discount - Enter a percentage in the Discount% field OR in the Cost Plus% field to record a reduction in cost that will be applied to all of a customer's orders.
Price Level - If Price Levels have been defined within the program, the user may assign a particular price level to each customer by selecting it from this drop-down list. If Price Levels have not been defined, this field will not be visible.
Source of Initial Order - will reflect the shopping cart from which the order originated. If the order was placed manually, this field will remain blank.
The lower portion of the screen is divided into tabs which organize additional information related to each customer. Click on a tab to see the data that is stored there. The tabs are Orders & Transactions, Notes, Custom Fields, Web Data, and Quotes. The Custom Fields tab is not visible until a custom, customer field has been defined in the program. For more information, see Configuring Custom Fields.
The Orders & Transactions tab provides a summary of the customer's most recent orders, payment transactions and their account balance.
Figure 2: View Customers screen: Orders and Transactions Tab
In the upper right-hand corner there are buttons that allow the user to review [RFM Data & Order History] information for the customer, [View (a particular) Order], or create a [New Order] for that customer.
RFM Data & Order History button - RFM is a method used for analyzing customer behavior based on Recency (when was the last order?), Frequency (how many orders has this customer placed?), and Monetary Value (what is the value of this customer's orders?). Click the button, select a date range and see the summary of the Recency, Frequency and total Monetary Value of orders placed in that time frame at the top of the screen. A summary of the orders will be available in the lower portion of the screen. Use the navigational arrows in the lower left-hand corner of the screen to scroll through the orders and see details about each one.
This functionality is also available via the [Show RFM Data] button on the Addresses tab of the View Orders screen and via the [Order History] button on the Addresses tab of the Manual Orders screen. See the Knowledge Base article Export Customer Data & Send Bulk Email, for information about generating customer reports, filtered by range of order frequency and/or order value within a selected date range.
this tab will display a list of any notes that have been added to the current customer record
for more detailed information, please refer to Notes Tab of the Orders, Customers, and Suppliers Screens
If custom, Customer fields have been defined, the Custom Fields tab will be visible. In the image below, the custom field that has been defined is called "test" and the custom information will appear in the box next to it. Refer to Configuring Custom Fields for setup information. The Advanced Custom Fields feature is only available in the Enterprise edition of the Order Manager.

Figure 3: View Customers screen - Custom Fields Tab
The Web Data tab contains the information that the customer uses to login to their online store. This is only applicable to certain shopping cart systems, such as Yahoo! Store and Yahoo! Merchants Solutions.
Figure 4: View Customers screen - Web Data Tab
The Quotes tab will display information about any quotes that have been entered into the system for the current customer. Refer to the Quotes Tab of the Customer Screen. For more information about creating quotes, see the Knowledge Base article, Quotes.

Figure 5: View Customers screen - Quotes Tab
The [Apply Payment] button allows the user to enter a payment and apply it to multiple orders from the current customer with outstanding balances due. This function is primarily for use when accepting payment by check for multiple orders.
Open the customer record from whom the payment is being received.
Click the [Apply Payment] button.
In the Amount of Payment field at the top, left corner of the screen, enter the amount received. Select the Payment Method and if payment is by check, enter the Check #.

Figure 8: Apply Payment to Multiple Orders screen
Click [Allocate Amounts] to apply payment to the Amount (Amt.) Due. The Order Manager will apply payment to the oldest orders first, working up to the newest orders. If there is a credit (i.e., payment was greater than amount due), it will be applied to the most recent order.
Click [Save Payments].
The [Print Statement] button allows customer statements (unpaid orders) or customer history statements (paid orders) to be printed.
The default report setting for the [Print Statement] button is Customer Statement. The system parameter, CustomerStatementTemplate, controls which type of statement is active.
To switch the type of statement to be printed:
Go to Main Menu > [Maintenance Menu] > [Set System Parameters] > [Parameter Group]> [Reports].
Select [CustomerStatementTemplate].
From the drop-down list, select [Customer History] or [Customer Statement].
Click [Save].
To print a statement:
Click [Print Statement].

Figure 9: View Customers screen - Print Statement button
The Customer Statement Filter screen will open. Enter the time frame for which orders should be included in the statement(s). Use the buttons provided, or type specific dates in the Start and End fields. Click the [All] button to have every order that the customer has ever placed listed on their statement; or, if All Statements is selected in the lower portion of the screen a statement for all orders for every customer in the system will be printed.

Figure 10: Customer Statement Filter screen
In the Which statements do you want to print? section of the screen, use the Statement for this Customer drop-down list to choose a specific customer for whom a statement should be printed, or check the [All Statements] box to print all customer statements for the specified time period.
Click [Print Report]. A preview window allows the report to be previewed or cancelled prior to it being printed.
This section of the article applies to the Search for Customers screen that is accessible from the View Customers screen.
For information about available Quick Search functions, see the Knowledge Base article, Keyboard Shortcuts and Useful Functions.
On the View Customers screen, click [Search].
The Search for Customers screen opens:

Figure 11: Search for Customers (Customer Filter) screen
Only one of the fields marked with an asterisk (*) can have search criteria specified for it in a given search; you cannot specify data in more than one of these fields at a time and it is not possible to use a "wildcard" in these fields.
All of the other fields are able to use "wildcard" search criteria. If you wish, you can enter only the first few letters or numbers of a value that you expect to find in that field. The program will search through all customer records to find those with values in the same field that begin with those characters. For example, if you enter "Rob" in the First Name field, the program will return a list of customers who first names are "Rob", "Robin", "Robert" and so on.
If you enter criteria in more than one of the fields not marked by an asterisk, the program will search for customer records that match the combination of all of the criteria that was entered.
If you want to search on phone numbers without any formatting, set one of the CustomerSearchField2-4 system parameters (in the Program group) to Phone - No Formatting. The program will then remove all non-numeric characters from the customer phone number and store it in another field in the customer record. From then on, the program will search that alternate field for the customer phone numbers. As new customer records are created, the program will create similar entries for the phone numbers that may be entered with formatting. For example, when the system parameter has been set to Phone - No Formatting, the program will take a phone number, such as (610) 994-3699 that is entered in the visible phone number field on the customer record, and store it in an alternate, non-visible field in the customer's record as 6109943699. When performing a search, enter the phone number as 6109943699 and the program will display the matching customer record, where the phone number will still be displayed as (610) 994-3699.
You can search for customers who purchased a particular product by entering the product’s SKU in the Purchased this item: text box, one of three ways:
Click [Show All] to see a list of all SKUs that exist in the Order Manager. Then select a SKU from the list and click [Begin Search].
Click on a button labeled with the letters of the alphabet to see all SKUs that start with the chosen letter. Select a SKU from the resulting list and then click [Begin Search].
Click the # (pound) button to see all SKUs in the Order Manager that begin with a number. Select a SKU from the list and click [Begin Search].
The search can be aborted at any time by clicking [Cancel].
When the search is complete, the program returns to the View Customers screen, where the matching records will be displayed.
If the search was unsuccessful, you will see a message box stating that no customers were found.
If the search was successful, you will see a count of the records returned in the bottom left-hand corner of the screen. Use the navigational arrows to scroll through the matching customer records.
To remove the filter and view all customer records:
Click [Search] on the View Customers screen. Then click [Begin Search] on the Search for Customers screen without entering any search criteria.
OR close and re-open the View Customers screen.
Click [Add]. A blank customer record appears. Enter the customer's information in the appropriate fields.
Figure 12: View Customers Screen opened for data entry
Click [Save] to retain the data entered into the new customer record.
Clicking [Cancel] prior to the [Save] button will return you to the View Customers screen without saving any information that was entered.
Open the customer record that needs to be changed.
Click [Edit].
Make the necessary changes to the customer's information.
Click [Save] to return to the View Customers screen. The changes made will now be displayed.
Clicking [Cancel] prior to the [Save] button will cause the program to exit the View Customers screen without saving any changes.
Navigate to the customer record. Use the navigation arrows in the lower left-hand corner of the screen or click [Search] in the upper right-hand corner of the screen. For information about searching, see Search for Customers.
Click [Delete].
You will see a message box stating "Customer deleted!" Click [OK].
Note: The program will not allow the user to delete a customer record that is linked to an order.
![]()
Updated: 1/13/12
Go to Top