
Version 5.9
In this Topic: Show
Most shipping carriers assign tracking numbers to packages when a shipping label is printed. Regardless of the method in which the data is obtained from the carrier, the Order Manager records tracking information related to an order in its store data file. This information can then be inserted into an email that is sent from the Order Manager directly to a customer, or it can be sent to a web store (depending on the capabilities of the shopping cart system), or to the Stone Edge Order Status System so that customers can see the shipping status of their orders while they are en route. The Order Manager function that triggers this action is called Process Tracking Numbers.
Some carriers are able to communicate tracking information directly via an ODBC connection, while others may only provide that data in a text file. The latter case requires the merchant to perform an additional manual step to record tracking information in the Order Manager.
This topic discusses how tracking information is entered into the Order Manager. For more information about the Process Tracking Numbers function, refer to its Knowledge Base topic.
There are several methods by which tracking numbers can be entered into the Order Manager:
imported from a text file; FedEx QuickShip and WindowBook's Postal Package Partner require tracking information to be imported via a text file rather than by an ODBC connection; drop-ship vendors may also provide tracking information in a text file
via an Open Database Connectivity (ODBC) connection to the Order Manager's store data file, using an external shipping application, such as Endicia DAZzle, UPS WorldShip, or FedEx Ship Manager, etc.
by printing shipping labels using the Order Manager's integrated shipping solutions; if any of these solutions is used, they do not require any additional steps on the part of the user in order to obtain tracking information, outside of the completion of the configuration wizards for that carrier in the Store Setup Wizard.
by manually entering the data via the [Add] button on the Shipping & Tracking tab of the Orders screen
There are two methods for importing tracking numbers into the Order Manager via a text file:
Via the Import Tracking Data screen (New Version) - which is the RECOMMENDED method, and provides a user interface for mapping the fields in the text file to Order Manager fields. System parameter CSVTrackingImportVersion = New Version. The default setting for this parameter is "New Version".
Via System Parameters (Old Version) - which requires the user to manually map tracking data fields from the .csv text file to specific system parameters in the Shipping Parameter Group. System parameter CSVTrackingImportVersion = Old Version.
Refer to Knowledge Base topic, Set System Parameters, for instructions about changing the setting of a system parameter.
Export tracking information from the shipping application to a text file (tab-delimited or comma-delimited). Be sure to note where you save this file on your computer.
Go to Main Menu > Maintenance Menu > Shipping & Fulfillment tab> and select Import .csv Tracking Numbers from the list of activities to open the Import Tracking Data screen.
Select either the Regular Orders or Drop Ship POs radio button in the Import tracking for: section of the screen.
If the text file does NOT contain a header row, un-check the box labeled First row contains field names.
Choose one of the pre-defined shipping carriers from the Default Carrier drop-down list.
In the Link Field box, select the radio button for the most appropriate field found in the text file:
Order Number (Order Manager #) - STRONGLY RECOMMENDED
Source Order Number (shopping cart order number -- numeric only)
Source Order ID (shopping cart order number -- alpha-numeric only)
Drop Ship PO Number - this button is only active when the Import Tracking for: section is set to Drop Ship POs.
Manually type in the path to the file that contains the tracking data or click the [Browse] button to navigate to its location and click [Open]. The data from the text file will be displayed at the bottom of the screen (up to 50 fields and 100 records or rows).
The program will map as many fields it can correctly recognize to the appropriate Order Manager fields in the drop-down lists. Manually select the correct mapping for any fields that the program could not adequately recognize. The Order # and Tracking Number fields are required fields; in other words, they must be mapped to a field in the text file in order for tracking information to be imported successfully.
Click the [Test Data] button to have the program check for data errors. A message box will appear with the results, and if an error has been detected, the user may elect to view additional information about the error.
When satisfied with the data in the text file and the settings on this screen, click the [Begin Import] button to initiate the process of importing the tracking information into the Order Manager.
When the process has been completed the program will provide a count of the new records that were added.
If item number information is included or the drop ship purchase order number is included, the program will create packing records for the items contained in the text file.
The new tracking records for the orders contained in the text file can be seen at the Shipping and Tracking tab of the Orders screen.

Figure 1: Import Tracking Data screen with sample data for Regular Orders
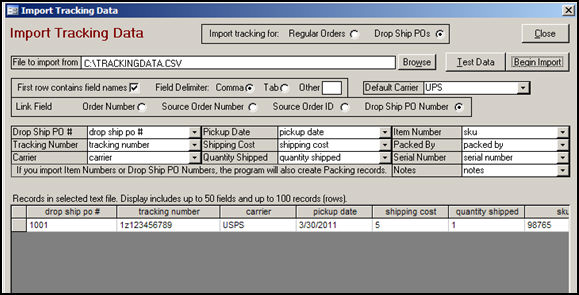
Figure 2: Import Tracking Data screen with sample data for Drop Ship POs
Export tracking information from the shipping application to a comma-delimited text file (.csv), or obtain the text file from the carrier or drop-ship vendor.
Review the data in the text file with an appropriate text editor and determine which fields are to be mapped to Order Manager fields, and note their position (sequence or column number) in the text file.
A comma delimited text file (CSV) would look something like this:
"1234","1Z123456789","12.75","8.5"
"1235","1Z987654321","5.00","1.2"
"1236","1Z543219876","6.50","1.5"
"1237","1Z219876543","23.20","18"
"1238","1Z765432198","15.95","12"
In the example above, the data in the first column (position 1) enclosed in quotes contains the Order Manager order number. The data in the second column (position 2) enclosed in quotes contains the tracking number. The third column (position 3) contains the shipping cost. The fourth column (position 4) contains the actual weight of the item.
TrackingCostField
TrackingOrderNumberField
TrackingIDField
For example, based the sample data given in step 2, system parameter TrackingOrderNumberField would be set to "1". TrackingIDField would be set to "2", and TrackingCostField would be set to "3". Do not include the quotes (" ") in the system parameters, just the integer.
Set system parameter TrackingDefaultCarrier to the appropriate shipping company: FedEx, UPS or USPS.
If the text file does not contain a Carrier field, set system parameter TrackingDefaultField to "0".
Parameter TrackingLinkField should be set to Order Number, SourceOrderNumber or SourceOrderID.
In order to utilize this method, one of the Quick Clicks must be set to Import .csv Tracking #'s. Refer to the Knowledge Base topic Quick Clicks, for instructions.
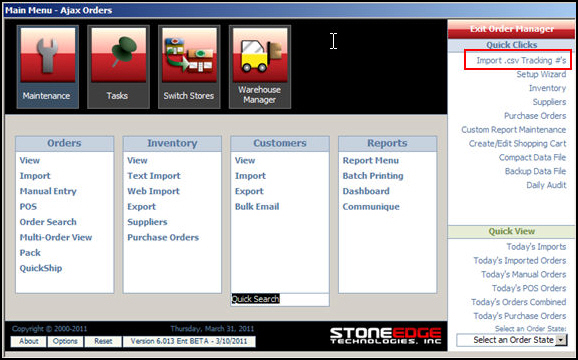
Figure 3: Select Tracking File with Data
Click the Import .csv Tracking #'s Quick Click link and navigate to the location of the text file.
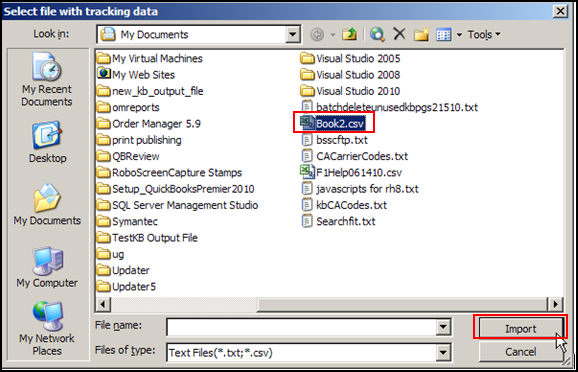
Figure 4: Select Tracking File with Data
Click the [Import] button to start the process. When finished, the program will provide a summary of the results.
The tracking records that were added to the orders referenced in the text file can be seen at the Shipping and Tracking tab of the Orders screen.
When an ODBC connection has been established between the Order Manager's store data file and an external shipping software application, such as UPS WorldShip, FedEx Ship Manager, or Endicia Galaxy Ship (USPS shipments), it is possible to directly update the Order Manager tables with tracking information with limited human intervention.
The user will have to create Import and Export Maps in the shipping application so that the correct fields in the shipping application are mapped to the appropriate Order Manager fields in the store data file. When a "batch" is closed, the shipping application sends the tracking numbers to the Order Manager automatically.
Refer to the Knowledge Base topics for UPS WorldShip (UPS WorldShip Setup Full Documentation), FedEx Ship Manager (Setting Up and Using FedEx Ship Manager) and Endicia Galaxy Ship (How to Setup Galaxy Ship to Interface with the Order Manager) for directions related to those specific shipping applications.
Enterprise users that employ an SQL database as their store data file must take some additional steps to facilitate the exchange of tracking information via an ODBC connection, which are outlined in the Knowledge Base topics, Using Galaxy Ship with an SQL Data File, UPS WorldShip Setup with the Enterprise Edition, or Using FedEx Ship Manager with an SQL Data File.
Although other shipping solutions may not be documented here, any application that can utilize an ODBC connection should be able to function in the same manner.
After any of the previously mentioned methods has been executed and new tracking information is available in the Order Manager, the Process Tracking Numbers button on the Maintenance Menu will be visible. Click this button to initiate the sending of tracking emails to customers and/or sending order status information to a shopping cart or the Stone Edge Order Status System.
Endicia DAZzle users have the option of sending tracking numbers immediately as s shipping label is printed, or they can opt to wait and have them sent when the Process Tracking Numbers function is executed.
For more information about the Process Tracking Numbers function itself, refer to its Knowledge Base topic in the previous link.
![]()
Created: 4/1/11
Go to Top