
Version 5.9
In this Topic: Show
The Kits tab of the Inventory screen is one of two places in the program that a Kit SKU can be defined. The other place is at the Define Kits screen which is opened by selecting Kits on the Inventory & Supplier tab of the Maintenance Menu. Both interfaces are quite similar, as one might expect.
For more information about Kits, please refer to the Knowledge Base topic, Define Kits Screen.
![]() Click the Show
link next to "In This Topic"
at the top of this page to see a series of links in outline form,
which can be used to quickly jump to that section of the topic.
Click the Show
link next to "In This Topic"
at the top of this page to see a series of links in outline form,
which can be used to quickly jump to that section of the topic.
In addition, major topics may provide a brief synopsis of a field's purpose or direct the reader to the appropriate section of the topic by scrolling over the image. To return to the previous location within the same page, right-click the mouse and select [Back].
If clicking a field directs the reader to a different Knowledge Base topic, it will open in a new tab or window, leaving the currently viewed topic open. The browser's settings determine whether a new tab or window is opened.
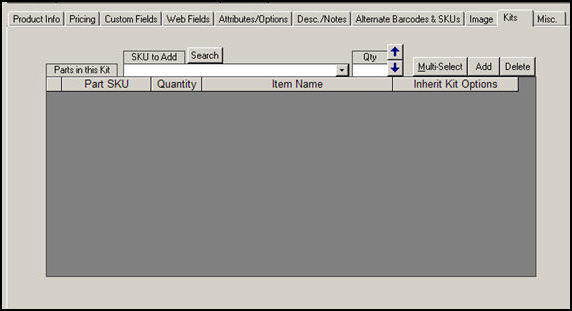
Figure 1: Inventory screen - Kits tab
when the name of a SKU has been entered into the SKU to Add combo box, either by manually typing one in or selecting one from the list, click the [Add] button to designate the component as part of the kit
the component SKU will be listed in the Parts in this Kit section of the screen
after selecting one of the entries in the Parts in this Kit section to be removed from the kit, click this button
best business practices imply that this function is only used when initially creating Kit SKUs
once a Kit SKU has been sold, components should not be changed; create a new Kit SKU instead
click this button to open the Select Items to Order (Add Items to Order) screen
this form allows the user to choose more than one component SKU at one time
in this section of the screen, the program will list all of the component parts of the Kit SKU
the information about each component is displayed in the following columns:
if this box is checked, any attributes associated with the Kit SKU itself will be copied into the Options or Freeform Options fields of the resulting line items for each component of the kit when the order is created; no changes are made to the underlying component inventory records themselves
the reason for this behavior is that the Order Manager is unable to discern which attributes apply to which components; therefore, all attributes are copied to each line item and it is the user's responsibility to determine which attribute applies to a given component when filling the order
this applies to manually placed or imported orders but not to Point of Sale orders
this button opens the Find a Product screen (aka Search Inventory) where the user may enter criteria and search for inventory records to add as a kit component
when a record has been selected from the Find a Product screen, its SKU will be populated in the SKU to Add combo box
At the Inventory screen, [Add] a new inventory record that will become the Kit SKU.
While it is possible to select an existing inventory record and define it as a Kit, the recommended practice is to create a new SKU whenever a new combination of products will constitute a kit.
The minimum fields on the Product Info tab that need to be completed before the new inventory record can be saved are as follows:
Click the Kits tab and enter, search or select the product SKU to be a component of the kit in the SKU to Add combo box. The [Multi-Select] or [Search] buttons can be used to enter a product into the SKU to Add combo box.
Enter the number of units of the component needed for the kit in the Qty field or use the Up and Down arrows to change the value of the Qty field.
Click the [Add] button.
Optional: Check the [Inherit Kit Options] check box to have any Option lists (attributes) of the Kit SKU copied into the Options or Freeform Options fields of each component's line item in the order. To learn more about options and attributes review the Knowledge Base topic, Options, Attributes and Sub-SKUs. In the context of this topic, the process of building of sub-SKUs is not relevant nor required.
To add an option list to a Kit SKU, click on the Attributes/Options tab of the inventory record and follow the instructions in the Knowledge Base topic, Add/Edit Option List screen.
Repeat steps 1 through 6 as many times as necessary until all components of the kit have been added to the inventory record of the Kit SKU.
The changes made at this tab are take effect immediately and do not need to be saved.
Created: 6/21/11
Go to Top