
Version 5.9
In this Topic: Show
The Order Manager can be used to drop-ship items that you do not stock or items that may be temporarily out-of-stock. You can place orders for these items with your supplier manually or automatically.
Inventory records for items that will always be drop-shipped should be marked as Drop-Ship items. The Global Editor can be used to quickly update a group of existing inventory records simultaneously.
Orders for regularly stocked items that are temporarily out of stock can be changed manually at View Orders to have the item drop-shipped instead.
Important!
The system parameter CheckInventory must be set to True in order to drop-ship products.
A supplier must also be specified for each item. The Primary Supplier of a single item can be designated on the Edit Product Supplier Information screen. The primary supplier can be set for multiple items at the Change Suppliers screen. If an item has multiple suppliers, the Order Manager will generate a PO for the primary supplier. If no supplier is designated as being the primary supplier for the item, the program will generate the PO for the lowest-cost supplier of the item. Choosing a specific supplier on the DROP-SHIPS tab of the View Orders screen overrides the previously mentioned program logic and the purchase order will be generated for the chosen supplier.
Go to Main Menu> Maintenance Menu>Maintenance tab>Set System Parameters> Go. Change system parameter Check Inventory to True. Click Save. Refer to article, Set System Parameters for information about changing parameters.
Go to Main Menu>Maintenance Menu>Setup Functions>Store Setup Wizard>Drop Shipping section.
On the first page, enter the Drop ship contact information. This information will be used on reports and email templates.
Select the template(s) that will be used for the various method(s) of sending purchase orders to suppliers. It is fine to initially accept the program defaults on this screen. Eventually, the best practice would be to choose the one that fits the majority of your suppliers' needs. The template chosen here can be overridden by the template that is selected on the individual Supplier record, Purchase Order Options tab, for suppliers that vary from the norm. Refer to Setting Up Drop Shipping Default Templates.
Go to the second page of the Drop Shipping section of the Setup Wizard and check the box labeled Mark drop shipped items as shipped.
Click Save and Exit.
Go to Main Menu>Maintenance Menu>Inventory & Suppliers>Inventory.
Select an item.
Click on the Edit button.
Click the Drop Ship checkbox.
Click Save and Exit.
Note: If many inventory items are to be changed to drop shipped items, use the Global Editor for expediency.
Go to Main Menu>Maintenance Menu>Inventory & Suppliers>Inventory.
Select the inventory item whose supplier is to be changed.
Select a supplier record from the list under the Suppliers for this SKU heading. (If no Primary Supplier has been assigned to the inventory record, the system will assign the Default Supplier as its supplier.)
Click the Edit button. The Edit Product Supplier Information dialog box opens.
Select a supplier from the Supplier drop down list. Click the Primary Supplier for this SKU checkbox if desired.
Figure 1
Edit the information as needed.
Click Save.
The program will prompt for verification before changing the Supplier record. Click OK to proceed with the change or Cancel to abandon the change.
Go to Main Menu>Maintenance Menu>Inventory & Suppliers>Change Suppliers.
Click either the Add Supplier or Change Supplier radio button.
If adding Suppliers:
Choose the current supplier in the Add: drop down list.
If changing Suppliers:
Choose the current supplier in the From drop down list.
Choose the new supplier in the To drop down list.
Click the Set as Primary Supplier checkbox (optional).
Create a list of items to be assigned to that supplier in the right-hand pane under the Make Changes button. This can be done several ways. Use any combination of the methods below to create the list:
Click Begin with or End with radio buttons at the top left-hand side of the screen and enter a text string in the This text: field. Click the Build List button and the items will be directly added to the list in the right-hand pane.
Use the Search button, enter criteria and hit Enter to filter the list of products in the Select a Product section at the bottom of that screen. Select the desired product and then click the OK- Use Selected Item button. The product will be added to the list in the left-hand pane. Click the Add to List button to move the product to the list in the right-hand pane.
Click on a number or letter in the SKU Starts With section of the lower left-hand pane. A list of items will appear in the left-hand pane. Select an item in the left-hand pane and click Add to List. The item will be added to the list in the right-hand pane.
Click the Show All button at the bottom of the left-hand side of the screen to display all inventory items in the left-hand pane directly above. Select an item in the list and click the Add to list button, or simply double-click on an item. The item is added to the list in the right-hand pane.
Click the Add selected supplier's SKU's to list button. All items that currently contain the supplier name that is selected in the From: drop-down box will be added to the list in the right-hand pane. (This button is only visible when the Change Supplier radio button is selected.)
Items can be removed from the list by using the Delete from list (a selected single item) or Clear List (all items) buttons.
Optional: It is also possible to set the Supplier's SKU to be the same as the Local SKU at this screen. Choose a radio button to determine whether the program should perform this action against the Entire List of items in the right pane or only against a Selected Item in the list. Click the Set Supplier's SKU=LocalSKU button.
Optional: Unit cost information can be manually entered in the Unit Cost Field.
When all of the desired items have been added to the list of items in the right-hand pane, click the Make Changes button. The program will prompt for confirmation before making the changes. Click OK to proceed and Cancel to abandon the changes.
Figure 2
Click Close.
You can configure the Order Manager to use one of the templates or reports that are supplied with the program as the default when it generates POs, or you can instruct the program to use a custom report or template.
For detailed information about customizing email templates, click here. For detailed information about customizing the other types of templates (also called custom reports), click here.
Go to Main Menu>Maintenance Menu>Store Setup Wizard>Drop-Shipping, Page 1. Click on the drop down lists in the Default Templates for Drop Ship Purchase Orders section and choose the templates you wish to use for each method of sending purchase order information.
Click Save and Exit.
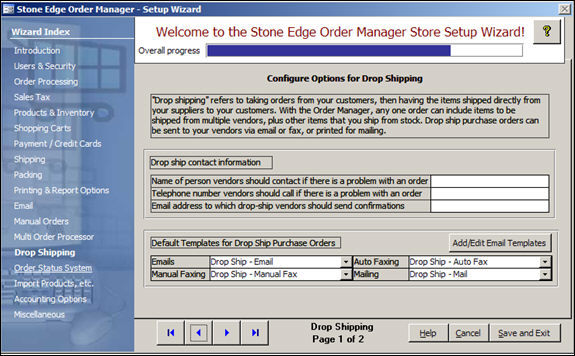
Figure 3
One or more of your suppliers may dictate how they wish to receive orders from you, e.g. Supplier A requires that you send POs via email and Supplier B requires that you send POs via fax. In this case, you must select the supplier's Order Method in the Drop-Shipping section of the View Suppliers screen, Purchase Order Options tab.
Go to Main Menu>Inventory>Suppliers; Main Menu>Quick Clicks>Suppliers; or Main Menu>Maintenance Menu>Inventory & Suppliers>Suppliers. Double-click or select Go.
The View Suppliers dialog box opens. Find the appropriate supplier record (use the navigational arrows at the bottom of the screen) and then click the Purchase Order Options tab.
Figure 4
Click the Edit button in the upper right-hand corner of the screen.
Select the radio button that indicates the correct Order Method for the supplier: Print for Mailing or Faxing, Fax automatically, or Email automatically, in the upper right hand section of the screen.
Select a template that begins with "Drop Ship" from the appropriate drop-down for the Mail, Email, Fax or Auto Fax purchase order send methods, or create your own. If no template is selected here, the default template that was specified on the first page of the Drop Shipping section of the Setup Wizard will be used.
Note: For detailed information about customizing email templates, click here. For detailed information about customizing the other types of templates (also called custom reports), click here.
The Text file export option can be used to send purchase order information to the supplier in a text file. This method requires the user to define a Fulfillment Template that will be used to select and format the data to be included in the text file. Enter the name of the Fulfillment Template here. Each supplier should have a separate export text file (Export File) where the purchase order data is written. If multiple suppliers accept order data in the same format, they may share a Fulfillment (Text File) template. Otherwise, create a unique fulfillment template according to each supplier’s requirements.
The Export File field contains the path to the text file where the purchase order data for this supplier should be written.
Check the Attach Text File box to have the text file named in the Export File field attached to the purchase order email that is sent to the supplier, when Email automatically is the selected send method. This option is only available for drop-ship purchase orders.
No Drop-Shipping – Select this radio button to prohibit a supplier from being used to drop-ship products to customers.
Click Save.
A line item in an order that is defined in the Order Manager as a Drop Ship item is assumed to be back ordered and its cost does not appear in the order total until an Actual Ship Date is set. Once the Actual Ship Date is set, the Order Manager adds the costs of the drop ship items to the order total.
The Order Manager can be configured to add the cost of drop ship items to the order total regardless of the Actual Ship Date by setting system parameter DropShipsShowAsShipped to True. This parameter can also be set by checking the box labeled Mark drop shipped items as shipped in the Store Setup Wizard.
The Actual Ship Date can be also be set from the Ship Dates & Status tab on the View Orders screen. Click the Actual button for either the Selected Item or the Entire Order. Select a date on the calendar and click OK.
Figure 5
Once the Actual Ship Date is set, the item appears as Shipped as in the image below:
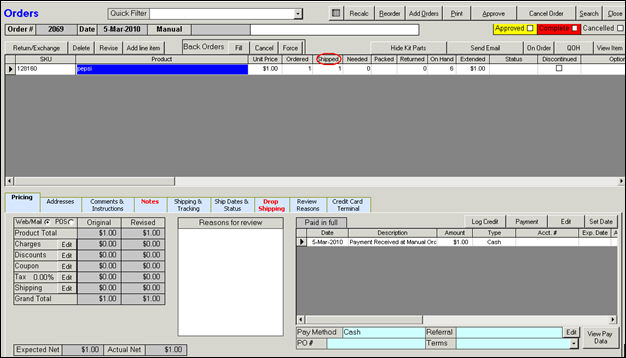
Figure 6
When you are ready to place the drop ship order with your supplier, click on the Drop Shipping tab.
Note: If the order contains a drop ship item, the tab heading is displayed in red text. If the order does not contain a drop ship item, the tab heading is displayed in black text.
Use the Order: buttons to place an order for the item(s) listed. A purchase order is issued and the All drop-ship orders sent is checked. You can then approve the order.

Figure 7
To configure the Order Manager to automatically approve orders that include drop ship items, go to the Order parameter group and set ApproveOrdersWithDropShips system parameter to True.
Review the system parameters listed below to further configure how the Order Manager should handle drop ship items, purchase orders and related actions.
To access the system parameters, go to Main Menu>Maintenance Menu>Maintenance>Set System Parameters.
|
System Parameter |
Parameter Details |
|
AddNoteWhenDropShipPOSent |
If TRUE, the program will add a Note whenever you send a drop ship purchase order. |
|
AllowChangeDropShipCosts |
If TRUE, when Revising a Drop-Shipped line item, you can change the Unit Cost of the item. If FALSE, you cannot change the cost. (To allow cost changes on all items, set AllowChangeCosts to TRUE.) |
|
AllowUnorderedDropShips |
If TRUE, when you approve an order the program will warn you if the order has un-ordered DropShip items, but will allow you to proceed. If FALSE, you cannot approve an order with un-ordered DropShip. |
|
ApproveOrdersWithDropShips |
Approve orders with DropShip items on them. |
|
CalcTaxIfAnyDropShips |
As orders are imported from a shopping, calculate taxes for orders that include drop shipped items. |
|
DropShipAutoFaxTemplate |
Default template for drop-ship purchase orders sent by automated fax. Can be over-ridden by settings for individual Suppliers. |
|
DropShipAutoOrder |
If TRUE, drop-ship purchase orders will be created automatically as you import orders. POs will only be created for Approved orders, and only for items with Primary Suppliers. WARNING: THIS IS A POTENTIAL SECURITY PROBLEM, SINCE CUSTOMERS CAN PLACE ORDERS AND HAVE THEM DROP-SHIPPED TO THEM WITHOUT YOUR KNOWLEDGE. |
|
DropShipContact |
Name of person vendors should contact if there is a problem with a drop-ship order. |
|
DropShipEmail |
Email address to which drop-ship vendors should sent confirmations. |
|
DropShipEmailTemplate |
Default template for drop-ship purchase orders sent by email. Can be over-ridden by settings for individual Suppliers. |
|
DropShipMailTemplate |
Default template for drop-ship purchase orders sent by mail. Can be over-ridden by settings for individual Suppliers. |
|
DropShipManualFaxTemplate |
Default template for drop-ship purchase orders printed for manual faxing. Can be over-ridden by settings for individual Suppliers. |
|
DropShipPDFTemplate |
Name of report to use for emailing Drop Ship POs as PDF files. |
|
DropShipPhone |
Telephone number of person vendors should contact if there is a problem with a drop-ship order. |
|
DropShipPostProcessTracking |
Set to True (default) to have the system process tracking numbers after posting Drop-Ship Tracking information. Set to False to avoid the tracking number processing to save time during drop-ship tracking posting. |
|
DropShipPurchaseOrdersShowCost |
If True Drop Ship Purchase Orders will show the cost of the products. |
|
DropShipPurchaseOrdersTemplate |
Name of report to use for printing Drop Ship Purchase Orders report. |
|
DropShipReturnsToInventory |
If True, a drop-ship item will default to being returned to your in-house quantity on hand rather than being returned to the vendor. Default=False |
|
DropShipSetDate |
If TRUE, the program will assume that drop shipped items are shipped, and calculate the actual ship date automatically. If FALSE, the program will leave the ship date for drop shipped items blank, and fill them in when you set the Actual Shipped Date. |
|
DropShipShowAsShipped |
By default the Order Manager will mark drop-ships as "needed" rather than shipped if the DropShipSetDate is set to False. If the ApproveOrdersWithDropShips parameter is set to True, you will need to set this parameter to True to have Order Manager mark the drop ship items as "shipped" rather than "needed". This will allow Order Manager to approve the order because there will be something to ship and Order Manager will show a "balance due" for the sale (for use if you have the ChargeCardsAtImport parameter set to True). |
|
DropShipUsePOSystem |
Set this option to True to be able to manage your drop ship orders using the Purchase Order System. This will allow you to mark Drop-Ship POs as having been shipped and will also allow you to track invoices against the Drop-Ship POs |
|
GetDropShipCostFromSupplier |
If using FIFO Inventory Tracking, cost for a drop ship item is pulled from the FIFO inventory record(s). If you want the cost for a drop ship item to come directly from the supplier, set this parameter to True. |
|
ManualOrdersHighlightDropShips |
If True, the Product column on the Manual Orders screen will turn blue where items are set to drop ship. |
|
SkipDropShipsAtBuildSubSKUs |
Set to True to have the Order Manager not build SubSKUs for items marked as drop ship in the inventory. |
|
TrackImportSetDropShipsSent |
Set to True to have the Order Manager Set Quantity Shipped = Quantity Ordered and Quantity Needed = 0 for any Drop Ship items when tracking data is imported from a shipping program. If TrackImportSetActualShipDate is also True, the ActualShipDate for those line items will also be set to the "Pick Up Date" or current date in its absence. |
|
UseBatchDropShip |
Set to True to allow batch drop ships to be processed from the Maintenance Menu>Shipping & Fulfillment>Batch Drop Ship button. |
|
ViewDropShipEmails |
f TRUE, when you click one of the Order Drop Ship buttons (Selected Item, All from Selected Supplier or All), if the drop ship order is to be emailed, you will be able to preview and edit the email before sending it. |
|
ViewOrdersHighlightDropShips |
If True, the Product column on the View Orders screen will turn blue where items are set to drop ship. |
You can use the Multi Order Processor to create purchase orders for drop-ship items in the orders listed. Click the check boxes in the DS column. For more information about the Multi Order Processor, click here.
Figure 8
Go to Main Menu>Maintenance Menu>Shipping & Fulfillment>Batch Drop Ship.
A drop ship order is placed for ALL unordered drop-ship line items in approved orders.
Updated 3/5/10
Modified: 2/6/12
Go to Top