
Version 5.9
In this Topic: Show
The Change SKUs screen can be accessed via the Inventory & Suppliers tab of the Maintenance Menu. Its purpose is just as the name suggests - to allow the user to change the SKU of an existing inventory record to a different value. When making any mass changes, it is advisable to first backup the store data file.
The screen has three logical sections, the top, the left-hand pane and the right-hand pane. We'll discuss these in a logical sequence rather than by the physical sequence.
The pane in the right-hand side of the screen is where the SKUs that are eligible to be changed are listed. The top section and left-hand pane of the screen provide different methodologies for adding SKUs to the list of change candidates in the right-hand pane.
Method 1: Use the controls in the "Change SKUs that" section, at the top of the screen. The user can select a group of SKUs based on the beginning or ending characters that they have in common. When using this method, click the [Build List] button to add the matching records to the right-hand pane. Both columns of the right-hand pane will be populated with the existing and the future SKUs. It is possible to over-type the data in the New SKU field, if necessary.
Method 2: Locate and select a SKU to be changed via the Select SKU to Modify pane. Use the [Search] button or one of the SKU Starts With buttons to see a list of matching SKUs in the left-hand pane. Select the row of a single SKU in the left-hand pane and click the [Add to List] button to move to the SKU to the list in right-hand pane. The user must then type a value in the New SKU column when using this method.
Once a list of SKUs has been identified and the information in the New SKU column is complete, click the [Test SKUs] button to check for errors. For example, if a row in the New SKU field is left blank, it will cause an error.
After successfully testing the changes, click the [Make Changes] button to actually execute the changes.
![]() Click the Show
link next to "In This Topic"
at the top of this page to see a series of links in outline form,
which can be used to quickly jump to that section of the topic.
Click the Show
link next to "In This Topic"
at the top of this page to see a series of links in outline form,
which can be used to quickly jump to that section of the topic.
In addition, major topics may provide a brief synopsis of a field's purpose or direct the reader to the appropriate section of the topic by scrolling over the image. To return to the previous location within the same page, right-click the mouse and select [Back].
If clicking a field directs the reader to a different Knowledge Base topic, it will open in a new tab or window, leaving the currently viewed topic open. The browser's settings determine whether a new tab or window is opened.
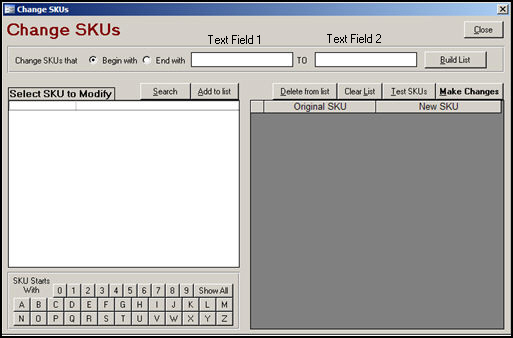
Figure 1: Change SKUs screen
click this button and enter a string of characters that the SKUs to be changed start with, in Text Field 1
mutually exclusive with the Ends with radio button
click this button and enter a string of characters, that the SKUs to be changed end with, in Text Field 1
this method can be used to add a group of SKUs to be changed at one time
mutually exclusive with the Begins with radio button
enter a string of characters that the SKUs to be changed either Begin with or End with
enter a string of characters that should replace the beginning or ending string entered in Text Field 1
after selecting the Begin with or End with radio button and entering values in the two text fields, click this button to see the list potential changes in the right-hand pane
this method is used to produce a list of SKUs to change simultaneously
click this button to open the Find a Product/Search Inventory screen, where the user may search for SKUs to add to the list of candidates to be changed; only one SKU can be added at a time to the list of records in the right-hand pane
when selected in this manner, the SKU will be added to the Select SKU to Modify section of the screen; any other SKUs that may have been present previously in this section of the screen will be removed
click the [Add to List] button to move it to the right-hand pane, where the SKUs to be changed are listed
select a SKU from the Select SKU to Modify pane and click this button to add it to the list of SKUs to be changed in the right-hand pane
use any of the buttons in this section to see a list of matching SKUs in the left-hand pane
click a letter to produce a list of SKUs that start with that letter in the Select SKU to Modify section, or click the [Show All] button to see all existing SKUs
click the [Add to List] button to move it to the right-hand pane, where the SKU can be changed
this section of the screen shows all of the SKUs that have been selected for change
depending on the method in which the SKU was added to this window, the New SKU column is pre-populated with the proposed changes, or the user must type in the appropriate change in the New SKU column
select a single SKU from the list and click this button to remove it from the list of SKUs to be changed
click this button to remove all of the SKUs to be changed from the right-hand pane
click this button to check the success or failure of the proposed changes to the SKUs in the right-hand pane
to execute the proposed changes,click this button
this column shows the current Stock Keeping Unit of a product that has been selected to be changed
this column reflects the proposed change in SKU for each product that is listed in the right-hand pane
click this button to exit from the Change SKUs screen
For this example we will change a group of SKUs that Begin with "123" to "abc":
Click the radio button labeled Begin with.
Enter "123" in Text Field 1. (The screen in the program does not actually have this field labeled as such.)
Enter "abc" in Text Field 2. (The screen in the program does not actually have this field labeled as such.)
Click the [Build List] button.
Review the proposed changes in the New SKU column of the right-hand pane.
Click the [Test SKUs] button to check for possible errors.
If the changes were tested successfully, click the [Make Changes] button to make the changes permanent. The program will prompt the user for confirmation once again before making the requested changes. Refer to Figures 3 and 4.

Figure 2: Example of selecting multiple SKUs to be changed
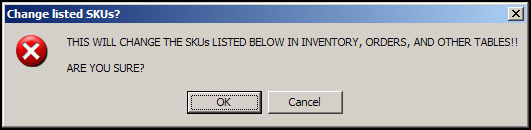
Figure 3: Confirmation prompt
Click [OK] to proceed with the changes, or [Cancel] to abort the change request.
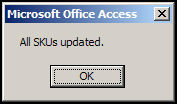
Figure 4: Acknowledge the changes
For this example, we will add another single SKU that does not meet the pattern in the previous example to the list of SKUs to be changed.
Click the [Search] button, which opens the Find a Product screen.
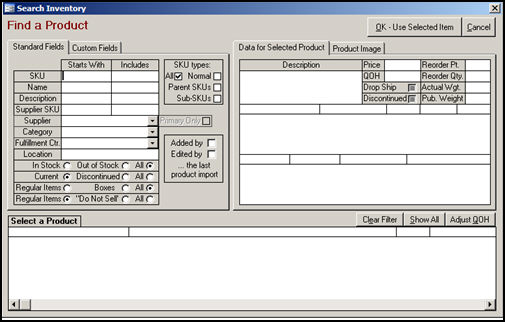
Figure 5: Example of selecting a single SKU to be changed with the Search button
Use any of the fields on this screen as criteria to locate the SKU in question. In this example, we are looking for a SKU that contains "book" as part of the SKU. The result is seen in the Select a Product section at the bottom of the page.
.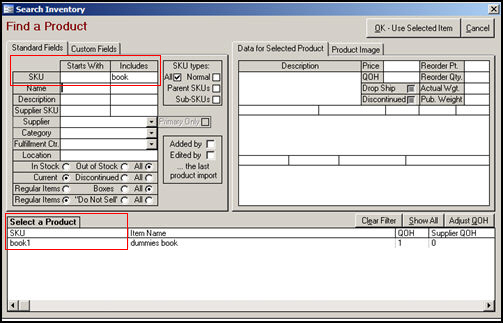
Figure 6: Searching for a single SKU with the Find a Product screen
Click on the SKU in the Select a Product section.
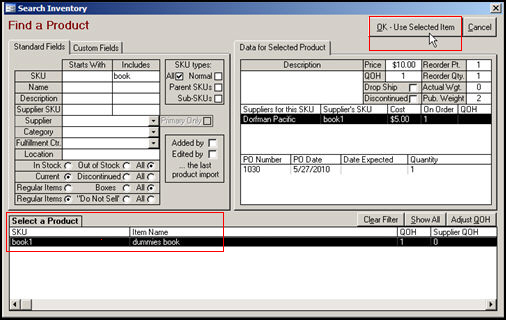
Figure 7: Select a single SKU to change on the Find a Product screen
Click the [OK - Use Selected Item] button.
The Change SKU screen appears with the SKU we selected in the Select SKU to Modify pane.
Click the [Add to list] button to move it to the list in the right-hand pane.
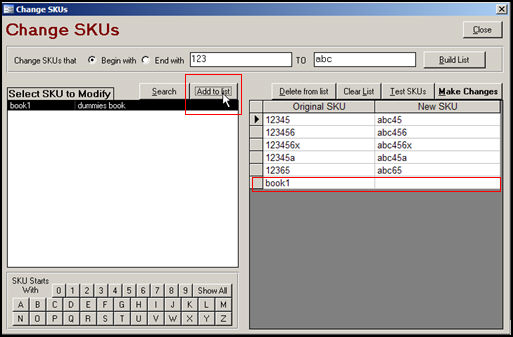
Figure 8: Selecting a single SKU from the Select a SKU to Modify section and adding it to the list in the right pane
Click the [Test Changes] button to check for possible errors.
Oops! We did not enter a value in the New SKU field and received an error. Let's correct that by typing "dummiesbook1" in the New SKU column.
If that is all of your changes, you would then click the [Make Changes] button; however, we are going to continue with another example of how to select a single SKU.
Let's assume that we also want to change the SKU of an inventory item that starts with the letter "b".
Click the button labeled "B" in the SKU Starts with section.
The Select SKU to Modify pane now contains a list of all SKUs that start with the letter "B".
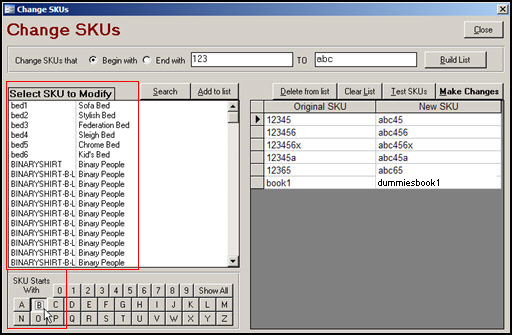
Figure 9: Example of selecting a single SKU to be changed with the SKU Starts With buttons
Select a SKU from the list and click the [Add to List] button move the right-hand pane.
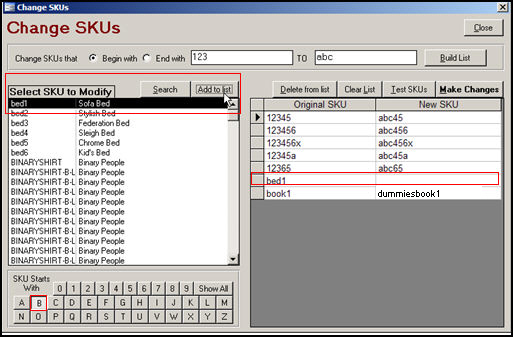
Figure 10: Add a single SKU to the right-hand pane
Enter the value "sofabed1" in the New SKU column for "bed1".
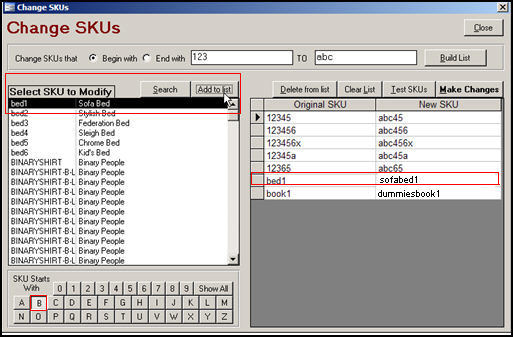
Figure 11: Type a value in the New SKU column for the Original SKU "bed1"
Click the [Test SKUs] button.
If there were no errors, click the [Make Changes] button to execute the changes to all of the records in the right-hand pane.
The program will prompt for confirmation before making the changes.

Figure 12: Program prompt for confirmation before making changes
Click the [OK] button to proceed.

Figure 13: Acknowledge the changes have been made
Click the [OK] button to acknowledge the completion of the process.
Created: 7/15/11
Updated: 7/27/11
Go to Top