
Version 5.9
In this Topic: Show
The Inventory screen contains several tabs along the lower half of the screen, one of which is the Attributes/Options tab. This article only contains information about the controls that are found on the Attributes/Options tab. For more information about the fields on the Inventory screen or one of its other tabs, please refer to the Related Topics at the end of this page.
The Attributes/Options tab is the location in the program where the information about the available product attributes are stored. This information can be manually entered or it can be populated by the Order Manager's XML Product Import function, if the shopping cart system supports that feature. Refer to the Shopping Cart Functions screen.
Each type of attribute has its options stored in an Option List. For instance, if the merchant sells T-shirts, the attributes size and color will most likely be used. In this example, this product will have two Option Lists, one containing all of the colors and the other containing all of the sizes in which the shirt is available.
To uniquely identify and track QOH for each possible combination of attribute options, the concept of "sub-SKUs" comes into play. A sub-SKU combines the SKU of a basic inventory product plus indicators representing each of the possible attributes of the product. Some shopping carts use this kind of logic at their Web sites and are able to pass that value to the Order Manager during an XML Product Export. If you are using a shopping cart that does not have that capability, the Order Manager can "build" a unique sub-SKU for each of your inventory items that has attributes. Refer to Knowledge Base topic, Sub-SKU Options for more information.
![]() Click the Show
link next to "In This Topic"
at the top of this page to see a series of links in outline form,
which can be used to quickly jump to that section of the topic.
Click the Show
link next to "In This Topic"
at the top of this page to see a series of links in outline form,
which can be used to quickly jump to that section of the topic.
In addition, major topics may provide a brief synopsis of a field's purpose or direct the reader to the appropriate section of the topic by scrolling over the image. To return to the previous location within the same page, right-click the mouse and select [Back].
If clicking a field directs the reader to a different Knowledge Base topic, it will open in a new tab or window, leaving the currently viewed topic open. The browser's settings determine whether a new tab or window is opened.
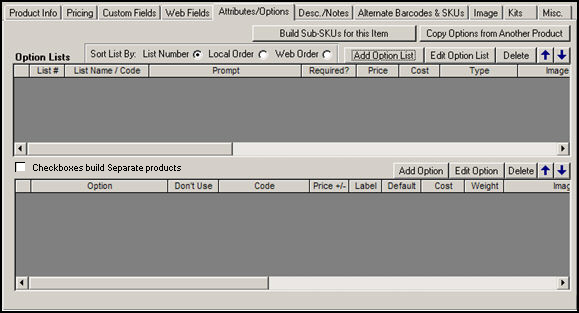
Figure 1: Attributes/Options tab of the Inventory screen
choose the order in which the Option Lists should be used when building sub-SKUs by clicking one of the Sort List By: radio buttons
click this button to build sub-SKUs only for the current inventory record
the program will prompt the user for confirmation before performing the action; click [OK] to proceed or [Cancel] to abort the action
to build sub-SKUs for all products at one time, go to the Inventory & Suppliers tab of the Maintenance Menu and select Build Sub SKUs, which opens the Sub SKU Options screen
choose the order in which the attributes, or Option Lists are used to build sub-SKUs by selecting one of the following radio buttons:
List Number - the number assigned to the list by Order Manager when it was created
Local Order - the order in which the Order Manager lists the attributes or Option Lists
if an XML Product Import is run and the shopping cart provides a sort order, the Order Manager will use that order locally
if the cart does not provide a sort order, the Order Manager will sort the attributes by alphabetically by Name and use it as the local sort order
if no Name field provided, the program will use the order in which the attributes appear in the XML as the local sort order
if Option Lists are manually added and ordered in the Order Manager, use caution when selecting the action the program should take regarding Option Lists when performing an XML Product import, as this data may be changed inadvertently
Web Order - the order in which attributes are listed at the Web store
this column displays the name or code that is assigned to a given attribute, or Option List
"Code" refers to a value passed by some shopping carts directly to the Order Manager during an XML Product Import that is appended to the sub-SKU to uniquely identify the product variant; only applies to shopping cart systems that use sub-SKU logic at their Web sites
this field only pertains to Miva Merchant shopping carts
Miva provides this field for the merchant to add a more descriptive, user-friendly "label" for a product which appears in the drop-down list at the cart, rather than using the less attractive SKU
making changes to this field in the Order Manager has no bearing on the value of this field at the Web site
if the user must choose an option from an Option List when placing an order, check the box in this column
in some cases an attribute has nothing to do with inventory tracking and therefore it would not be necessary to require the user to make a choice when placing an order; an example of this would be a product warranty
this field only applies to attributes (Option Lists) that have no options, and reflects the increase or decrease in cost of the product when this attribute is purchased
if options are subsequently added to this attribute or Option List, this field will not be used; the value specified in the Price field of the individual options in the lower grid will be used instead
an example of an attribute or Option List that has no individual options is when a service is provided, such as engraving; use this field to add an additional charge for that service
this field only applies to attributes (Option Lists) that have no options, and reflects the increase or decrease in cost of the product for this attribute
if options are subsequently added to this attribute or Option List, this field will not be used; the value specified in the Cost field of the individual options in the lower grid will be used instead
shows the kind of control that is used when displaying the options to the user at a Miva Merchant Web store only
the choices are:
Drop-List
Radio Button
Check Box
Text Field
Text Area
reflects the order in which the options are sorted locally (by Order Manager):
if an XML Product Import is run and the shopping cart provides a sort order, the Order Manager will use that order locally
if the cart does not provide a sort order, the Order Manager will sort the attributes by alphabetically by Name and use it as the local sort order
if no Name field provided, the program will use the order in which the attributes appear in the XML as the local sort order
if Option Lists are manually added and ordered in the Order Manager, use caution when selecting the action the program should take regarding Option Lists when performing an XML Product import, as this data may be changed inadvertently
scroll to the right of the screen to see this field in the upper grid
reflects the order in which the options are sorted at the Web site
scroll to the right of the screen to see this field in the upper grid
this field reflects the increase or decrease in weight of the product when a given option is selected
scroll to the right of the screen to see this field in the upper grid
this field is only applicable to Miva Merchant shopping carts and those merchants that employ Viking Coders Inventory Manager for variant inventory tracking; it is ignored in all other cases
if this box is checked, the option list will be used when sub-SKUs are built
scroll to the right of the screen to see this field in the upper grid
if this box is checked, the option will not be listed as a choice when ordering this product
for instance, if the supplier is temporarily out of green T-shirts, check this box and it will not be displayed as a choice when an order is placed for this shirt, however, all of the other colors in the Option List will be displayed
this field is only used in conjunction with certain shopping cart systems that use "sub-SKUs" logic at the Web site
the value in this field is a SKU modifier that is used in conjunction with the value of the WebOptionCodeDelimiter system parameter to pass sub-SKU information directly to the Order Manager during an XML Product Import (only)
this field shows the increase or decrease in the Price of the product when a particular option is chosen
this modifier is added to the base Price of the inventory item
this field is only used in conjunction with ShopSite shopping cart systems
the purpose of this field is to identify one of the product "options" as the "label" that appears by default in the option selection combo box, such as "Please select a color..."
it indicates that this "option" is not an actual option, but just a label to prompt the customer into making a selection from the list of options
check the box of one of the options in the Option List that is the default option, or the one that is initially selected
this field reflects the increase or decrease in the Cost of the product when a particular option is chosen
this modifier is added to the base Cost of the inventory item
this field reflects the increase or decrease in the Weight of the product when a particular option is chosen
this modifier is added to the base weight of the inventory item
this field is contains the path to an image file of the product at the Web site
scroll to the right of the screen to see this field in the lower grid
reflects the order in which the options are sorted locally (Order Manager):
if an XML Product Import is run and the shopping cart provides a sort order, the Order Manager will use that order locally
if the cart does not provide a sort order, the Order Manager will sort the attributes by alphabetically by Name and use it as the local sort order
if no Name field provided, the program will use the order in which the attributes appear in the XML as the local sort order
if Option Lists are manually added and ordered in the Order Manager, use caution when selecting the action the program should take regarding Option Lists when performing an XML Product import, as this data may be changed inadvertently
scroll to the right of the screen to see this field in the lower grid
reflects the order in which the options are displayed at the Web site
scroll to the right of the screen to see this field in the lower grid
this only applies to Miva Merchant shopping carts when Viking Coders Inventory Manager is used for variant product tracking
this field is only visible if system parameter UseVikingCodersInvMgr is set to TRUE
use these buttons to move the selected option up or down within the selected Option List
moving an option with these arrows does not impact the sub-SKU building sequence
Navigate to the desired inventory record.
Click the Attributes/Options tab.
Click the [Add Option List] button.
Enter a name for the Option List in the List Name field.
Optional: Choose the type of control that will be used to display the options in the list to the user when an order is being placed (Miva Merchant only):
Drop-list
Radio Buttons
Check Box
Text Field
Text Area
Optional: The Prompt field pertains only to a Miva Web store and entering or changing the value in this field has no affect on the Web site.
Optional: The Image Path field contains the path to the image of the product at the Web site.
Optional: If this Option List (attribute) does not have options associated with it, enter modifiers that should be added to the base Price, Cost or Weight fields of the inventory item when this attribute is purchased. These fields are set to zero by default, and will not be used if options are assigned to this attribute.
Optional: If it is necessary to choose an option from this list when ordering the product, check the box labeled Required.
Optional: If this Option List should be used by the Order Manager when building sub-SKUs, then check the box labeled Use when building Sub-SKUs.
Click the [Save] button.
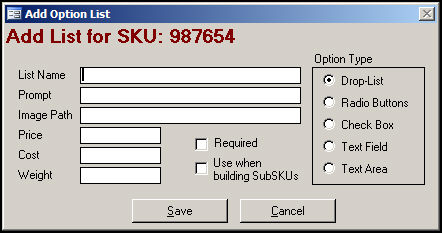
Figure 2: Add Option List screen
Navigate to the desired inventory record.
Click the Attributes/Options tab.
Select an Option List by clicking on its row in the upper grid.
Click the [Edit Option List] button.
Make the necessary changes to the data in this screen and click the [Save] button to retain the changes. Click the [Cancel] button to abandon the changes.
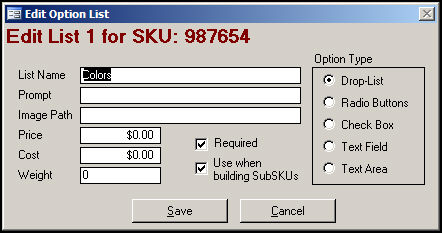
Figure 3: Edit Option List screen
Navigate to the desired inventory record.
Click the Attributes/Options tab.
Select an Option List by clicking on its row in the upper grid.
Click the [Delete] button.
The program will prompt the user for confirmation before deleting the Option List and all of its Options. Click [OK] to proceed.
Please be aware that any options added manually may be inadvertently changed, based on the Options Lists action chosen during an XML Product Import (if the shopping cart system supports that functionality).
Navigate to the desired inventory record.
Click the Attributes/Options tab.
Click on the Option List to which the option will be added.
Click the [Add Option] button.
Enter a name for the Option in the Name field. This is the only required field on this screen.
Optional:
If desired, enter informational data in the Code, Prompt and Image Path fields; the Code and Prompt fields are only used by some shopping cart systems and the Image Path field refers to an image at the Web site
If the price or cost of the product changes depending on the option that is selected, enter the modifier in the Price +/- or Cost +/- fields; for instance if an XXL T-shirt costs $2.00 more than T-shirts S-XL, enter $2.00 in the Cost +/- field for the XXL option
Is a Label - this field only applies to some shopping cart systems that allow the merchant to utilize alternative text to list a product at the Web site rather than using the less friendly SKU
Default - check this box if this option should be the option initially selected in the display presented to the user when the product is purchased
If an option should not be included in the choices presented to the user when the product is purchased, check the box labeled Don't Use
Click the [OK] button.

Figure 4: Add Option screen
Navigate to the desired inventory record.
Click the Attributes/Options tab.
Select an Option by clicking on its row in the lower grid.
Click the [Edit Option] button.
Make the necessary changes to the data in this screen and click the [OK] button to retain the changes. Click the [Cancel] button to abandon the changes.
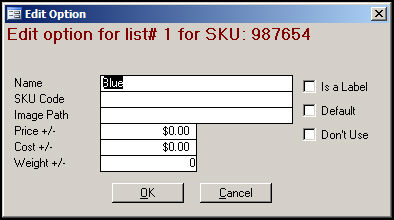
Figure 5: Edit Option screen
Navigate to the desired inventory record.
Click the Attributes/Options tab.
Select an Option by clicking on its row in the lower grid.
Click the [Delete] button.
The program will prompt the user for confirmation prior to deleting the selected option. Click [OK] to proceed.
![]()
Created: 7/13/12
Go to Top