Contents of this Topic: Show
Order information is imported directly from the website
Product records can be imported directly from the website if only one warehouse is defined
Product variants are natively supported starting in MM V5.5, or you can use a third-party module, such as Viking Coders Inventory Manager if you need to use Stone Edge parameters WebOptionsCodeDelimiter or WebOptionsProductDelimiter
Customer records can be imported directly from the website
Custom order fields can be imported from the website using a third-party module
Manual Inventory Synchronization is supported from Stone Edge to Miva (Push/Send)
Real-time Inventory Synchronization is supported at the sub-SKU level starting in MM V5.5 (requires integration script v3.518 or higher), or with other third-party modules, such as Viking Coders Inventory Manager.
Order Status Updates are supported without a third-party module starting with MM V5.5 PR7, and a minimum version of 3.419 of the Stone Edge integration script for Miva Merchant. The native Miva Order Status System is really a line item status system as Stone Edge is not able to directly set the status of an order, just line items. Viking Coders Order Status Manager is still supported.
While you now have the option of choosing native Miva Merchant support for Order Status Updates, our integration script is not designed to support both native Miva support and a third-party module simultaneously. If you have a third-party module installed and the appropriate Stone Edge system parameters are set, the integration script favors the third-party module over the native Miva Order Status System.
Go to the Stone Edge Software Download Gateway page (www.stoneedge.net/dlgateway). Refer to the email you received from Monsoon Commerce when you purchased Stone Edge for the required username and password.
Go to the category Other Downloads, locate the Miva Export Module (integration script) for your store version and select the corresponding Download button.
In the File Download window, select Save.
Choose to save the file your Desktop or other location where you can easily find the module. When the download is complete, select Open.
Select Extract all files and go through the Extraction Wizard.
A new window opens showing the unzipped file (folder). Make note of the location of the Miva Export Module because you will need it in the next section.
Log into your Miva Administration page.
In the left menu, expand Global Settings.
Next to Modules, select Add.
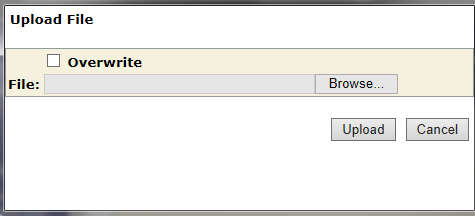
Select the Upload button to the right of the Module text field.
Select Browse and navigate to the extracted Miva Export Module on located your computer.
Select the Export Module file (omxmlexp.mvc or omxmlexp.mv) and select Open.
In the Miva Upload File window:
If you are installing the export module for the first time, select Upload.
If you are upgrading the export module, select Overwrite and then Upload.
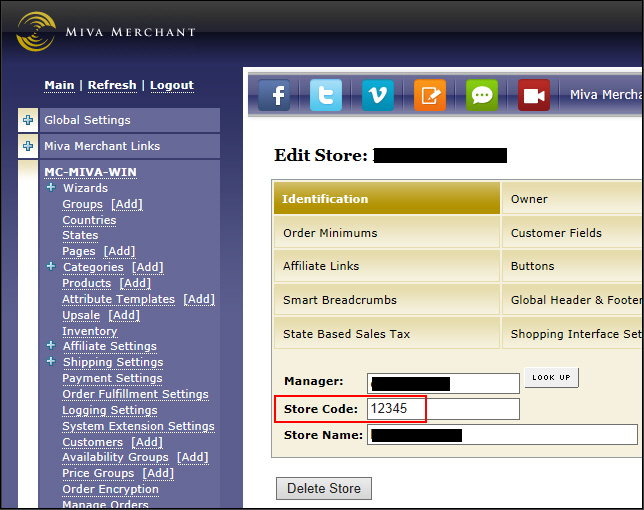
Enter your Store Code. Note: Find the store code in Miva Merchant by going to the Administration screen, and selecting Store Settings.
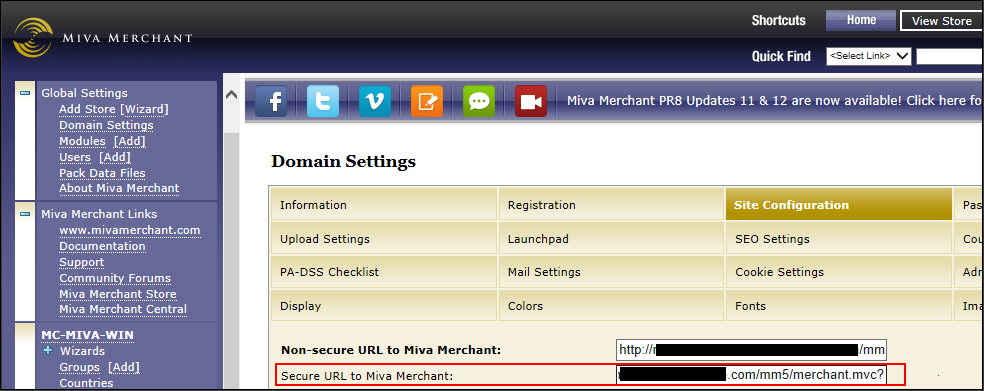
Enter the Secure URL to Miva Merchant in Script URL field. This value can be found in the Miva Admin page (Miva Admin>Global Settings>Domain Settings>Site Configuration).
Select Save to create the shopping cart definition.
Select Test Script URL to validate the path to the script. This button is not visible until the shopping cart definition is initially saved. If successful, the program pops a message box stating "Test passed" and the script version. This test does not validate the User Name and Password credentials, merely the accessibility of the script.
The shopping cart definition is complete! Continue with other configuration tasks listed below, if they are supported by your shopping cart system.
Note: Product records can only be imported from the website if a single warehouse is defined in Stone Edge and should only be done once when initially setting up the system.
Go to Main Menu>Settings>System Functions>Shopping Carts.
Select the appropriate shopping cart definition from the list.
Click Import & Update Data in the Additional Functions section of the screen to open the Shopping Cart Functions screen.
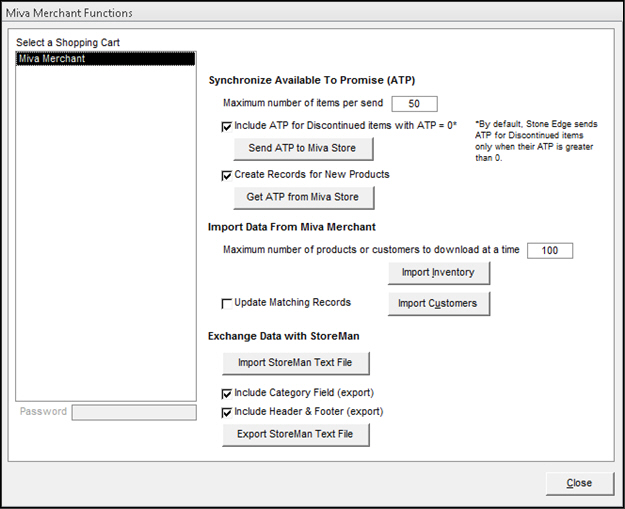
Select Import Inventory.
The program asks for confirmation that you want to import all products from the shopping cart.
Select OK.
The subsequent screen allows you to refine the product record import process. The choices available depend on the shopping cart system.
Choose whether to Start by deleting all existing Inventory? or to retain existing product data.
If existing product data is not deleted, choose whether to replace all existing data with data from the shopping cart, just selected fields, or do not change any existing data. The last choice basically means that only data for product records which do not presently exist in the store data file are imported.
Select OK.
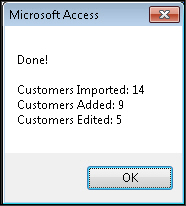
When the product import is complete, the program displays a summary of the results.
Select OK.
Select Close to exit the Shopping Cart Functions screen.
Customer records can be imported from the shopping cart. Customer records are also created as orders are imported if the program does not find a matching customer record in the store data file. Refer to Matching Customer Records to Existing Customers, for more information about that process.
Custom order fields can be imported using a third-party module which can be purchased through Miva.
Custom order fields let you collect supplemental responses (required or non-required) from your customers during checkout.
Consult the documentation provided with the add-on module and install it in your Miva store
For more information about setting up custom order fields in Stone Edge, review the Knowledge Base topic, Configuring Custom Fields.
If you are using a third-party module and plan to chose Custom Fields as the value for parameter AddendumDestination, create the appropriate custom order fields for the appropriate data types in Stone Edge.
.
Go to Main Menu>Settings>System Functions>Set System Parameters.
Select the Miva parameter group.
In Parameters in Selected Group, select the appropriate parameter for your module:
For William Weiland's Addendum* module, set the UseAddendumModule parameter to TRUE, and then select Save.
For either Sebenza Studios Additional Checkout Data modules, set UseSebenzaAddlDataModule to TRUE, and then select Save.
For Viking Coders Order Instructions module, set UseVikingCoderCheckout to TRUE, and then select Save.
The parameter AddendumDestination applies to all of the supported add-on modules. Make your selection for the location where Stone Edge stores the custom data from Select or enter your choice:
Comments - places all data fields imported from the module into the Comments field in Stone Edge.
Order Instructions - places all data fields imported from the module into the Order Instructions field in Stone Edge.
Custom Fields - allows you to direct each field imported from Miva into a separate destination field in Stone Edge. Map the field number of each imported field to the corresponding DestForAddendField1-10 parameters. (Supports maximum of 10 data fields). Be sure the data type of the custom field created in Stone Edge matches the data type of the incoming data. For example: If you select a custom date field but the incoming data is not recognized as a date by Stone Edge (like "February Fifteenth"), the data is disregarded.
Example1: If you gather data in field 4 of the third-party module and you want to store this data in the Gift Message field of Stone Edge, set DestForAddendField4 parameter = Gift Message.
Example2: When storing the data in a custom order field, select the corresponding custom field label in the corresponding fields DestForAddendField1-10. For example, If you defined a single custom date field through Main Menu>Settings>Data Functions>Configure Custom fields, the field name or label is stored in parameter CustomDateField1. Select CustomDate1 in DestForAddendField1, which maps to the value in parameter CustomDateField1.
*The default installation of this module stores the Miva order number, last name of the billing party and the zipcode of the billing party in fields 1-3, respectively. Data in addition to these fields is stored in Fields 4-10.
Go to Main Menu>Import My Orders>Import My New Orders.
Choose the appropriate shopping cart definition from Select Shopping Cart.
Select Import via Internet.
If this is the first time you are importing orders from this cart, you are asked if any of the orders have already been shipped. If so, you specify the cut-off date. Refer to Knowledge Base topic, First Import, for general instructions.
If this is not the first time you are importing orders from this cart, select an existing batch or create a new batch of orders to import.
Refer to Knowledge Base topic Import Orders, for general instructions.
This feature is supported. Refer to Knowledge Base topics, Status Events, and Status Updates Feature: Basic Requirements, for more information about configuring Stone Edge to send order status updates to shopping carts.
Set main system parameter UseStatusUpdates to TRUE.
If you are using Viking Coders Order Status Manager, set cart-based system parameter UseVikingCodersOrderStatusMgr = TRUE.
Define any status labels through the List Maintenance feature. If you are using Viking Coders Order Status Manager, the status labels do not need to match exactly. If new labels are created in Stone Edge, they are automatically added to the Viking Coder's module.
If this is the first shopping cart you are setting up, load the default list of Status Events, otherwise, skip this step.
Choose the status event which triggers the sending of updates to the cart, and select Notify Cart.
Ensure that the Local or Shared Stack is up and running.
While the Miva status labels listed below do not need to exactly match those in Stone Edge, the labels used in Stone Edge must contain a portion of these values for the integration script to pass the information correctly to Miva.
Cancelled
Backordered
Pending
Picking
RMA Issued
Returned
Shipped
Although Miva allows the use of the label "Picking" for shipped items, Stone Edge does not. All line items that are associated with a tracking number are assigned the status label of "Shipped" by the integration script.
Be advised that the line item status labels Backordered, RMA Issued and Return are exactly that, purely labels. The information passed by the integration script does not tie-in to those functional areas of the shopping cart system. It simply assigns a status label to a line item of an order.
If a new line item is added to an order after it is imported from Miva, Stone Edge is not able to add the new line item to the order at Miva Merchant. The integration script only updates the status information of items present when the order is originally created at the shopping cart.
If tracking information is present, the integration script assumes the line item is shipped regardless of the status label assigned in Stone Edge, and creates a "Shipment" record for each tracking number at Miva and attempts to assign line items to those "Shipment" records based on the tracking number/line item associations established in Stone Edge. The integration script sets the line item status to "Shipped" for any items which have a tracking number. Each time status information is sent to Miva, the integration script first removes all shipment information from the order, evaluates the tracking data being sent and then builds new shipment records to reflect the current status of the order's line items. The name of the shipping carrier and date the item was shipped is also be included in the status update sent to Miva.
If a line item is split across multiple shipments, the integration script attempts to split the line item at Miva to indicate the appropriate quantity of the item per shipment. If the split shipment is deleted in Stone Edge, the export module does not merge the split line items back together, they remain split at Miva. However, if the line item is altered in Stone Edge to reflect a single shipment, the integration script flags the two splits at Miva with the same shipment information. For example, If 100 widgets are sold but only 50 are shipped, the line item at Miva is split into two line items of 50 widgets each. When the initial shipment of 50 is removed from Stone Edge and a new shipment for 100 is created, the two records for 50 units at Miva are flagged as belonging to the same shipment of 100.
As line item status updates are received by Miva, the web site evaluates the affected orders and determines the appropriate status label to assign to the orders. Presumably, once all line items in an order are associated with a "Shipment" record, the order would be marked as "Shipped". Contact Miva Merchant if you need more information about their internal processes.
Set system parameter SynchQOH to TRUE.
Take a physical inventory and update the ATP of all products in Stone Edge or the web store if only one warehouse is defined.
Go to Main Menu>Settings>System Functions>Shopping Carts.
Select the appropriate shopping cart definition from Carts List.
Select Import & Update Data under Additional Functions.
Select Send ATP to Miva Store if more than one warehouse is defined. Go to step 12.
If only one warehouse is defined, you can import ATP (QOH) from your web site by selecting Get ATP from Miva. Optionally, select Create Records for New Products.
You are asked to confirm you want to import all ATP figures from the shopping cart.
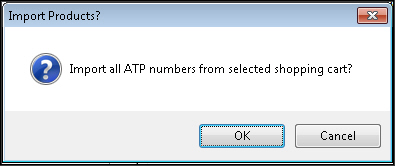
Select OK.
A summary of the import is displayed.
Select OK.
Select Edit.
Select Synchronize Inventory.
Select Save.
Shopping Cart Functions Screen
Matching New Records to Existing Customers
Status Updates Feature: Basic Requirements
Created: 1/12/15
Revised:
Published: 09/08/2015