
Version 5.9
In this Topic: Show
The purpose of this topic is to depict several different work flow scenarios when using the Order Manager to process orders. Each of the examples provided in this topic represent common usage patterns of our customers, but they are by no means the only ways in which the Order Manager can be used.
There are more than 2,000 merchants using the Stone Edge Order Manager software to import and/or enter, process, pack, ship, and track orders. The program is extremely flexible in allowing user to formulate the manner in which it will operate to best serve their business needs, making it impractical to document every conceivable method.
It is best to start out with the least complicated work flow and as you become more familiar with the program and its advanced features, gradually incorporate those functions which will streamline your unique order management processes. We encourage our customers to utilize the Stone Edge Technologies Knowledge Base and User Guide for self-help solutions or purchase an Express Setup Service or training time with a support technician to learn more about the program's advanced functionality that can further automate your business. Contact the Stone Edge Sales department by sending an email to sales@stoneedge.com or by phone at 877-786-6393.
The examples below assume that the basic Order Manager installation and setup tasks have already been performed. The functionality that is demonstrated is also dependent on the capabilities of the shopping cart that is being used. In other words, not all shopping carts are created equally; refer to the Shopping Cart Matrix to determine what functions can be performed by the shopping carts that have been officially integrated with the Order Manager. Shopping carts which do not have official integration written by Stone Edge Technologies or the shopping cart vendor may still be used if a Generic Shopping Cart license is purchased from Stone Edge Technologies. In this situation, the user is responsible for the creation and installation of integrations scripts that may be needed to perform advanced features with the Order Manager, other than importing order information from a text file.
This merchant has an e-commerce business with a volume of fewer than 50 orders per day. At the start of the day or at varying intervals throughout the day, he prefers to manually review and process each order that was imported from his shopping cart, as well as orders that were manually entered into the Order Manager.
Here are the steps he follows:
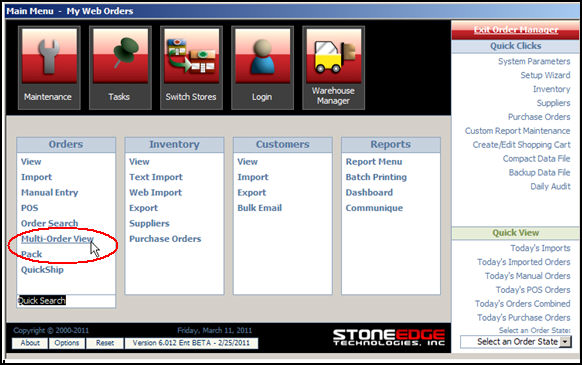
The merchant clicks the [Import] link in the Orders section of the Main Menu.
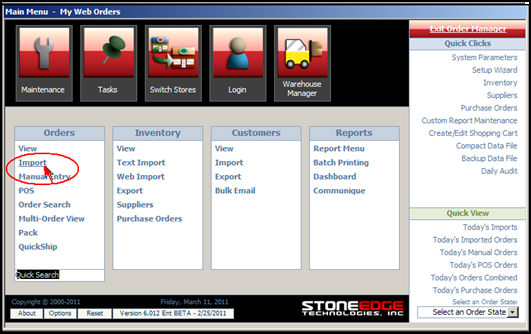
Figure 1: Main Menu - Import Orders link
He imports the new orders from his shopping cart into the Order Manager by clicking the [Import via Internet] or [Import From Text] buttons, depending on the capability of the shopping cart. Figure 2 shows that the merchant's Able Commerce shopping cart definition is presently selected, as indicated by the peach background. The merchant can choose one of any of the shopping cart definitions in the list from which to import orders.
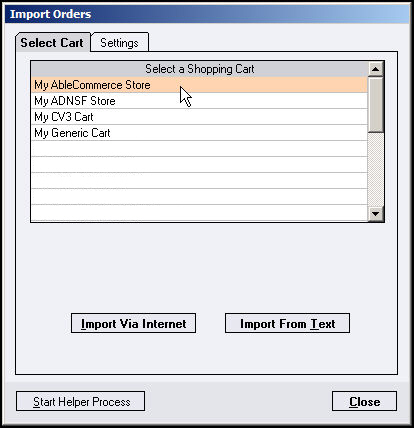
Figure 2: Import Orders screen - Select Cart tab
After the import process has been completed, he opens the Orders screen, using the Orders from Last Import Quick Filter to show only the most recently imported orders.
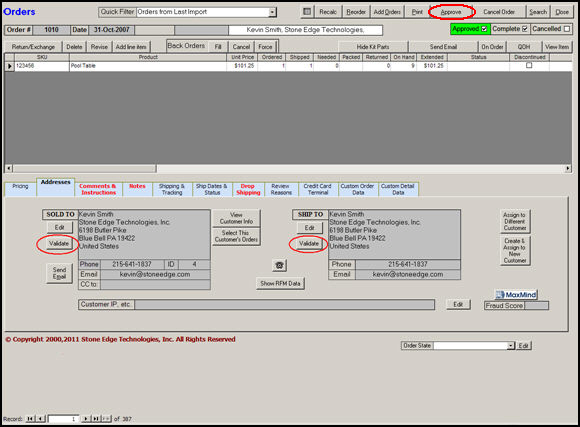
Figure 3: Import Orders screen - Addresses tab
While at the Orders screen, he does the following tasks for each newly imported order:
Selects the Addresses tab to validate the customer's address to cut down on fraud. Refer to Figure 3.
Selects the Comments and Instructions tab to check for any Ordering Instructions, Comments, Gift Messages, or Notes.
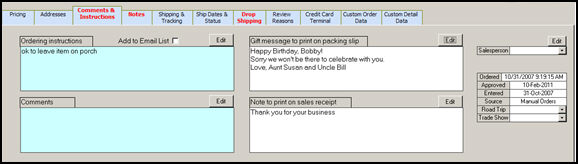
Figure 4: Import Orders screen - Comments & Instructions tab
If there are drop-ship items on the order, he selects the Drop Shipping tab to send a drop-ship purchase order to the supplier.
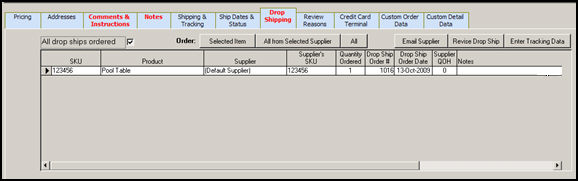
Figure 5: Import Orders screen - Drop Shipping tab
Selects the Credit Card Terminal tab and authorizes and/or captures payment for the order by using the Payment Terminal screen.
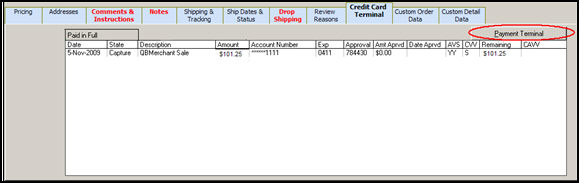
Figure 6: Import Orders screen - Credit Card Terminal tab
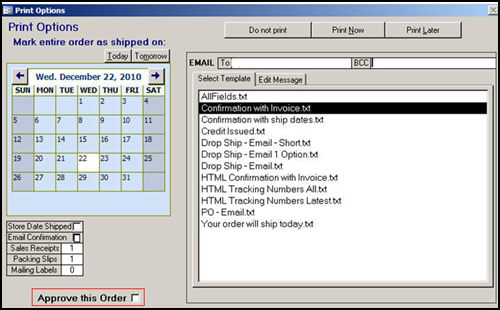
He begins the approval process by clicking the [Approve] button. Refer to Figure 3. This opens the Print Options screen, where he checks the box labeled [Approve this Order] at the bottom of the screen, and may also choose to send an email confirmation to the customer. He prints the paperwork for the order (sales receipts and packing slips, one copy each) by clicking the [Print Now] button, which returns him to the Orders screen.
Next he repeats this process with the remaining orders that were just imported. When he has reviewed, captured payment for, and approved all of the imported orders that he is able to fill, he is ready to pack the orders. He closes the Orders screen and opens the Pack & Ship screen, where he selects his name from the Packer drop-down list.
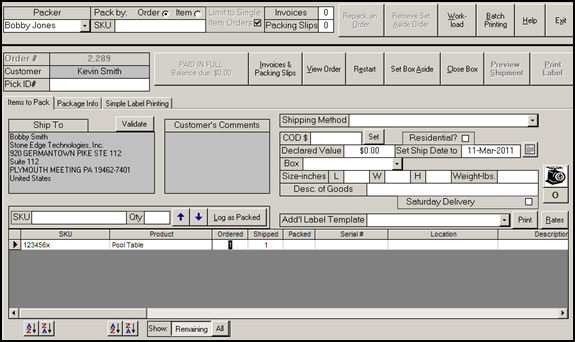
The merchant has configured a barcode scanner to work with the Order Manager, so he scans the barcode on one of the packing slips. If he didn't have a barcode scanner, he would type the order number into the Order # field.
He then scans the barcode of each item as he packs it. Or, if he has no scanner configured, as he packs an item, he double-clicks the line item record in the Pack & Ship screen, and then clicks the [Log as Packed] button.
He selects "Ground" (which has been previously defined as a UPS shipping method in the Order Manager) from the Shipping Method drop-down menu. The [Print Label] and [Preview Shipment] buttons will then become active.
The merchant uses the Order Manager's integrated UPS Online Tools shipping software, so he can print the UPS shipping label without leaving the program. He simply clicks the [Print Label] button. Use the [Preview Shipment] button to review and change any of the settings before the label is printed.
The tracking information from UPS is immediately stored in the Order Manager's order record, which can be seen at the Shipping & Tracking tab of the Orders screen.
The Pack & Ship screen will then reset, ready for the next order number to be scanned or entered.
After he finishes packing all the approved orders, they are ready for the daily UPS pickup service.
This husband and wife team run an e-commerce business with a volume of 50 to 100 orders a day. They expedite their order processing by utilizing the Multi-Order Processor and Batch Printing features.
Here are the steps they follow to process their orders:
They click the [Import] link in the Orders section of the Main Menu.
Figure 9: Main Menu - Import Orders link
Orders are imported from their shopping cart into the Order Manager by clicking the [Import via Internet] or [Import From Text] buttons, depending on the capability of the shopping cart. Figure 9 shows that the merchant's Able Commerce shopping cart definition is presently selected, as indicated by the peach background. The merchant can choose one of any of the shopping cart definitions in the list from which to import orders.
Figure 10: Import Orders screen - Select Cart tab
After the import process has been completed, the Multi-Order Processor screen is opened from the Main Menu.
 .
.
Figure 11: Main Menu - opening the Multi-Order Processor
They select the Orders from Last Import Quick Filter to show only the most recently imported orders.
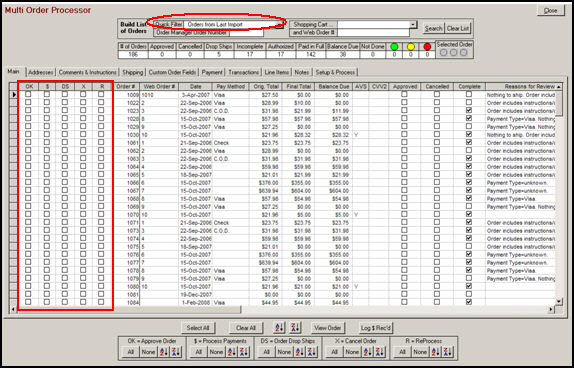
Figure 12: Multi-Order Processor screen - Orders from Last Import Quick Filter
From the Multi Order Processor screen, they process the orders in a batch. Each row in the data sheet represents a single order. By clicking in the OK, $, DS, and X check boxes on the left side of the screen for as many orders as they would like, they can approve, process payment transactions, place drop ship orders with the supplier, or cancel the selected group of orders. Refer to Figure 12.
To check for any ordering instructions, comments, gift messages, or notes, they click the Comments & Instructions tab.
Note: The couple has the Order Manager set up to validate order addresses during import, so they don't need to perform that task manually. Set system parameter, VerifyAddressesAtImport equal to TRUE.
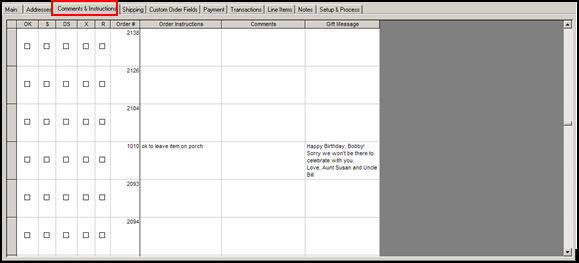
Figure 13: Multi-Order Processor screen - Comments and Instructions tab
When they have reviewed all the orders, they click the Setup & Process tab. At this screen they select from a variety of options, such as which credit card mode to use when processing payment transactions, or the number of invoices, packing slips, or mailing labels to add to the batch print queue for each of the orders in the selected batch. When they have made all their selections, they click the [Process Orders] button to start the batch processing cycle and to send confirmation emails to the customers.
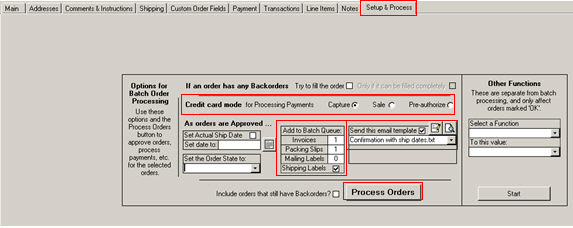
Figure 14: Multi-Order Processor screen - Setup & Process tab
When the batch processing cycle has been completed, they close the Multi Order Processor and open the Batch Printing screen. They print the packing slips and invoices for all of the orders that were just approved and processed by clicking the buttons with the same label, shown in Figure 16.
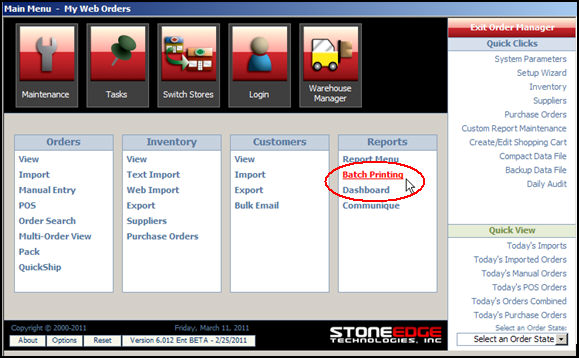
Figure 15: Main Menu - opening the Batch Printing screen

Figure 16: Batch Printing screen
The couple has used FedEx shipping software to pack and ship orders since they opened their business, and opted to continue using it when they began using the Order Manager. Therefore, there are no shipping labels to print in the Batch Printing Queue. With packing slips and invoices in hand, they open their external FedEx Ship Manager shipping software, pack the orders, select the shipping details, and print shipping labels. The program also works with other external shipping software, such as UPS WorldShip, ShipRush, or any other program that use an ODBC connection to the Order Manager's store data file. Refer to the Knowledge Base book entitled, Shipping and Packing, to find topics that discuss those options.
Note: An external shipping software package is not a requirement, as The Order Manager has integrated UPS, FedEx and USPS (via Endicia's DAZzle) shipping software to print those carriers shipping labels directly from the program.
After they print the shipping labels from the Fed-Ex shipping software, tracking information is written back to the specific order records in the Order Manager's store data file.
Returning to the Order Manager, they go to the Maintenance Menu > Shipping and Fulfillment tab and click the [Process Tracking Numbers] button. This will email tracking information to the customers and send order status information to their web store.
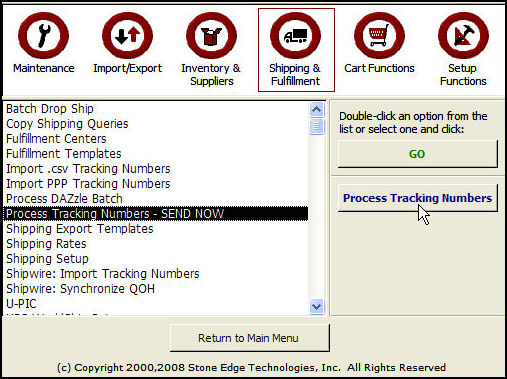
Figure 17: Shipping & Fulfillment tab of the Maintenance Menu - tracking information is available to send
Finally, they return to the Orders screen to review and manually process any orders that might have failed in the batch processing cycle. (e.g., a declined credit card). See User Scenario 1 for the steps involved in manually processing orders individually.
After all the orders are packed and shipping labeled are affixed, they are ready to be picked up by the carrier.
This larger-scale e-commerce business processes one hundred or more orders per day. The company utilizes the Order Manager program efficiencies and automates its order processing.
Here are the steps they follow to process their orders:
A front office employee clicks the [Import] link in the Orders section of the Main Menu.
Figure 18: Main Menu - Import Orders link
Orders are imported from one of their shopping carts at a time by selecting a cart from the list and clicking the [Import via Internet] button. Figure 19 shows that the Able Commerce shopping cart definition is presently selected, as indicated by the peach background.
Note: Although new orders can be imported into the Order Manager either via the Internet or from a text file, to achieve complete automation of the order approval process, a shopping cart that allows the direct import of order information via the Internet is required.
Figure 19: Import Orders screen - Select Cart tab
This business has configured the Order Manager to validate addresses, capture/authorize credit card payments, approve orders that are paid in full and print pick lists as the orders are imported. Packing slips and Invoices (Sales Receipts) can be automatically sent to the Batch Printing queue on import, but manual intervention is required to send them to a printer. This merchant has also created Approval Rules which can automatically approve orders based on other specified criteria, change shipping methods based on weight or destination, etc., or cancel orders that are deemed fraudulent. Any orders which fail the "auto-approval" process, for reasons such as a bad address or declined credit card, will be manually reviewed at the Orders screen.
Note: New orders can be imported into the Order Manager either via Internet or from a text file, depending on the capability of the shopping cart. However to achieve full automation of the order approval process, as detailed in Step 3., a shopping cart that permits orders to be imported directly via the Internet is required.
Once the import is complete, the employee opens the Batch Printing screen to print the paperwork for all of the orders from the last import as a group. The [Sales Receipts], [Packing Slips] and [Shipping Labels] buttons are clicked, sending those items to the default printer. This paperwork is also given to the warehouse staff to be included with the order when it is packed. Pick Lists for auto-approved orders have already been sent to a printer in a warehouse location where the pickers can begin to gather the inventory items necessary to fulfill the orders.
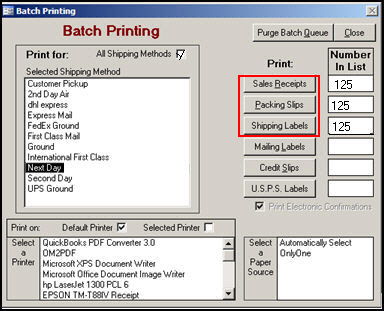
Figure 20: Batch Printing screen
At shipping workstations, employees pack the appropriate items into boxes and use the Quick Ship screen to weigh the shipments and print shipping labels via any of the integrated shipping software solutions (UPS Online Tools, FedEx Ship Manager or Endicia's DAZzle for USPS).
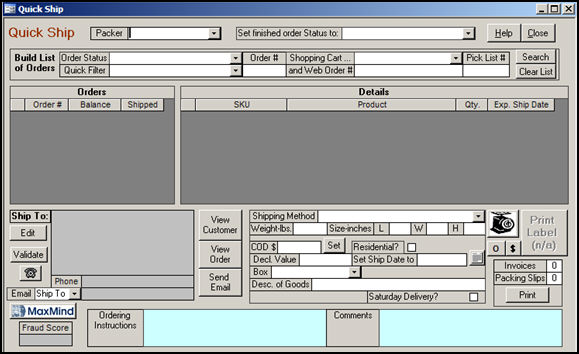
Figure 21: Quick Ship Packing screen
While the packers are processing the "auto-approved" orders, the front office employee opens the Orders screen and filters for any orders which failed the auto-approval process. The employee can filter for these orders in a number of ways using the Quick Filter drop-down list or [Search] button (Search for Orders screen).
To determine why an order failed the auto-approval process, the front office employee clicks the Review Reasons tab and looks at the information provided there. If possible, he resolves the issue. For example, if it were a bad address or credit card, he contacts the customer to obtain the correct address or a different credit card number.
Note: See User Scenario 1, for more information about manually reviewing and approving an order.
Once each order is reviewed, validated, and approved, he returns to the Batch Printing screen and prints the paperwork, which is delivered to the warehouse staff so the orders can be packed and shipped.
When the boxes have been sealed and the shipping labels have been affixed, the orders are ready to be picked up by the shipping carrier.
![]()
Created: 3/11/11
Go to Top