![]()
Version 7.5
![]()
Version 7.5
Contents of this Topic: Show
The Fulfillment Templates screen is called by the Export Template button of the Fulfillment Center screen. It is used to control the layout of the data exported to a text file which is sent to an outside company, or Fulfillment Center, that picks the merchant's inventory and ships the orders to their customers.
Fulfillment Templates are associated with a Fulfillment Center defined within the program.
Fulfillment Templates can be inserted into other Fulfillment Templates to provide header information in the text file.
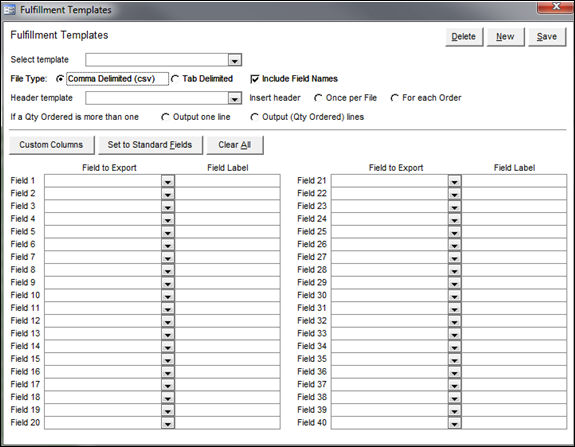
Fulfillment Templates screen
choose an existing template from this list to see its properties and field layout on the screen
click this button to remove the currently viewed template from the system; use this button with caution as this action cannot be reversed
click this button to define a new fulfillment export template
after entering information for a new template or making changes to an existing template, click this button to retain those additions or changes
to abandon any changes made at this screen before the Save button is clicked, use the red X in the upper right-hand corner which closes the screen
select this button to create a .csv text file
select this button to create a tab delimited text file
check this box to include field names as the column headings in the text file
select a template from the drop-down list to use it as a header template for the currently viewed fulfillment template
this drop-down list contains the same list of templates displayed in the Select Template drop-down list
it is not possible to select the currently viewed template as its header template
use as many of the forty drop-down fields (1 - 40) to map the SEOM fields to those in the text file
the sequence in which the fields are mapped is the sequence in which the fields will appear in the text file
click this button to read directions about creating a custom column in the text file
choose the Custom Column selection in any of the Field 1 - 40 drop-down lists
optionally, add a Field Label value to describe the purpose of that field, and optionally, a constant value to be entered into each record in the text file
this button populates the drop-down lists with the most commonly used fields
the user may manually change these mapping to suit their needs
click this button to erase all of the selections made on this screen
Go to Main Menu>Settings>Shipping Functions>Fulfillment>Export Templates button.
To create a new template, click the New button.
Enter a name for the new template when prompted by the program and click OK.
Select the appropriate radio button to indicate which type of text file is created, comma or tab delimited.
To have the field names appear as the column headers in the text file, check the box labeled Include Field Names.
If a header template should be included in the file, select it from the drop-down list and then indicate whether to insert the header once per file or once for each line item.
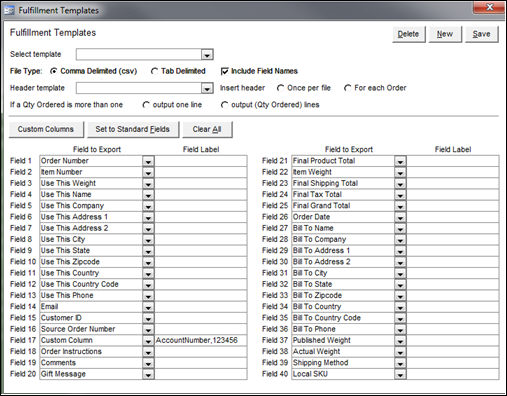
Click the Set to Standard Fields button to populate Fields 1-40 with the most commonly used fields. The user can change these selections or add custom columns if they wish.
To have a different value than the SEOM field name appear as the column header, enter the desired value in the Field Label column of the appropriate field.
Click Save button to retain the layout and properties of the new template.
The template can now be assigned to a fulfillment center.
Choose the fulfillment template from the Select Template drop-down list at the top of the screen to have its properties and field layout displayed.
Make any necessary changes to the template and click the Save button.
Select one of the forty fields and choose Custom Column from the drop-down list.
To add a value as the column header for this field, type it into the Field Label column of the appropriate row on the Fulfillment Template screen.
To add a constant value in this column for each record in the text file, enter that value after the Field Label, separating the values with a comma.
For example, in the following image, the output text file will include a custom column labeled "AccountNumber" that contains the value "123456" in each row of the text file. Refer to Field 17.
It may be necessary for the merchant to provide their account information at the top of each text file that is sent to them. Creating a header template is an ideal way to provide that data.
Go to the Main Menu > Setting > Shipping Functions > Fulfillment>Export Templates.
To create a new template, click New and enter a name for the template when prompted by the program.
The type of file to which the data is exported is controlled by fulfilment center template, not by the header template, so there is no need to change the default selection here.
If the first line of the text file should include the Field Names or Field Labels of the header template in the text file, check the Include Field Names box. When using Custom Columns to insert a row of static data, it is not necessary to include the Field Names or Field Labels in order to have the static data inserted into the file.
The frequency in which the program inserts the header template data into the text file is controlled by the fulfillment template, regardless of the radio button that is selected in the header template.
Map as many of fields as necessary to Custom Column in the Field to Export drop-down list to produce the desired row of header information. For example, map Field 1 to Custom Column. In the Field Label field, enter a label for the custom column, followed by a comma and the static value that should appear in that column. There should not be any spaces in the Field Label or static value.
When all of the settings have been chosen, click Save to retain the header template definition and return to the Fulfillment Center screen.
Select a fulfillment template from the Select Template drop-down list and then select the newly created header template from the Header template drop-down list.
Created: 6/5/12
Revised: 6/20/12
Published: 04/14/16