![]()
Version 7.5
![]()
Version 7.5
Contents of this Topic: Show
When an order is placed for a product to be shipped by a fulfillment center, depending on how the fulfillment center is defined, the program either writes the order details into a cumulative text file that is manually sent to the fulfillment center, or the program automatically sends the information to the fulfillment center in a separate email for each order. If the former method is chosen, the user must remember to rename, or delete and reallocate the text file after it has been sent to the fulfillment center or the program will continue to append new data to it, which may result in duplicate information being sent to the fulfillment center.
The program supports multiple fulfillment center definitions, as a single order may contain items that are shipped from different physical fulfillment centers, requiring a different text file to be created for each one.
Many external fulfillment centers require the data that is sent to them to be in a particular format. Create a unique Fulfillment Template for each provider, according to their specifications.
After the products are shipped, the external fulfillment center generally sends shipping and tracking data back to the merchant via text files that can be imported into SEOM.
The text files generated by this system can also be sent to drop-ship suppliers (vendors). The program can automatically send a text file via email when drop-ship purchase orders are created, depending on the settings in the Supplier record.
Fulfillment Templates are used to determine the sequence of order information within the text file that is generated by the program to be sent to its associated Fulfillment Center. If multiple fulfillment centers accept data in the same layout, a fulfillment template may be used by more than one Fulfillment Center definition.
Header Templates are optional, and they are created the same way that a fulfillment template is created. Header templates can be specified in conjunction with a fulfillment template to add a row of header information at the top of the text file or before each order row. If the external fulfillment center or drop-ship supplier wants to see the merchant's company name and account number at the top of the file, a header template can be created to do that by using Custom Columns.
The program is presently able to export approximately sixty SEOM fields, and it also allows the user to create "custom columns" up to a maximum of eighty total fields that can be exported by a given template. Custom columns can be left blank (no data) or each row in the column can contain the same static value that is specified by the user.
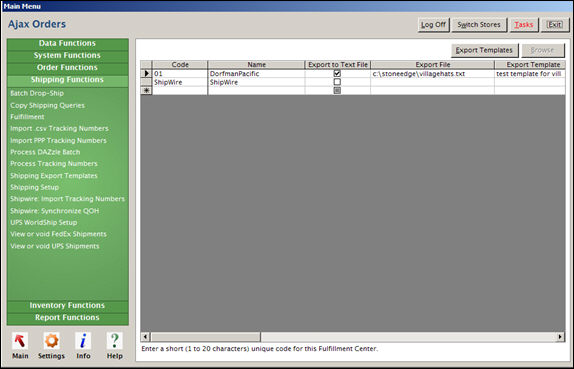
Fulfillment Centers screen
Use the horizontal scroll bar to view the right-most fields.
Select a field to see a brief description of the field's purpose at the bottom of the screen
Notice that there are no Edit, Cancel or Save buttons on the screen. Each record is saved upon exiting the row.
Once data has been entered in a new row, the program will not allow the user to close the screen unless it has data in both the Code and Name fields.
To delete a row, right-click on the row and select Delete.
this button is used in conjunction with the Export File field
it is used to navigate to the location of the text file where the program should store the order data, rather than manually typing in the path to the file
select this box to export order data to a text file, as opposed to sending the order information by email for each individual order
this method is mutually exclusive with the Send Email method
if this field is select, the user must also complete the Export File field
this field must be completed if the Export to Text File field is selected
enter the fully qualified path to the text file that contains order information to be sent to this fulfillment center OR use Browse to navigate to the location of the file
the user must manually send this cumulative file to the fulfillment center or drop-ship supplier, generally at the end of the day
remember to delete the file after it has been sent, or rename it with the date and timestamp if the user wishes to keep a copy of the file for their records; otherwise the potential exists for the duplication of data, as the program continues to append data to the text file specified in the fulfillment center definition; if the file in the definition is not found, the program creates it
select this to send an email, per order, containing the product and shipping information to the fulfillment center as each order is approved
this option is mutually exclusive with the Export to Text File method of sending data to a fulfillment center
if this box is checked, the user must also select an Email Template and provide an Email Address in their respective fields
from the drop-down list, select the Email Template to be used when sending the text file to the fulfillment center
this is a required field if the Send Email field is checked
enter the email address of the fulfillment center to which the text file will be sent
this is a required field if the Send Email field is checked
Go to the Main Menu > Settings > Shipping Functions > Fulfillment.
Enter a unique 1-20 alpha-numeric character value in the Code field to identify the Fulfillment Center within the program.
Type in a unique user-friendly name for the Fulfillment Center in the Name field.
Choose the method by which the data is sent to the Fulfillment Center:
Export to Text File
Check the box in the Export to Text File column to have the program generate a text file containing the order information to be sent to this fulfillment center.
Type in the path to the text file containing the order data in the Export File field, or use Browse to navigate to its location.
Click in the Export Template field and select the template to format the data for this fulfillment center or drop ship supplier.
If a template has not yet been created, select Export Templates to open the Fulfillment Templates screen and define a fulfillment template.
Send by Individual Emails
Check the box in the Send Email column if the program should send the text file by email.
Select an email template from the drop-down list in the Email Template column.
Enter the email address for the fulfillment center in the Email Address field.
There is no Close button on this screen. To navigate away from this screen, select another tab, link or button in the accordion.
Created: 6/6/12
Revised: 9/23/14
Published: 04/14/16