
Version 5.9
In this Topic: Show
This document contains the following sections. Click on a link to jump to that section:
A Return occurs when your customer sends an item back to you for a credit or refund, and no replacement product is sent. An Exchange occurs when your customer returns an item, and you send them one or more replacements for it. Either may also result in additional charges or credits to the customer. An RMA (Return Merchandise Authorization) is an authorization for the return or exchange, generally sent to the customer before they send the item(s) back to you. RMAs help you keep track of your returns and exchanges.
To process returns and exchanges, click the Return/Exchange button on the View Orders screen. The system displays the RMAs, Returns and Exchanges window:
Figure 1
The fields in the areas labeled RETURNS and EXCHANGES at the top of this screen are for information only; you cannot edit them. They will change as you set up the return or exchange to help you keep track of the value of the returned and exchange items, etc.
Use the following system parameters to configure RMA options:
AllowDoRMAs - Controls whether the Generate RMA option is available at the Returns, Exchanges and RMAs form.
GenerateRMAsDefault - Controls the default state of the ”Generate RMA” option when you click the Return/Exchange button.
OutstandingRMATemplate - Name of report to use for printing Outstanding RMA list
ReturnFeeCalcType -
NONE - System will not calculate a fee for returns.
FLAT - System will charge the amount entered into the ReturnFeeCalcValue parameter for each return action (one or more items can be returned during a single return action).
PER ITEM - System will multiply the amount in the ReturnFeeCalcValue by the number of units returned.
PERCENT - System will apply the percentage value entered into the ReturnFeeCalcValue parameter to the total retail value of the returned items.
ReturnFeeCalcValue - Based on the value selected for ReturnFeeCalcType parameter, enter the dollar amount or percentage to use when calculating fees for returns.
ExchangeFeeCalcType
NONE - System will not calculate a fee for exchanges.
FLAT - System will charge the amount entered into the ExchangeFeeCalcValue parameter for the exchange order.
PER ITEM - System will multiply the amount in the ExchangeFeeCalcValue to the number of units being exchanged.
PERCENT - System will apply the percentage value entered into the ExchangeFeeCalcValue parameter to the total retail value of the exchange items.
ExchangeFeeCalcValue - Based on the value selected for ExchangeFeeCalcType parameter, enter the dollar amount or percentage to use when calculating fees for exchanges.
ShippingCreditCalcType
NONE - System will not calculate a shipping credit for returns.
FLAT - System will charge the amount entered into the ReturnShippingCreditCalcValue parameter for each return action (one or more items can be returned in a single return action). If the ReturnShippingCreditCalcValue is set to zero, the system will use the remaining shipping amount on the original order.
PER ITEM - System will multiply the amount in the ReturnShippingCreditCalcValue to the number of units being returned.
PERCENT - System will apply the percentage value entered into the ReturnShippingCreditCalcValue parameter to the remaining shipping amount on the original order.
ShippingCreditCalcValue - Based on the value selected for ReturnShippingCreditCalcType parameter, enter the dollar amount or percentage to use when calculating shipping credits for returns.
ExchangeDefaultShippingMethod - The default shipping method for an exchange order when Apply Shipping Fees To Exchange is selected on the RMAs screen; Shipping Fees can be $0.
ExchangeShippingFeeAmount - Flat dollar amount to charge for shipping exchange orders.
RMAAllowNewReasons - If FALSE, reasons for RMAs will have to be selected from a pre-defined list (entered at the List Maintenance form); if TRUE, users can select from the list or enter new reasons.
RMACreatedDefaultEmail - If a template name is entered here, that will be the default email template selected when a new RMA is issued.
RMAIssuedStatus - If text is entered here, that text will be inserted into the Status field in the Order Details table when an RMA is issued for an item. Any text already present in the Status field will be lost. If nothing is entered here, the Status field will not be affected. Note that this status will be set even if the RMA does not apply to the total quantity of the line item.
RMAReceivedDefaultEmail - If a template name is entered here, that will be the default email template selected when anything is received against an RMA.
RMAReceivedStatus - If text is entered here, that text will be inserted into the Status field in the Order Details table when the total authorized return quantity of an RMA has been received. Any text already present in the Status field will be lost. If nothing is entered here, the Status field will not be affected. Note that this status will be set even if the RMA does not apply to the total quantity of the line item.
RMASetToCurrentUser - If user security is on or a default user is specified, set this to true to have the Returns, Exchanges & RMAs system automatically set the user when the form opens (parameter is set to True by default).
This section explains the basic steps for processing a simple return with no RMA. Complete the following steps to perform a simple return without generating an RMA:
At the View Orders screen, display the order with the items or items to be returned.
Click the Return/Exchange button. The Returns and Exchanges screen will appear:
Figure 2
On the Details tab, select your name from the Entered By drop-down list. The names that appear in this drop-down are obtained from the list of Sales People that are defined via the List Maintenance facility of the Maintenance menu.
Under Select Action, make sure that Create a new Return/Exchange is selected.
Clear the Generate RMA check box.
In the fee area at the bottom of the screen, make sure that Create An Exchange is not selected.
Select any of the other check boxes at the bottom of the screen to define fees or credits that should be added to the order:
Apply Restocking Fees for Return - Available for Returns and Exchanges.
Apply Shipping Credit for Return - Available for Returns and Exchanges.
For each fee or credit selected, select a calculation method under Base fees/credits on and enter a Value. (Defaults for these options can be preset in the System Parameters; see list of parameters earlier in this document.) Below is a description of the Fee/Credit Basis types:
Flat Amt. - The Value entered represents the dollar amount to charge regardless of the value of the returned item(s).
Per Unit - The Value entered represents the dollar amount to charge for each unit returned.
% of Amt. - The Value entered represents a percent of the purchase price of all items returned.
Go to the Items Available for Return tab. The system displays a list of the items on the order that can be returned.
Figure 3
The Available column displays the total number of items available to be returned (not necessarily the quantity shipped for the order, if other returns were processed earlier).
Note: As you select items, the total value and quantity being returned, as well as the fees and credits applied, are shown at the top of the form.
Select and define the item(s) to be returned from the list:
Check the Return checkbox to return an item
Enter the quantity to return in the Return Q column.
Enter the date you expect to receive the item from the customer in the Date Exp. field (optional).
Select a Status (optional). See List Maintenance for information on defining additional statuses.
Enter the quantity to put back into your inventory (items that can be resold) in the QOH column.
Vendor is the quantity to be returned to your supplier. If the customer is returning the items to the drop-ship vendor, enter the quantity of re-sellable items in the Vendor column.
If the items are damaged or cannot be resold, enter the quantity in the Discard column.
Note: The sum of the QOH, Vendor, and Discard fields must match the number in Return Q for each item.
If the customer was sent the wrong product, enter the actual SKU that they received in the SKU Sent column. (You can also click in this field and click the Search SKUs button.)
Note: The system will make QOH and cost-of-goods changes based on this information. You may be alerted if the SKU Sent does not have sufficient inventory available to pull to account for the incorrect shipment.
Add any notes specific to each line item in the Notes column (optional).
Click the Save button at the top of the screen. Click OK in the Returns Processed box. The system then displays the original order in the View Orders window with the returned item marked as Returned and the amount deducted from the order total. Also, an Order Note is added that indicates what was done.
If the returned item was paid for (which would usually be the case), a Credit Due is indicated for the order on the Pricing tab. To issue the credit:
If the original payment was made with a credit card and charged through the Order Manager, go to the CC Terminal tab, click Get data from order, then click Transmit to tell the credit card gateway to issue the credit.
If the original payment was made by credit card not using the Order Manager, or by check or some other payment method, you will have to issue the credit manually (e.g., by sending the customer a check). Once that has been done, go to the Pricing tab and click the Log Credit Issued button. Fill in the information on the form that appears to tell the program that the customer has received their credit.
Returns and exchanges can be processed with or without a Return Merchandise Agreement (RMA). Complete the following steps to perform a return or exchange without generating an RMA:
At the View Orders screen, display the order that you want to work with.
Click the Return/Exchange button. The Returns and Exchanges screen will appear:
Figure 4
On the Details tab, select your name from the Entered By drop-down list.
Select Create a New Return/Exchange if it is not already selected. Other options may be available depending on whether there are already other returns or RMAs for the current order.
Clear the Generate RMA check box.
To create an Exchange, select the Create An Exchange check box. That will activate the Exchange Fees options and make the Exchange Items tab visible.
Use the check boxes below the Create an Exchange check box to define any fees or credits that should be added to the order:
Apply Restocking Fees for Return - Available for Returns and Exchanges.
Apply Shipping Credit for Return - Available for Returns and Exchanges.
Apply Additional Fees to Exchange - Only available for Exchanges.
Apply Shipping Fees to Exchange - Only available for Exchanges. Select the shipping Method and enter the Total Amount.
Note: If you are processing an exchange, you can specify which order gets the fee or credit - the original order or the new exchange order - by selecting either the In Orig. Order or In New Order options.
For each fee or credit selected, select a calculation method under Base fees/credits on and enter a Value. (Defaults for these options can be preset in the System Parameters; see list of parameters earlier in this document.) Below is a description of the Fee/Credit Basis types:
Flat Amt. - The Value entered represents the dollar amount to charge regardless of the value of the returned item(s).
Per Unit - The Value entered represents the dollar amount to charge for each unit returned.
% of Amt. - The Value entered represents a percent of the purchase price of all items returned.
Go to the Items Available for Return tab. The system displays a list of the items on the order that can be returned.
Figure 5
The Available column displays the total number of items available to be returned (not necessarily the quantity shipped for the order, if other returns were processed earlier).
Note: As you select items, the total value and quantity being returned, as well as the fees and credits applied, are shown at the top of the form.
Select and define the item(s) to be returned from the list:
Check the Return check box to return an item
Enter the quantity to return in the Return Q column.
Enter the date you expect to receive the item from the customer in the Date Exp. field (optional).
Select a Status (optional). See List Maintenance for information on defining the available statuses.
Enter the quantity to put back into your inventory (items that can be resold) in the QOH column.
Vendor is the quantity to be returned to your supplier. If the customer is returning the items to the drop-ship vendor, enter the quantity of re-sellable items in the Vendor column.
If the items are damaged or cannot be resold, enter the quantity in the Discard column.
Note: The sum of the QOH, Vendor, and Discard fields must match the number in Return Q for each item.
If the customer was sent the wrong product, enter the actual SKU that they received in the SKU Sent column. (You can also click in this field and click the Search SKUs button.)
Note: The system will make QOH and cost-of-goods changes based on this information. You may be alerted if the SKU Sent does not have sufficient inventory available to pull to account for the incorrect shipment.
Add any notes specific to each line item in the Notes column (optional).
If you are performing an exchange, complete the following steps:
If the customer is exchanging for the same item, click the Send Replacements button on the Items Available for Return tab. The system adds all items marked for return to the list on the Exchange Items tab.
Note: The Send Replacements function does not check to see if the return items are already on the Exchange Items list, so be careful not to duplicate your entries!
If the customer is exchanging for a different item, click the Exchange Items tab and select the SKU, Quantity, and Price (and Price Level if using Multi-Level Pricing) of the item(s) to place on the exchange order, then click Add.
Note: As you add exchange items, the total quantity, value, and exchange fees to apply are shown at the top of the form.
If you want to add notes on the return, click on the Notes tab, click Add Note, enter the information and click OK.
Click the Save button at the top of the screen to create the Exchange and to add optional fees and credits to the order.
Note: When you enter an Exchange, the Order Manager will create a new order with the exchange items. That order can then be processed and shipped like any other order. The program will add notes to both of the orders explaining what was done and referencing the other order number.
Depending on the prices of the original and exchange items, as well as any additional charges or credits, there may be a balance or credit due to the customer. If the system parameter AllowCarrryForwards is set to False (this is the default setting), the balance or credit due will remain with the original order.
If you set the parameter AllowCarrryForwards to True, and there is a balance due from the customer, the program will ask if you want to carry the balance due onto the new order. If there is a credit due, you can either carry just enough credit to cover the charges for the new order, or carry the entire credit forward.
The system displays a message that returns were processed and the exchange was made in a new order. Click OK. The system then displays the original order in the View Orders window with the returned item removed. Also, an Order Note is added that indicates which items were exchanged and the order number of the newly created order.
The Balance Due or Credit Due to the customer is indicated on the Pricing tab. To issue credit or receive payment:
If the original payment was made with a credit card and charged through the Order Manager, go to the CC Terminal tab, click Get data from order, then click Transmit to tell the credit card gateway to issue the credit or payment due.
If the original payment was made by credit card not using the Order Manager, or by check or some other payment method, you will have to issue a bill or credit the customer manually (e.g., by sending the customer a check). Once that has been done, go to the Pricing tab and click either Log Credit Issued or Enter Payment button. Fill in the information on the form that appears to tell the program that the customer has paid the balance due or received credit due.
The Order Manager’s RMA system lets you issue RMA numbers to customers who wish to return items that you have shipped to them. It also lets you track when items are received back from your customers, and print lists of outstanding RMAs.
RMAs are numbered sequentially, beginning with 1 and are displayed to your customers in email, etc. as the Order Number, followed by a dash, then the RMA number. For example, if your 3rd RMA is for order number 567, the RMA will appear as 567-3. That way the first part of the RMA always tells you the associated order number and the second part provides uniqueness.
Create a default list of RMA Reasons by going to the List Maintenance screen and adding entries to the RMA Reasons list.
Create one or more email templates to use when emailing RMA information to your customers. To view examples of RMA templates, see RMA Template Examples. Special tags for inserting RMA information can be found in the Misc. tag group. They include the following tags:
LastRMADate: Inserts the date of the most recent RMA for the current order.
LastRMADetails: Lists the RMA number, RMA quantity, SKU and Item Name for each item in the MOST RECENT RMA for the current order. If present, also shows date expected. If any have already been received, it will also include quantity received and date received.
LastRMANumber: Inserts the RMA number (Order Number – dash – RMA number) of the most recent RMA for the current order.
LastRMAReason: Inserts reason entered for the most recent RMA for the current order.
RMADetails: Lists the RMA number, RMA quantity, SKU and Item Name for each item in ALL RMAs for the current order. If present, also shows date expected. If any have already been received, it will also include quantity received and date received.
At the View Orders screen, display the order you want to work with.
Click the Return/Exchange button. The RMA screen will appear:
Figure 6
On the Details tab, select your name from the Entered By drop-down list.
Select Create a New Return/Exchange if it is not already selected. Other options may be available depending on whether there are already other returns or RMAs for the current order.
Enter the RMA Details:
Check the Generate RMA checkbox. The system activates the RMA Details area.
Select or enter a Reason for RMA. If you haven't defined any RMA Reason, see the article List Maintenance for information on adding entries to the RMA Reasons list.
Select an RMA Status. See List Maintenance for information on adding to the list of available statuses.
Enter the date when the returned items are expected in the Date Expected field, or click the calendar button to the right of the field to select a date.
To send an email confirmation to the customer, check the Send Email Confirmation checkbox. After the RMA is saved, you will be able to pick the email template and edit the email prior to sending it if necessary.
If you are creating an Exchange with the RMA, select the Create An Exchange checkbox. That will activate the Exchange Fees options and make the Exchange Items tab visible.
Use the checkboxes under the Create an Exchange checkbox to define any fees or credits that may be assigned to the order:
Apply Restocking Fees for Return - Available for Returns and Exchanges.
Apply Shipping Credit for Return - Available for Returns and Exchanges.
Apply Additional Fees to Exchange - Only available for Exchanges.
Apply Shipping Fees to Exchange - Only available for Exchanges. Select the shipping Method and enter the Total Amount.
For each fee or credit selected, select when and where the amount should be applied:
Now (applied immediately)
First Rec’d (applied when the first returned item is received)
All Rec’d (applied when all returned items for the order have been received)
In Orig. Order (For exchanges; applied to the original order)
In New Order (For exchanges; applied to the new order the Order Manager generates for an exchange)
For each fee or credit selected, select a calculation method, or basis, for the fee or shipping credit from the Base fees/credits on area (this option can be preset in the System Parameters) and a Value. The system will calculate the Total Amount column once you select the items to be returned. Below is a description of the Fee/Credit Basis types:
Flat Amt. - The Value entered represents the dollar amount to charge regardless of the value of the returned item(s).
Per Unit - The Value represents the dollar amount to charge for each unit returned.
% of Amount - The Value entered represents a percent of the purchase price of all items returned.
Click the Items Available for Return tab. The system displays the list of items on the order that can be returned.
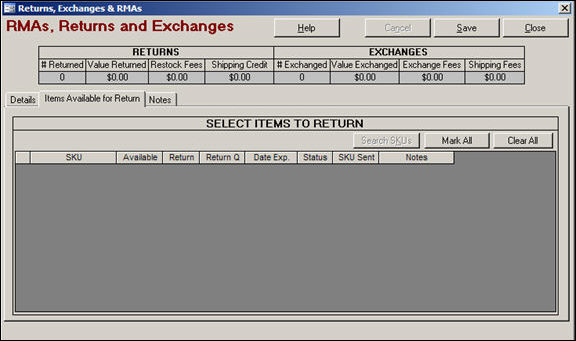
Figure 7
The Available column displays the total number of items available to be returned (not necessarily the quantity shipped for the order, if other returns were processed earlier).
Note: As you select items, the total value and quantity being returned, as well as the fees and credits applied, are shown at the top of the form.
Select and define the item(s) to be returned from the list:
Check the Return checkbox to return an item, and enter the quantity to return in the Return Q column.
Enter the date you expect to receive the item from the customer in the Date Exp. field (optional).
Select a Status (optional). See List Maintenance for information on adding to the list of available statuses.
Enter the quantity to put back into your inventory (items that can be resold) in the QOH column.
If the item was drop-shipped to your customer, but it was sent back to you (not to the vendor), enter the number returned in QOH. If the customer is returning the items to the drop-ship vendor, enter the quantity of re-sellable items in the Vendor column.
If the items are damaged or cannot be resold, enter the quantity in the Discard column.
Note: The sum of the QOH, Vendor, and Discard fields must match the number in Return Q for each item.
If the customer was sent the wrong product, enter the actual SKU that they received in the SKU Sent column. (You can also click in this field and click the Search SKUs button.)
Note: The system will make QOH and cost-of-goods changes based on this information. You may be alerted if the SKU Sent does not have sufficient inventory available to pull to account for the incorrect shipment.
Add any notes specific to each line item in the Notes column (optional).
If you are performing an exchange, complete the following steps:
If the customer is exchanging for the same item, click the Send Replacements button on the Items Available for Return tab. The system adds all items marked for return to the list on the Exchange Items tab.
Note: The Send Replacements function does not check to see if the return items are already on the Exchange Items list, so be careful not to duplicate your entries!
If the customer is exchanging for a different item, click the Exchange Items tab and select the SKU, Quantity, and Price (and Price Level if using Multi-Level Pricing) of the item(s) to place on the exchange order, then click Add.
Note: As you add exchange items, the total quantity, value, and exchange fees to apply are shown at the top of the form.
If you want to add notes on the return, click on the Notes tab, click Add Note, enter the information and click OK.
Note: When you enter an Exchange, the Order Manager will create a new order with the exchange items. That order can then be processed and shipped like any other order. The program will add notes to both of the orders explaining what was done and referencing the other order number.
Click the Save button to create the Return, and optionally the Exchange, and to add optional fees and credits to the order(s). If you opted to send an Email Confirmation, a dialog box will open so you can select and edit the template. The system confirms the creation of the RMA and if applicable, the exchange made in a new order. Click OK.
Figure 8
Keep in mind that the return has not officially occurred yet. You must Receive the returned items before the Order Manager will generate the return on the order.
Complete the following steps to edit an existing RMA:
Click the Return/Exchange button in the View Orders window. The RMAs, Returns, and Exchanges window opens with Receive items against an RMA as the default selection in the Select Action box.
To make the Edit existing RMA information selection available, click the Cancel button. Click OK to cancel changes and start over.
Select the option to Edit existing RMA information and select the RMA number from the Select RMA drop-down list.
Select your name from the Entered By drop-down list.
Make any needed changes to the information, fees, or credits on the Details tab. If the RMA includes an exchange and the exchange was already processed, you cannot modify the exchange information (you can only modify the fees).
Note: Keep in mind that if fees were already applied by earlier actions, the system will only apply the difference between the amounts originally applied and any new amounts entered here.
If you want to add additional returns to the RMA, go to the Items Available For Return tab. Refer to the same instructions as above for Generating RMAs.
If you want to remove any items from the RMA that have not been received, click the Items Approved for Return tab.
Figure 9
Select the Cancel checkbox and enter a quantity for each item to remove from the RMA in the # to Cancel field.
Note: If the line item has an SKU that is different from the Wrong SKU, the system attempts to revise QOH values for the two SKUs based on the quantity removed. You can only cancel the amounts not yet received. In addition, the system does not allow you to add new returns for the same item that is being canceled during the same edit action.
You can review returns that are already recorded on the Items Already Returned tab.
You can add additional notes to the RMA on the Notes tab.
Click the Save button to save the changes to the RMA.
Depending on the selections chosen, the system may create an exchange order, or it may apply additional fees and credits to the original and/or exchange orders.
Complete the following steps to receive items for an existing RMA.
Click the Return/Exchange button in the View Orders window
The RMAs, Returns, and Exchanges window opens with Receive items against an RMA as the default selection in the Select Action box and the RMA number selected in the Select RMA drop-down list.
Figure 10
Go to the Receive RMA Items tab to enter the items that are being received.
Figure 11
If all items have been received, click the All In checkbox. Otherwise, enter the quantity received in the In Now column. That value cannot exceed the amount in the Available column.
Enter the quantity to be returned to your inventory in the QOH column. If the item is a drop-ship item and the customer has returned the item to the drop-shipper, enter the quantity returned to the vendor’s inventory in the Vendor column. If items are damaged or cannot be resold, enter the quantity in the Discard column.
If the SKU on the item that is received from the customer does not match the SKU, enter the actual SKU received in the SKU Received column. This causes inventory QOH changes to be made between the SKU and the SKU actually received.
Note: The sum of the numbers entered into the QOH, Vendor, and Discard fields for each received item must match the amount in the In Now column.
Select the Status and enter any line item notes in the Notes column.
Enter any additional notes for the RMA on the Notes tab.
Click the Save button to record the returns (and optionally, create an exchange and/or write fees and credits).
Note: If there was an exchange and the system parameter AllowCarrryForwards is set to True, the system will ask if you want to carry the balance or credit due onto the new order. If there is a credit due, you can either carry just enough credit to cover the charges for the new order, or carry the entire credit forward. For information about setting the System Parameter, AllowCarryForward, see Step 16 in Processing a Simple Exchange, earlier in the document.)
The system confirms the received items on RMA have posted. Click OK.
Figure 12
The system displays the View Orders window with the RMA returned information listed in the line items:
Figure 13
To print a report listing all outstanding RMAs:
Go to Main Menu> Print Reports.
Select the report, Outstanding RMAs.
Click Print.
If you have processed a return on an order by mistake, you can reverse the return if needed.
At the View Orders screen, display the order with the return that you want to cancel.
Open the Returns/Exchanges screen.
On the Details tab, select the salesperson from the Entered By drop-down list.
In the Select Action box, select the Cancel an existing return option (if it's not already selected). This will make the Items Already Returned tab visible.
Click the Items Already Returned tab.
Check the Unreturn checkbox and enter the number of returns to cancel in the Q To Unreturn column (cannot exceed the number in the # Can Unreturn column).
NOTE: Number returned may not match # Can Return due to older versions of the Order Manager not recording the specific line item the return was recorded against. If the system cannot readily verify which line item caused the return, it will not permit the item to be un-returned.
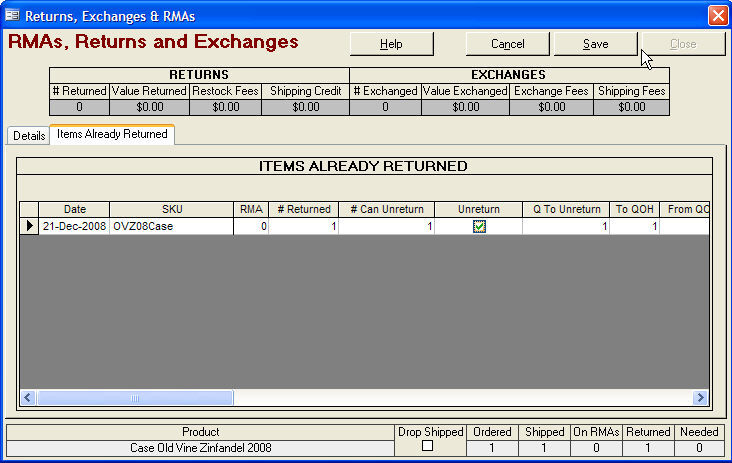
Figure 14
Enter the number of items to pull from inventory in the From QOH column (cannot exceed the number in the To QOH column).
If the item was a drop-ship, enter the number to pull from the vendor inventory in the From Vendor column (cannot exceed the number in To Vendor column).
Enter the number to pull from Discard in the Discard column (cannot exceed the number in the To Discard column).
Add any item notes in the Notes column.
Click Save to cancel the return.
Here is an example of how you use these tags in a template:
|
Order Number: <<OrderNumber>> ========================== RMA Details: <<RMADetails>> ========================== Last RMA #: <<LastRMANumber>> Last RMA Date: <<LastRMADate>> Last RMA Reason: <<LastRMAReason>> ========================== Last RMA Details: <<LastRMADetails>> ========================== |
And here is what the tags in the example would produce for an order for two items, where each item was included in a separate RMA, and one of the items was received:
|
Order Number: 9 S020089: Epson Ink-Color: S020089 S020108: Epson Ink-Black: S020108 ========================== RMA Details: RMA #9-42 Issued: 1/31/03 Qty: 2 SKU: S020089 Item: Epson Ink-Color: S020089 Date Expected: 2/1/03 Date Received: 1/31/03 Qty Received: 2 RMA #9-43 Issued: 1/31/03 Qty: 2 SKU: S020108 Item: Epson Ink-Black: S020108 Date Expected: 2/11/03 ========================== Last RMA #: 9-43 Last RMA Date: 1/31/03 Last RMA Reason: Defective Item ========================== Last RMA Details: RMA #9-43 Issued: 1/31/03 Qty: 2 SKU: S020108 Item: Epson Ink-Black: S020108 Date Expected: 2/11/03 ========================== |
Updated: 5/18/09
Modified: 1/13/12
Go to Top