
Version 5.9
In this Topic: Show
The Order Manager can offer special price breaks for products purchased in large quantities, otherwise known as Quantity Pricing or Quantity Discounts.
Go to the Pricing Tab of the Inventory Screen of an inventory item (product) to define Quantity Discounts.
If Multi-Level Pricing is implemented, each Quantity Discount must be associated with a Price Level. However, if single level pricing is being used, which is the default, customers are still eligible for a Quantity Discount if provided their purchase meets the requirements of the discount.
Once defined in an inventory item record, Quantity Discounts can be applied to line items in orders created at the Manual Orders screen, or at the Point of Sale (POS) Interface.
![]() Click the Show
link next to "In This Topic"
at the top of this page to see a series of links in outline form,
which can be used to quickly jump to that section of the topic.
Click the Show
link next to "In This Topic"
at the top of this page to see a series of links in outline form,
which can be used to quickly jump to that section of the topic.
In addition, major topics may provide a brief synopsis of a field's purpose or direct the reader to the appropriate section of the topic by scrolling over the image. To return to the previous location within the same page, right-click the mouse and select [Back].
If clicking a field directs the reader to a different Knowledge Base topic, it will open in a new tab or window, leaving the currently viewed topic open. The browser's settings determine whether a new tab or window is opened.
Go to the Quantity Discounts section of the Pricing tab of the Inventory screen.

Figure 1: Portion of Pricing tab of the Inventory screen
Enter the low-end value of the quantity purchase range to be eligible for the new discount in the Starting Quantity field.
Enter the high-end value of the quantity purchase range to be eligible for the new discount in the Ending Quantity field.
Enter the selling price of the product when the Quantity Discount is met in the Reg. Price field .
Optional: If the product is currently "On Sale", check the box in that column.
Enter a value in the Sale Price field. Zero is acceptable.
From the drop-down list, choose the Price Level to which the Quantity Discount applies. If multiple Price Levels have not been defined, the only choice in the drop-down list will be Price.
Click the [Add Discount] button. Refer to Figure 2 to see the button.
Repeat steps 2 - 8 as often as necessary until all Quantity Discounts have been created.
Click on the row of the quantity discount to be deleted.
Click the [Delete Discount] button.

Figure 2: Portion of Pricing tab of the Inventory screen
While at the Line Item tab, select a SKU and enter the qualifying quantity in the Qty to Order field.
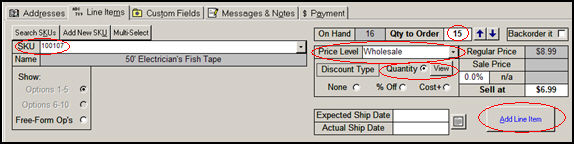
Figure 3: Portion of the Line Items tab of the Manual Orders screen, showing customer record is associated with Price Level "Wholesale"
If the customer record is associated with a specific Price Level, it is automatically entered in this field. The Quantity button is automatically selected. See Figure 3.
Optionally, click the [View] button to see the list of quantity discounts that are currently defined for this product.
Or, it is possible to see the Quantity Discount selling prices for another Price Level directly from the drop-down list, where you may select a different discount.
Otherwise, skip to step 4.
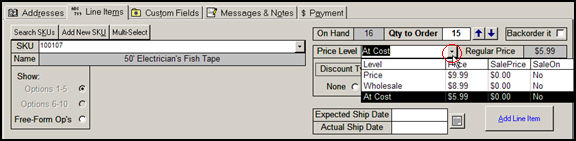
When a qualifying quantity has been entered, and the customer record is not associated with a Price Level, the default Price Level will be used (see system parameter DefaultManualOrdersPriceLevel). The Quantity radio button is automatically selected.
Optionally, click the [View] button to see the list of quantity discounts that are currently defined for this product.
Or, it is possible to see the Quantity Discount selling prices for another Price Level directly from the drop-down list, where you may select a different discount.
When the desired discount is selected, click the [Add Line Item] button to add the product to the order.
Continue adding other line items and processing the order.
Before adding any items to the transaction, enter the number of items that the customer wishes to purchase on the Key Pad tab. In Figure 4, the customer wants to order 10 of the same item. Do not be concerned about the "0.1" value in the field with the white background - the program will put in the correct whole number after the [Quantity] button is clicked.
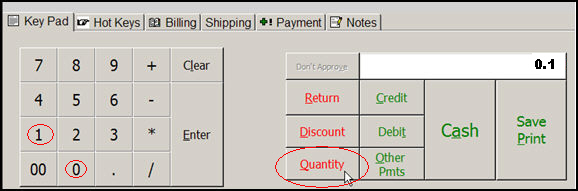
Figure 4: Portion of the POS Interface, Key Pad tab
Click the [Quantity] radio button. This quantity only applies to the very next item that is added to the order, and is displayed at the top of the screen.
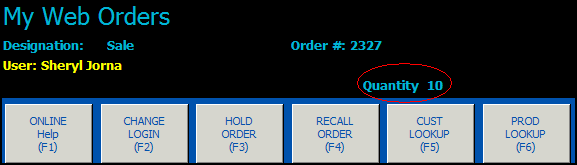
Figure 5: Portion of the POS Interface, showing the quantity ordered
If the customer record has been associated with a specific Price Level, adding the customer record to the order will automatically apply the appropriate quantity discount for that level, providing the order quantity is eligible for a discount.
If a customer record is not associated with a particular Price Level, or to change the customer's current Price Level you can manually select a Price Level from the drop-down list on the Edit Customer Information screen (click the [F5] button), but you must also elect to change the customer record at that time.
Previously added line items will not be automatically altered to reflect any eligible quantity discounts; they would have to be removed and re-entered.
While customer data, including the Price Level, can be viewed by clicking the Billing tab, it cannot be modified there.
See the Pricing Parameter Group, for details.
Created: 10/6/11
Go to Top