
Version 5.9
In this Topic: Show
Several kinds of data can be imported using the Import Data from Other Sources screen, such as Product (Inventory), Customer, or Supplier records. It is possible to import product cost and price information via this screen, as well. Data can be imported from:
A tab or comma-delimited text file
A table in a Microsoft Access database
Any other format (e.g. an Excel spreadsheet or FoxPro table) that can link to an Access database. For information on linking data in external tables to Access, please see MS Access documentation.
Note: Depending on the type of data that is being imported, different fields will be visible on the Import Data from Other Sources screen.
When importing data from a text file, if the data contains commas, the file should be saved as a tab-delimited file, not a csv.
Quotes should not be present in text files, regardless of whether it is a csv or tab-delimited file, or you will encounter errors.
This section outlines the basic steps that should be followed when using this screen, however, more specific details about the selections that can be made for each type of data that can be imported is covered in later sections of this article.
The Local SKU field is required and must have a field mapped to it from the external file. It is not necessary to map all of the other fields in the text file to an Order Manager field. Check all of the tabs (i.e. Standard Product Fields, Custom Text & Integer Fields, etc.) to see other fields that are available. There are screen shots of each of them in this article.
Go to the Main Menu >Maintenance Menu> Import/Export tab> and select Import Suppliers, Customers, Inventory or Costs & Prices.
The Import Data from Other Sources screen opens:
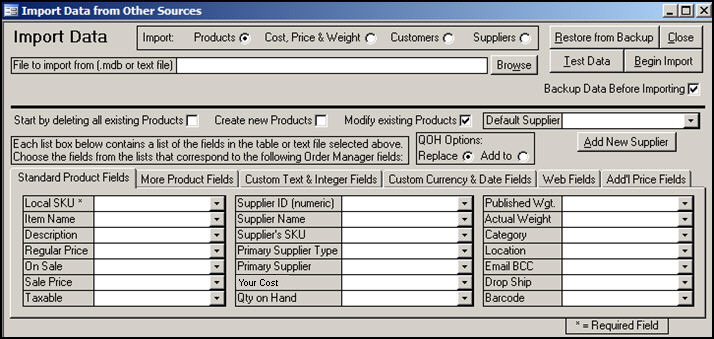
Figure 1: Import Data from Other Sources screen - Import Products selected
Click the radio button for the type of data to be imported:
Products
Cost, Price & Weight
Customers
Suppliers
Click the [Backup Data Before Importing] check box to have the program make a backup copy of the tables that will be affected by the import. If a problem is encountered, such as the mappings being off, use the [Restore from Backup] button to have the program update the data file with the backups that were made before the process was started. Re-map the fields and try again. The format of the name of the backup file is Temp Product Backup yyymmdd.mdb. If more than one backup is created in the same day, the program will append -01, -02, etc. as necessary.
Enter the path and file name of the MS Access database or text file which contains the data that will be imported or click the [Browse] button to select a file. The file must be a tab or comma-delimited text file (.txt or .csv) or a Microsoft Access database (.mdb).
If using an MS Access database, the Database table to import from drop down list appears below the File to import from field. Select the table in the external database that contains the data you wish to import from the drop down list.

Figure 2: Import Data from Other Sources - external database entered
If using a text file, new fields will become visible that allow the user to indicate whether the first row of data in the text file contains field names, and to choose the delimiter used in the text file. If there are any tab characters in the text file, the program will pre-select the Tab option; if not, it will pre-select Comma. If the text file uses a different delimiter, enter it in the Other field.
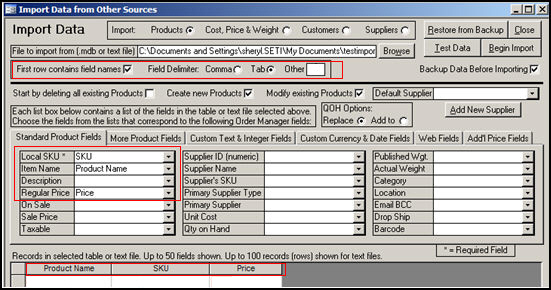
Figure 3: Import Data from Other Sources - tab delimited file entered
After the name of the external file has been entered, a sample of the data in that file will be displayed in the Records in selected table or text file section at the bottom of the screen. Refer to Figure 3.
If the external file contains a header row, the program will attempt to match the field names in the text file with an appropriate fields found in the Order Manager tables. The user can change them if necessary, and can manually map any other fields that the program was not able to match. The field labels, such as Local SKU and Item Name indicate the name of the Order Manager fields. The values that are populated in the drop-down lists on each of the tabs (Standard Product Fields, More Product Fields, Custom Text & Integer Fields, etc.) are the field names found in the external file. Refer to Figure 3.
Click [Test Data] to have the program check the incoming data and report if it detects any obvious problems.
Click [Begin Import] to import the data.
The Import Suppliers function can add new suppliers, modify existing suppliers, or both. Click in the appropriate check box to perform the desired function.
The field names listed on the Standard Supplier Fields tab are the field names used in the Supplier table in the Order Manager, the table into which data is being imported. Match the Order Manager fields with the corresponding field names in the external file by selecting them from the drop-down lists.
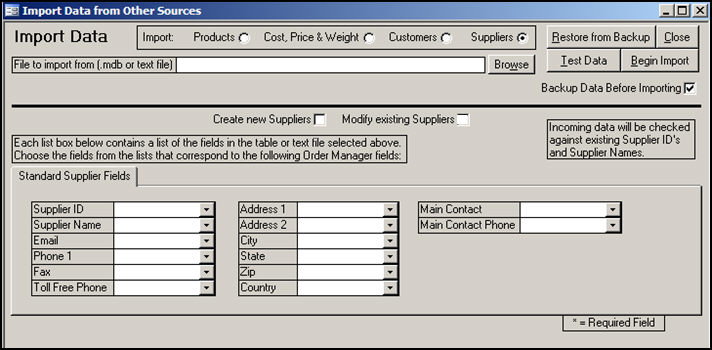
Figure 4: Import Data from Other Sources - Import Supplier records
The Import Customers function by itself only adds new customer records; it does not modify existing customer records. By default, the program will compare incoming customer records with those that already exist in the Order Manager, and based on the values that are set in the system parameters CustomerSearchField1-4, will determine if the customer already exists. If so, the program will skip the incoming record and continue the import with the next record in the file.
If the Customer Matching feature is enabled, and the Match on Customer ID box is checked, the program will pause the import when a matching customer record is found and the allow the user the opportunity to determine the action that the program should take. When an action has been specified, the import will continue with the next record in the text file.
The Custom Text and Integer Fields tab and the Custom Currency & Date Fields tab will only be visible if the user has created custom fields of those types in the Order Manager.
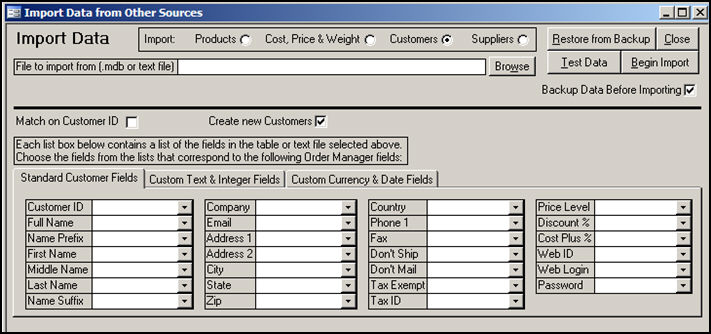
Figure 5: Import Data from Other Sources - Import Customers
Select the Order Manager field(s) from the list at the bottom of the form and select the appropriate field found in the text file from the corresponding drop-down list. Be sure to review all of the tabs (i.e. Standard Customer Fields, Custom Text & Integer Fields, etc.) for any other fields of information that you may want to import, as well.
The Email field is a required field for the customer import process to be executed, and must be mapped to a field in the text file, even if there is no data in that field for every customer record in the text file.
The Phone, Web ID and [Last Name + Zip] fields are optional, however, these fields may be used by the program to compare incoming customer information against existing customer records and identify a match. Therefore, we suggest that you also map at least one of these fields in addition to the Email field, to help prevent the creation of duplicate customer records. See the Customer Search section of the Knowledge Base article Matching New Records to Existing Customer Records Upon Import, for more information.
Tip: The only ways to update existing customer records are:
manually at the View Customers screen
at the Shopping Cart Functions screen, provided the shopping cart supports that functionality
by using the Customer Matching feature of the Order Manager
When product data is being imported, select one of the following options:
Start by deleting all existing Products - If checked, the Inventory table in your data file is emptied before your new data is imported. If not checked, products that do not already exist in your data file are appended to the Inventory table as new product records.
Create new products - If checked, products that do not already exist in your data file are added based on SKU. If not checked, existing product records are modified, but no new product records are added.
Modify existing products - If checked, the program replaces data in existing product records with data from the imported file for items with identical SKUs. If not checked, new product records may be added, but existing products are NOT modified.
Default Supplier - If you select a default supplier from the drop down list, new product records that do not contain a Supplier ID or Supplier Name are assigned to the default supplier you select.
Warning: The Country of Origin field found on the More Products Fields tab, must be a two letter abbreviation for the country where the product was produced. Do not spell out the entire country name in the text file. This field is used for USPS and UPS customs forms.
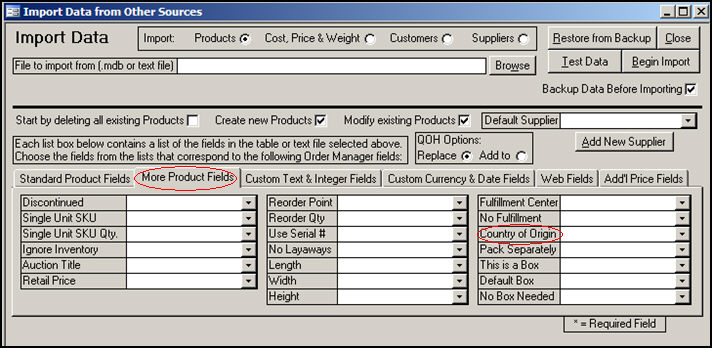
Figure 6: Import Data from Other Sources screen - More Product Fields tab
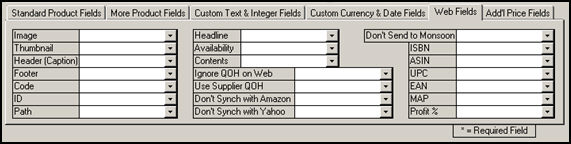
Figure 7: Import Data from Other Sources screen - Web Fields tab
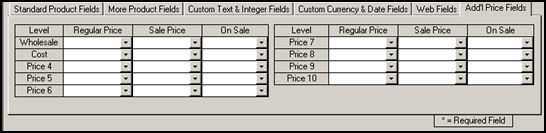
Figure 8: Import Data from Other Sources screen - Add'l Price Fields tab
When cost, price, weight and/or supplier SKU data is being imported:
Select a Default Supplier from the drop down list to assign new product records that do not contain a Supplier ID or Supplier Name to the selected supplier.
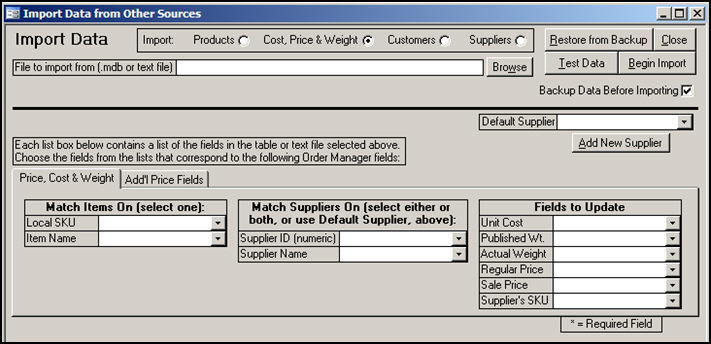
Figure 9: Import Data from Other Sources screen - Price, Cost & Weight tab
Match Items On (select one): - Local SKU is the best choice because SKUs must be unique, whereas products may share the same name.
Match Suppliers On (select either or both, or use Default Supplier, above): - The Supplier IDs in the external file must be numeric and they must be the same Supplier IDs that exist in the Order Manager.
Fields to Update - The field labels listed under Fields to Update section are the field names used in the Order Manager table into which the data is being imported. Match these fields with the appropriate, or corresponding, fields in the external file by selecting them from the drop down lists.
![]()
Updated: 12/2/14
Modified: 5/17/12
Go to Top