
Version 5.9
In this Topic: Show
The Order Manager can export customer data to a text file and send bulk email to customers from the Customer Export Setup screen. This functionality is useful if the merchant needs to duplicate Order Manager customer information in another software application or if they want to send bulk email to customers as a no-cost marketing tool. The Order Manager also integrates with Bronto email marketing software, however, the user is required to have a valid Bronto subscription for that service.
To access the Customer Export Setup screen, go to the Maintenance Menu, Import/Export tab and select Export Customer Data & Bulk Email To Customers from the list of activities.
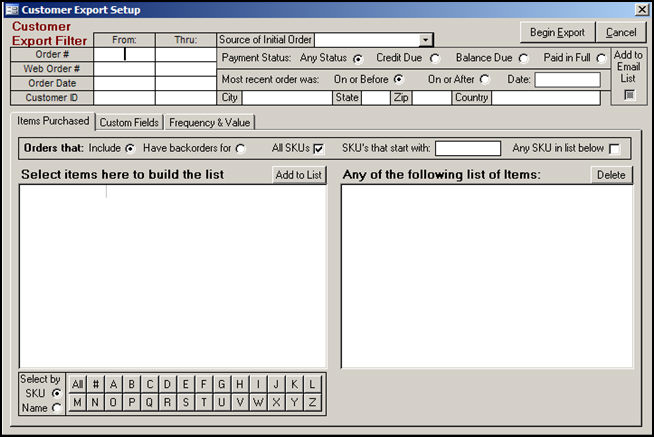
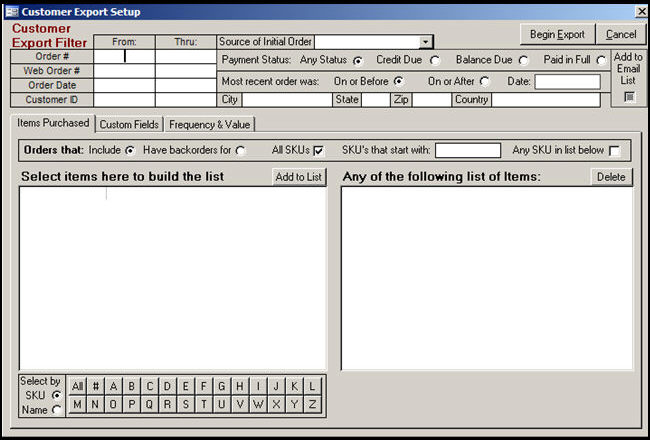
Figure 1: Customer Export Setup screen - Customer Export Filter mode
Use any combination of the fields on the main screen to identify a target group of customer records.
Ranges of order numbers, web order numbers, order dates, or customer ids.
Payment status. Select Any Status, Credit Due, Balance Due, or Paid in Full.
Customers where their most recent order was on or before or after a given date.
Address. Enter a City, State, Zip, or Country.
ShopSite users: There is an option in your shopping cart that allows your customers to opt-in to your email list at check-out. Checking the box labeled Add to Email List, in the top right corner of the Customer Export Setup screen, will cause the program to use that field as criteria when selecting records to export.
Use the Items Purchased tab to further limit the records that will be selected for export. Refer to Figure 1.
Choose customer records based on information contained in their orders by selecting the appropriate radio buttons or check boxes in the Orders that: section of the screen, or by entering a partial SKU in the SKU's that start with field.
Build a list of SKUs in the Select items here to build list side of the screen and click the [Add to List] button to move them to the Any of the following list of Items: section, where they will be used as filtering criteria to produce the list of customer records. Double-clicking the item in the left-hand box will also add it to the list in the right-hand pane.
To display products sorted by SKU (left-hand column of Select items here to build list pane):
Click the [SKU] radio button plus the [All] button to see all SKUs in alphanumeric order.
Click [SKU] plus the [#] button to see SKUs that begin with a symbol, followed by SKUs that begin with a number, in alphanumeric order.
Click [SKU] plus a ["letter"] button to see SKUs that begin with that letter in alphanumeric order.
To display products sorted by product name (right-hand column of Select items here to build list pane):
Click the [Name] radio button plus [All] to see all product names in alphanumeric order.
Click [Name] plus [#] to see product names that begin with a symbol, followed by product names that begin with a number in alphanumeric order.
Click [Name] plus a ["letter"] button to see product names that begin with that letter in alphanumeric order.
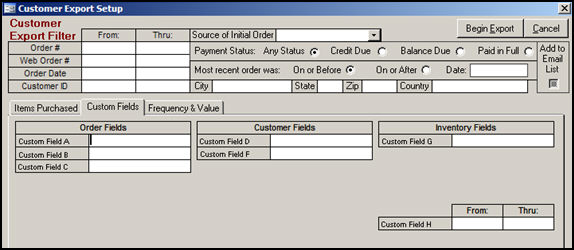
Figure 2: Customer Export Setup screen - Custom Fields tab
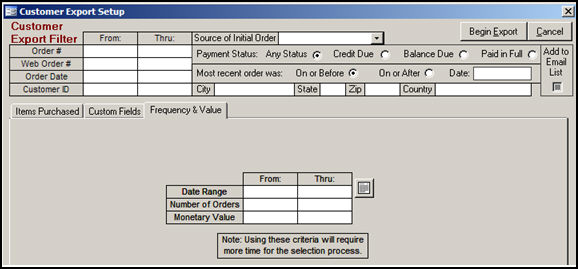
Figure 3: Customer Export Setup screen - Frequency & Value tab
Click [Begin Export]. The screen changes to the Export Customers mode, where the user identifies the type of external file that will be created as well as which Order Manager fields will be included in the export.
Continue with the next section.
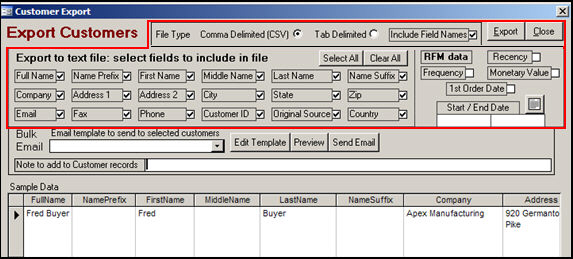
Figure 4: Customer Export screen - Export Customer mode
Indicate the File Type that will be created by choosing the appropriate radio button - Comma Delimited (csv) or Tab Delimited.
Indicate whether or not to include the field names in the first row of the text file by checking or un-checking the box of the same name.
Check (or un-check) each of the fields that should be included (or excluded) from the export process.
Click the [Export] button to start the process.
The program will prompt the user to specify a name and location for the text file.
When the export has been completed a message box will pop-up, saying "Data exported".
Click [OK] to acknowledge the end the process.
Click [Close] twice, to exit the Customer Export screen and return to the Maintenance Menu.
Initially, this screen will display the Customer Export Filter fields by which the user can provide criteria in any combination of the fields on the main screen, such as Order #, Payment Status, the date of the order, or the source of the order, etc., as well as by the fields found on the Custom Fields or Frequency & Value tabs, to identify a target group of email addresses.
![]() ShopSite users: There is an option in your shopping cart that allows your customers to opt-in to your email list at check-out. Checking the box labeled Add to Email List, in the top right corner of the Customer Export Setup screen, will include those customers in the list of customers to whom bulk email messages will be sent.
ShopSite users: There is an option in your shopping cart that allows your customers to opt-in to your email list at check-out. Checking the box labeled Add to Email List, in the top right corner of the Customer Export Setup screen, will include those customers in the list of customers to whom bulk email messages will be sent.
Click the [Begin Export] button and the screen will change to Export Customers, where the user may select, edit and preview the email template that will be used for the bulk email message in the Bulk Email section of the screen.
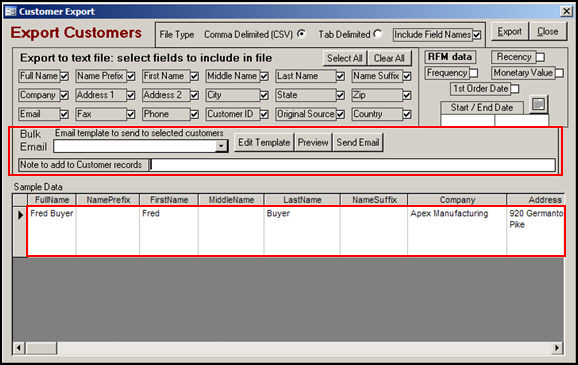
After reviewing the list of customers or previewing the email message, click the [Send Email] button to distribute the message to all of the customers in the Sample Data field.
![]() Any customers records that have the Do not mail to this customer box checked on the View Customers screen are automatically excluded from any bulk emailings.
Any customers records that have the Do not mail to this customer box checked on the View Customers screen are automatically excluded from any bulk emailings.
Created: 3/25/11
Go to Top