
Version 5.9
This article applies to Order Manager versions 4.4 and higher.
To view a pre-recorded, instructional webinar, go to the Stone Edge Technologies Webinars page and select The Purchase Order System.
For information on drop-ship POs, see Drop-ship Purchase Orders.
The Order Manager can create purchase orders (POs) for re-stocking purposes. You can log new inventory into the Order Manager when you receive it, and enter invoices from your vendors. You can create POs automatically or manually. If you create POs manually, you can either select items individually or use the multi-select tool.
To open the Purchase Orders screen, go to Main Menu> Inventory button> Purchase Orders. When the Purchase Orders screen first opens, it does not display any existing purchase orders. Filter for a single, or range of purchase orders by typing the PO numbers in the From and Thru fields and clicking Apply Filter. To view all purchase orders, click Clear Filter.
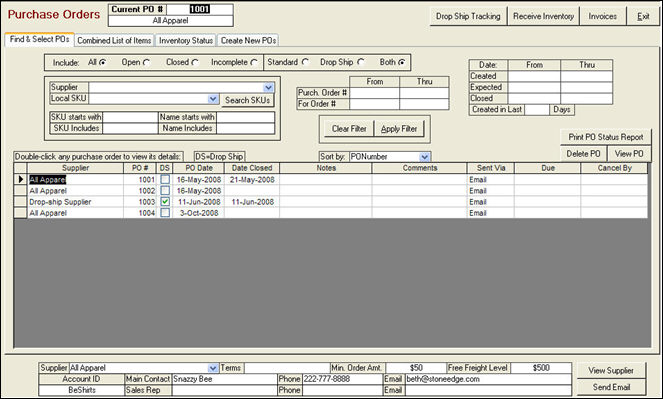
Note: The Selected PO Info and Selected PO Items tabs are hidden until you view a purchase order by double-clicking on it in the window of the Find & Select POs tab or selecting it and clicking the View PO button.
The Order Manager can create new purchase orders automatically for a single supplier or all suppliers. If you select All Suppliers, the program will create a separate PO for each supplier. The program will display the items and quantities to be ordered. You can then review and modify the data prior to actually creating and sending the orders.
The automatic PO generation only works for products that have a "primary supplier" designated on their inventory item record in the Order Manager. Products with no primary supplier can only be added to purchase orders manually.
The program will review the following factors for each product:
Quantity on Hand
Quantity needed for any un-filled orders
Quantity already ordered from your suppliers, but not yet received
Minimum order quantity and other purchasing rules
The POCalcMethod system parameter (in the Purchase Orders group) controls how the Order Manager automatically calculates the Items and Quantity to Order for the purchase orders it generates. There are three possible settings for this parameter, which determine the items and quantities to order and what fields are displayed on the Inventory screen:
Target Quantity displays the Target Qty. field. The Target Qty. is the quantity you wish to have in inventory at all times. For example, you want 10 pieces of an item on the shelf at all times. You sell 2 pieces and now you have 8 pieces on the shelf. The purchase order system automatically reorders 2 pieces to return the stock level to 10.
Order Quantity displays the Reorder Qty. and Reorder Point fields. The Reorder Qty. is the number of pieces ordered automatically when an item reaches or drops below its Reorder Point. For example, if an item reaches or drops below its reorder point of 2 (there are 3 pieces on the shelf and you sell 1), then the system orders the reorder quantity or the number of pieces on backorder, whichever is greater.
Delayed Target displays Target Qty. and Reorder Point fields. The Delayed Target setting works similarly to the Target Quantity setting except that the system does not place an order until the inventory level drops below the Reorder Point. For example, your Reorder Point is 2. Your Target Qty. is 10. You sell 2 pieces and now you have 8 pieces on the shelf. The purchase order system does not place an order until the inventory level reaches 2, in which case it orders 8 pieces to return the stock level to 10.
To set your parameter, go to Quick Clicks> System Parameters. In the Parameter Group box, select Purchase Orders. Select POCalcMethod from the Parameters in Selected Group box. Whichever method you use, the Create POs Automatically function allows you to edit and add items to the automatically generated purchase orders prior to sending them.
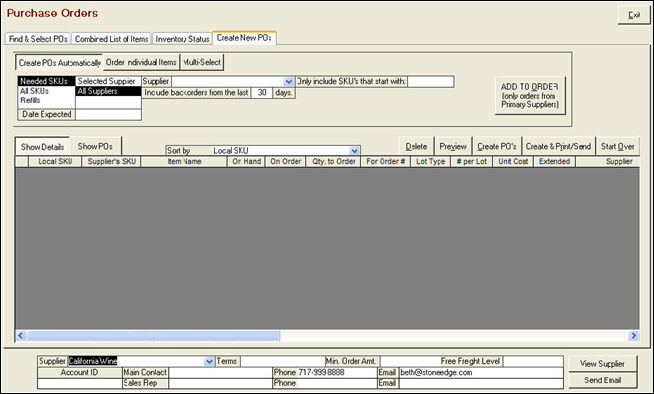
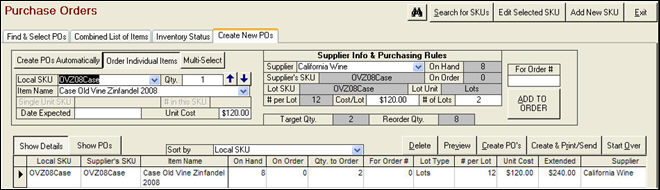
At the Purchase Orders screen, go to the Create New POs tab.
To reorder items automatically based on reorder points and reorder quantities, choose the Create POs Automatically option.
Select the options you want to use:
Item Ordering Option |
Result |
|
Needed SKUs |
Only purchase items that require reordering based on the setting of the system parameter POCalcMethod. |
|
All SKUs |
Order all items in your inventory in the specified Reorder Quantity for each item. |
|
Refills |
Order items based on historical sales data.
For example (underlined values are sample numbers): If there is less than a 30 day supply, bring the QOH up to a 60 day supply. Base the sales on the last 30 days OR on sales from May 1, 2009 thru May 31, 2009.
The Order Manager will calculate the average number of items that sold per day in that period. You can then order an X-day supply based on that rate. |
Select the suppliers for which you want to create purchase orders:
Supplier Option |
Result |
|
Selected Supplier |
This will create a single purchase order for the selected supplier. Select the supplier from the drop-down list. |
|
All Suppliers |
This will create a separate purchase order for each supplier that you need to order from. |
Note: When the Selected Supplier option is selected, for an item to be added to the PO, the item’s Primary Supplier must be set to the selected supplier.
You can enter a string of text to Only include SKUs that start with the entry.
Once all of your options are set, click the ADD TO ORDER button. The information for each purchase order is added. The items to order appear in the list in the lower portion of the window, below the Show Details and Show POs buttons:
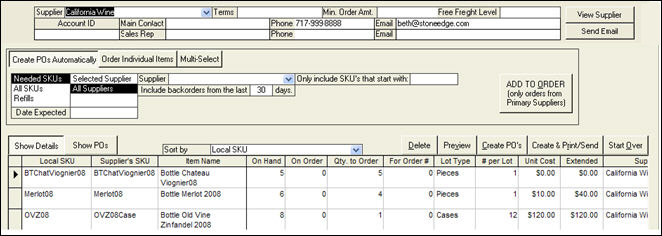
It is possible to edit the values in the Qty. to Order fields at this time. Individual SKU's can also be removed from the list of products that will be added to the purchase orders by selecting a SKU and clicking the Delete button before the Create PO's button is clicked.
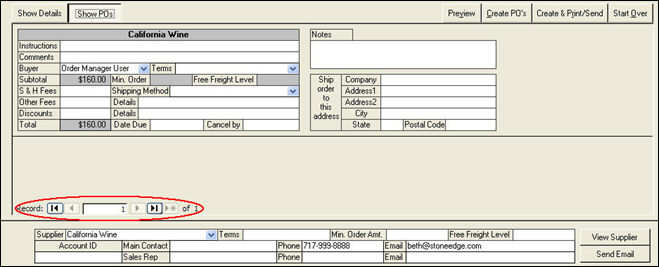
Click the Show POs button to preview each PO that will be created when either the Create POs or Create Print/Send button is clicked. You can enter any special instructions or details for each PO from this preview as well. Use the navigation buttons (circled in red below) to scroll between the potential purchase orders.
Select the Create PO button or Create & Print/Send button to create the order and/or send it to the supplier. The system displays a confirmation screen.
Note: The system may display a warning if any PO is below its supplier’s minimum quantity or free shipping threshold. Click the Yes button to override the warning.
Click OK. The Order Manager asks you if you would like to print file copies.
Select Yes or No.
The system creates your purchase order(s) and, depending on the delivery method specified for each supplier, either prints them or emails or faxes them to your suppliers.
The Order Individual Items function lets you manually order individual items from specific suppliers. Enter or change the information in the fields and click the ADD TO ORDER button.
You can review the items to order in the lower half of the window, and view each PO that is created by clicking the Show POs button. Select the Create PO button or Create & Print/Send button to create the order and/or send it to the supplier. You will see a confirmation screen. Click OK to create the PO.
The system creates your purchase order(s) and, depending on the delivery method specified for each supplier, either prints them or emails or faxes them to your suppliers.
With the Multi-Select function you can quickly add multiple items to purchase orders. Click the Multi-Select button on the Create POs tab, and the system displays the Add Items to Order window:
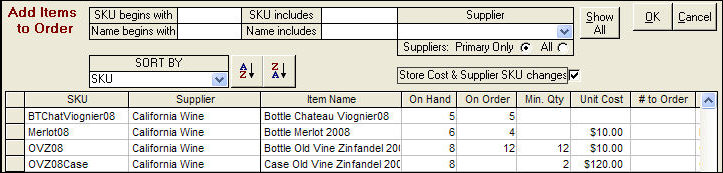
Filter the items shown by entering criteria in the fields at the top, and press the [Enter] key to display the filtered items. Click Show All to view all items in your inventory. Enter a quantity in the # to Order field for each item that you want to add to the purchase order, and click the OK button.
The system adds the selected items in the specified quantities and creates a PO for each supplier. You can review the items to order in the lower half of the Create New POs window, and view each PO that is created by clicking the Show POs button. Select the Create PO button or the Create & Print/Send button to create the order and/or send it to the supplier. You will see a confirmation screen. Click OK to create the PO.
The system creates your purchase order(s) and, depending on the delivery method specified for each supplier, either prints, emails or faxes them to your suppliers. Refer to the Purchase Order tab of the View Suppliers screen (Main Menu>Inventory>Suppliers).
If you have items in your inventory that you purchase from your supplier as a "lot", then you must set Supplier Purchasing Rules before creating a purchase order so that the Order Manager can correctly generate a purchase order and track inventory for lot items.
Note: You probably defined your lot items when you imported your inventory during setup or entered it individually as a new inventory item (See Manually Creating Product Inventory Records for more information).
Go Maintenance Menu> Inventory button> Product Info tab and find the item’s inventory record.
Click the small Edit button to the right of the Suppliers for this SKU box.
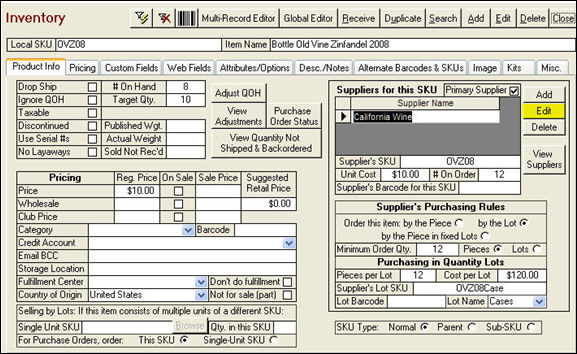
The Edit Product Supplier Information box opens.

Figure 1: Purchasing by the Lot - In this example, a merchant sells wine by the bottle, which the vendor requires he purchase by the Lot, (i.e., case) with a minimum order quantity of 1. Should the Auto PO System determine that the merchant needs to order 8 bottles of wine to meet his target quantity on hand, it will order a quantity of 1 lot because this SKU must be ordered in lots of 12 bottles. The Auto PO System will place one lot (1 case) on the purchase order (instead of 12 bottles) because this SKU is ordered "by the Lot."
Figure 2: Purchasing by the Piece in fixed Lots - In this example, the merchant sells wine by the bottle, which he must purchase by the Piece in fixed Lots (i.e. cases). Should the Auto PO System determine that the merchant needs to order 8 bottles of wine to meet his target quantity on hand, it will increase the order quantity to 12 units because this SKU must be ordered in fixed lots of 12 bottles. The Auto PO System will place 12 units on the purchase order (instead of 1 lot or case) because this SKU is ordered "by the Piece in fixed Lots."
Enter the Supplier’s Purchasing Rules about how you purchase this item from the supplier.
Choose by the Piece (default setting), by the Lot, or by the Piece in fixed Lots (this is not typical). The difference between purchasing in "lots" and "by the piece in fixed lots" is how you, or your vendor, want the line item to display on the purchase order – by the number of units (singles) or the number of lots (i.e., cases).
If the supplier of this item has a Minimum Order Qty., enter that number in the field. If you must order this item by the lot, select Lots, otherwise leave it set to Pieces (default setting).
In the Purchasing in Quantity Lots box, enter the Pieces per Lot and Cost per Lot.
Click the Save button.
Created: 1/18/12
Modified: 2/6/12
Go to Top