Setting Up a ChannelAdvisor Shopping Cart
A secure link to your ChannelAdvisor store via the Channel Advisor XML API allows you to automatically retrieve orders from your ChannelAdvisor store. You can then download and import these orders into the Order Manager for processing.
If you are unable to determine your ChannelAdvisor account information after reading the information below, please contact your ChannelAdvisor account manager.
Account Profile ID: This is a numeric value unique to each ChannelAdvisor Merchant Account.
The easiest way to determine your Account ID is to examine a URL for a ChannelAdvisor checkout generated within that account. You can find these URL's by visiting the Sales> All sales view in the ChannelAdvisor Merchant application, and clicking the "visit checkout" command for a particular order. If no sales exist, you can create a sample checkout via the Checkout> Checkout Preview menu option. The account ID (aka "Profile ID") is the value found after the "p=" query string parameter.
For example, in this checkout URL:
https://chnla.com/r.asp?p=10055350&t=2595456&i=5647151
10055350 is the account profile ID.
Note that the above link may expand out to something like this:
https://checkout.channeladvisor.com/checkout/1252/default.asp?z=0&t=2595456&p=10055350&i=5647151&amself=1
The same rule applies: look for the "p=" query string parameter to locate your account profile ID.
Member Name: The Login Member Name is the login ID provided to you by ChannelAdvisor to access your reports and is typically an email address. If you do not have a login ID or wish to create a limited access ID just for these reports, please contact your ChannelAdvisor Account Manager.
Password: The login password corresponding to the Login ID.
API URL: Your API URL will be either merchant.channeladvisor.com or enterprise.channeladvisor.com depending on the type of your ChannelAdvisor account.
Setting Up the Shopping Cart
-
You can access the Shopping Carts screen one of three ways:
-
Main Menu> Quick Clicks> Create/Edit Shopping Cart button
-
Main Menu> Maintenance Menu> Cart Functions tab> Create/Edit Shopping Carts button
-
Main Menu> Quick Clicks> Setup Wizard> Shopping Carts tab> Create and Edit Shopping Carts button
-
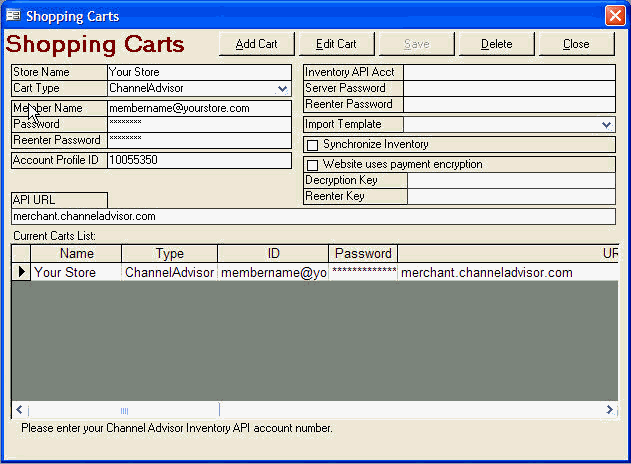
The Shopping Carts screen opens. See Figures 1 and 2.
-
Click [Add Cart].
-
Enter a Store Name. Note: You can name the store anything you wish as long as it is easily distinguishable from any other shopping carts you have configured in the Order Manager..
-
Choose [ChannelAdvisor] from the Cart Type drop-down list.
Note: If you are licensed to use only one type of shopping cart you do not see a drop down list; ChannelAdvisor is your default cart type. If you're licensed for multiple carts, the screen adjusts to display the fields necessary for a ChannelAdvisor cart set up.
-
Contact ChannelAdvisor Support to obtain the value for the Inventory API Acct field and enabling communication between the Order Manager and the Web site.
-
Enter the appropriate secure URL to the ChannelAdvisor XML API in the API URL field of the Shopping Carts screen:
ChannelAdvisor Merchant Sellers: merchant.channeladvisor.com
ChannelAdvisor Enterprise Sellers: enterprise.channeladvisor.com
-
To perform real-time inventory synchronization, it is also necessary to check the box labeled Synchronize Inventory, but do not do so until the Knowledge Base topics Real-Time Inventory Synchronization with Channel Advisor and Inventory Synchronization have been reviewed. It is acceptable to put this step off to a later date.
-
Click [Save]. The shopping cart will appear in the Current Carts List: section of the screen.

Figure1: Shopping Cart form in Version 5.612 or lower
-
Click [Close] to exit the Shopping Carts screen.
Updated 9/9/09
Modified 10/7/13
