Setting Up An Amazon Seller Central Cart
-
Semplice 1.1 is compatible with Windows 7. Be sure to follow the directions beginning on page 31 of the Semplice Install Guide. Users may encounter permissions issues when installing Semplice on Small Business Server 2008. Wrinklebrain will provide updated documentation to address the situation in the near future. In the mean-time, contact Stone Edge Tech Support for assistance.
The Order Manager does not require an export script from Amazon Seller Central to import orders. Instead, the Order Manager can import orders from Amazon Seller Central shopping carts in two ways:
-
importing orders directly through the Internet using Amazon's XML interface and Semplice, a third-party software from a company called WrinkleBrain, or
-
exporting a text file from an Amazon Seller Central store site and importing it into the Order Manager for processing.
The integration between the Order Manager and Amazon Seller Central shopping carts does NOT support the import of customer records, product data, or data from custom fields.
Note: Semplice is the current software product from WrinkleBrain that enables direct order import into the Order Manager using Amazon's XML interface. The Semplice product replaced WrinkleBrain's previous product, called WASH, in August of 2008. Current WASH users will be switched to Semplice when the time comes to renew their license. To purchase Semplice software at a special price through Stone Edge, contact sales by email or by phone at 877-786-6393.
This document contains the following sections. Click on a link to jump to that section:
-
Import orders one last time from Amazon using WASH.
-
On your computer, go to the Microsoft Start Menu> Control Panel> Administrative Tools> Services.
-
Look for any service that begins with the name WrinkleBrain. Right-click on each and select Properties. On the General tab click the Stop button and change Startup Type to Disabled. Click Apply, and then OK.
-
Download Semplice from www.stoneedge.net/dlgateway.
-
Extract the contents of the zip files to the desktop.
-
Depending on the version of Semplice you are using, follow the Semplice Install Guide V.7, or Semplice MWS Install Guide V1.1 (if license for Semplice was purchased after October, 2011).
-
After installation browse to C:\Semplice on your computer.
-
Within this directory find the folders, ToAmazon and FromAmazon. These must be shared so that all users have full control access to them.
-
Right-click on each folder and select Properties. Depending on version of Windows you will either see a Sharing tab, or a Sharing tab and a Security tab.
-
If Sharing is the only tab, check the box next to Share this folder. Then check the box next to Allow Users to Change My Files.
-
If both tabs are present, click the radio button next to Share this folder. Next, click on the Permissions button and add a Group or user name called Everyone. Once you have done that click in the Allow Full Control checkbox on the bottom of the screen. Click Apply and then OK. Next move on to the Security tab and add an Everyone user and once again click in the Allow Full Control checkbox.
-
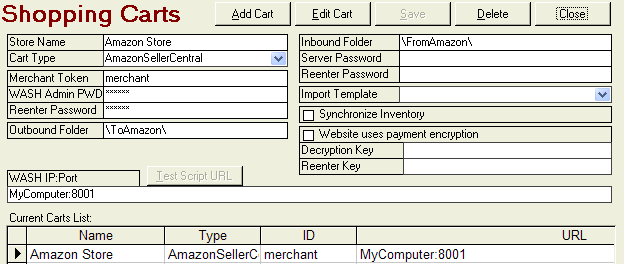
In the Order Manager go to the Maintenance Menu> Cart Functions> Create Shopping Carts.
-
In the Inbound Folder field, enter \FromAmazon\ and enter \ToAmazon\ in the Outbound Folder field.
-
All other settings can be left the same if you are installing Semplice on the same machine as WASH. If you are installing Semplice on a different machine than the one on which WASH was installed, then the Wash IP:Port field should be filled in with YourPCName:8001. (This is the name of the computer where you have installed Semplice.) For example, if your PC name is MYPC you would type MYPC:8001.
-
Download Semplice from www.stoneedge.net/dlgateway
-
Extract the contents of the zip file to the desktop.
-
Depending on the version of Semplice you are using, follow the Semplice Install Guide V.7, or Semplice MWS Install Guide V1.1 (if the license for Semplice was purchased after October, 2011).
If Semplice V.7 is used, Windows 7 or Windows Vista users must perform some additional setup steps found at the end of that Semplice Install Guide.
-
After installation browse to C:\Semplice on your computer.
-
Within this directory there are two folders which need to be shared and all users must have full control access to them. They are ToAmazon and FromAmazon. (The FromAmazon folder gets created the first time that the Semplice Storefront is started from the Semplice Dashboard,  , by pressing the "Play" button or by right-clicking on the Storefront (name of your store) and choosing Start Storefront.)
-
Right-click on each folder and select Properties. Depending on version of Windows you will either see a Sharing tab or a Sharing tab and a Security tab.
-
If Sharing is the only tab, check the box next to Share this folder. Then check the box next to Allow Users to Change My Files.
-
If both tabs are present, click the radio button next to Share this folder. Next, click on the Permissions button and add a Group or user name called Everyone. Once you have done that, click in the Allow Full Control checkbox on the bottom of the screen. Click Apply and then OK. Next move on to the Security tab and add an Everyone user and once again click in the Allow Full Control checkbox.
-
In the Order Manager go to Maintenance Menu> Maintenance tab> Set System Parameters. Set the following parameters:
-
AmazonUseWashSystem, set to True
-
AmazonUseChargeWhenShip, set to True
-
UseStatusUpdates, set to True
Note: You must set the AmazonUseWASHSystem parameter (in the Amazon group) to True before you begin setting up your shopping cart. If you do not, you will not see the Merchant Token, WASH Admin PWD, WASH IP:Port, Outbound Folder, and Inbound Folder fields on the Shopping Carts dialog box.
-
Go to Maintenance Menu> Cart Functions> Create Shopping Carts.
-
Click Add Cart and enter a name in the Store Name field. This name is for internal purposes only.
-
Select AmazonSellerCentral from the Cart Type drop-down list. If the user is only licensed for one shopping cart type the Cart Type drop-down box will not be visible. Go on to the next step.
-
Enter your Amazon Seller Central Merchant Token in the designated field.
-
In the WASH Admin PWD field enter a password. (This can be any password you'd like; it's no longer used but a value must be entered into the field.) Re-enter the password in the Reenter Password field.
-
In the Inbound Folder field, enter \FromAmazon\ and enter \ToAmazon\ in the Outbound Folder field.
-
The Wash IP:Port field should be filled in with your PCName and then :8001. For example, if your PC name is MYPC you would type MYPC:8001.
-
Click Save, and then Close to exit.
Note: You must call Amazon Seller Central and ask them to switch your Order Reports to an XML feed rather than a plain text feed in order for Semplice to be able to import your orders.
Before you set up the Amazon cart, go to Maintenance Menu> Maintenance tab> Set System Parameters and ensure that the AmazonUseWASHSystem parameter (in the Amazon group) is set to False (this is the default).
Optional - Set AmazonPaymentMethod (in the Amazon group) to either Generic 1 or Generic 2 as the default payment method for Amazon orders (since the orders are imported paid in full without payment information). Note: It is possible to create a custom payment method to report Amazon payments to your accounting application as Amazon payments and not generic payments. See Payment Methods for details. If using Quickbooks, be sure to return to the Accounting Export Setup>Deposits tab and make sure that this custom payment method is mapped to an account.
Optional - Set AmazonCopyAddress (in the Amazon group) to True to copy the Ship To address to the Bill To address. Note: Amazon does not provide the billing address for any orders.
-
You can access the Shopping Carts dialog box one of four ways:
-
-
Main Menu> Maintenance Menu> Cart Functions tab> Create/Edit Shopping Carts
-
Main Menu> Maintenance Menu> Setup Functions tab> Store Setup Wizard> Shopping Carts tab> Create and Edit Shopping Carts
-
Quick Clicks> Create/Edit Shopping Cart
-
Quick Clicks> Setup Wizard> Shopping Carts tab> Create and Edit Shopping Carts
-
The Shopping Carts dialog box opens.
-
Click Add Cart.
-
Enter the name of your shopping cart. Note: You can name the shopping cart anything you like, but it should be easily distinguishable from other shopping carts you may have.
-
Select AmazonSellerCentral from the Cart Type drop down list.
-
Click Save. The cart is added to the Current Carts List:
-
Click Close to exit the Shopping Carts dialog box.
-
Download your Order Reports from Amazon Seller Central and save them to the NewOrders directory used by the Order Manager, e.g. C:\StoneEdge\NewOrders.
-
The shopping cart is set up; follow the instructions in the article, Importing Orders from Amazon Seller Central (Text).
This section explains the system parameters and their values that are needed to integrate your Amazon Seller Central shopping cart with the Order Manager.
To open the System Parameters screen, go to Maintenance Menu> Maintenance tab> Set System Parameters. Select the Amazon Parameter Group. Click on the Parameters to see Details and set the Parameter Value. The Parameter Details are listed below.
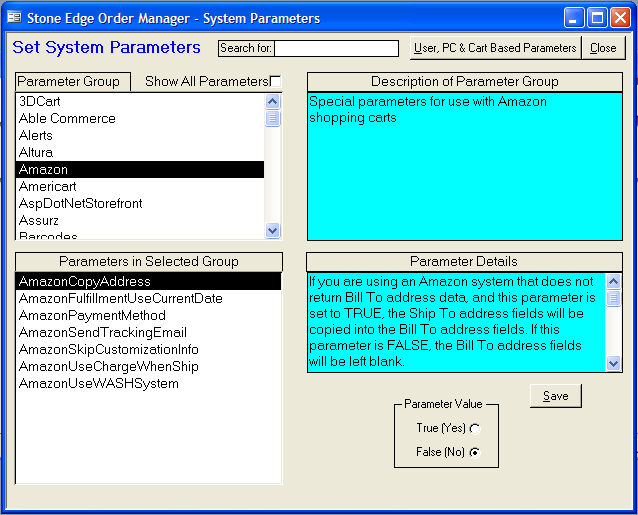
AmazonCopyAddress - If you are using an Amazon system that does not return Bill To address data, and this parameter is set to True, the Ship To address fields will be copied into the Bill To address fields. If this parameter is False (this is the default), the Bill To address fields will be left blank.
AmazonFulfillmentUseCurrentDate - If True (this is the default), as Fulfillment messages are sent to Amazon, the system will use the current date as the "Fulfillment Date". Set this parameter to False to have the program search for the earliest fulfillment date to report to Amazon. System will first search the pickup date of all tracking numbers related to the order. Next the system will review the Actual Ship Date of all line items that are contained in the fulfillment message. The earliest date found will be the "Fulfillment Date" reported to Amazon.
AmazonPaymentMethod - Select the Amazon Payment Method from the drop-down list that you use for Amazon orders, and then click Save.
NOTES:
1) Before setting this parameter, you must manually add "Amazon" (or whatever payment method name you want for reporting purposes) to the list of payment methods on the Payment Methods screen. For instructions on how to do this, see the article, Payment Methods.
2) If you use the XML interface (Semplice), the XML information may contain the payment method which will override this system parameter.
AmazonSendTrackingEmail - Set to False (the default is True) to avoid sending tracking number email to customers placing orders through Amazon.
AmazonSkipCustomizationInfo - If using Customization Info fields in Amazon, set this parameter to False (the default is True) to have the program place the customization info into the option fields for each line item.
AmazonUseChargeWhenShip - Set to True (the default is True) if your Amazon Seller Central store has been upgraded to use the "Charge When Ship" feature. This will impact how credits are reported to Amazon in the case of order or item cancellations.
Note: Using Amazon's Charge When Ship function does not require any modifications to the Order Manager or Semplice (formerly WASH). It does, however, require that merchants send fulfillment feeds to Amazon within 30 days of the order date. Otherwise, Amazon cancels the order online but the Order Manager still shows the order as open. After Amazon processes the fulfillment feeds, confirmation email is handled by the Amazon system; therefore, Amazon asks that merchants do not also send confirmation email to customers. Merchants using multiple types of shopping carts can avoid sending tracking number email to Amazon customers only by setting the AmazonSendTrackingEmail system parameter (available in the Amazon Parameter Group in the Order Manager version 4.3XX Beta and higher) to False. For merchants who only have an Amazon Seller Central cart, set the BatchEmailForTrackingInfo (in the Email Parameter Group) to False.
AmazonUseWASHSystem - Set to True (the default is False) if using WrinkleBrain's Semplice (formerly WASH) program to communicate with Amazon's XML API.
Important Parameters to Set Outside the "Amazon" Parameter Group
Note: The Order Manager can't import or process payment transactions from Amazon, so the following parameters must be set so that your imported orders are recorded as "paid in full" and your reporting is accurate.
AssumePaidInFull - (To set this parameter, select the Order Parameter Group.) If you want the Order Manager to assume that all Amazon.com orders have been pre-paid, set this parameter to True. Otherwise the program will assume that no payment has been received and will show all Amazon orders as having a "Balance Due" (this parameter can also be set per individual shopping cart).
WebTransactionType - (To set this parameter, select the Credit Cards Parameter Group.) When orders are placed in your Amazon Seller Central shopping cart, the shopping cart completes the transaction online, so set this parameter to Sale.
See Also:
Training Video - Configure Semplice to Import from Amazon.com
Updated 8/19/09
Modified 10/31/11