

In this Topic: Show
Stone Edge Order Manager version 5.0 introduced the ability to print UPS shipping labels without the need for third-party software.
To use the internal UPS System you must already have an established Daily Pickup account with UPS.
The current release of Stone Edge is only designed to accept a single UPS Account for all shipping and does not support multi-package shipments at this time.
To use the Stone Edge internal shipping system for UPS, set the following System Parameters.
Go to System Parameters> Shipping Group:
UPSShippingSystem - Set this to "Order Manager"
UnitOfMeasureDimensions - Set this parameter to define the dimensional values for your products.
UnitOfMeasureWeight - Set this parameter to define the weight values for your products.
![]() Complete all pages of the Shipping
section of the Store Setup Wizard
before executing
the UPS OnLine® Tools
Setup Wizard, which
is found on the first page of that section.
Complete all pages of the Shipping
section of the Store Setup Wizard
before executing
the UPS OnLine® Tools
Setup Wizard, which
is found on the first page of that section.
The UPS OnLine® Tools Setup Wizard walks you thru entering your UPS account information and preferences. Many of the settings entered on the UPS OnLine® Tools Setup screens correspond to System Parameters in the UPS Parameter Group.
You can select the Cancel button at any point during the setup to exit the wizard. Keep in mind that the data entered into the wizard is not saved until you select the Finish button at the end of the setup, so the next time you run the wizard, you will need to re-enter your information.
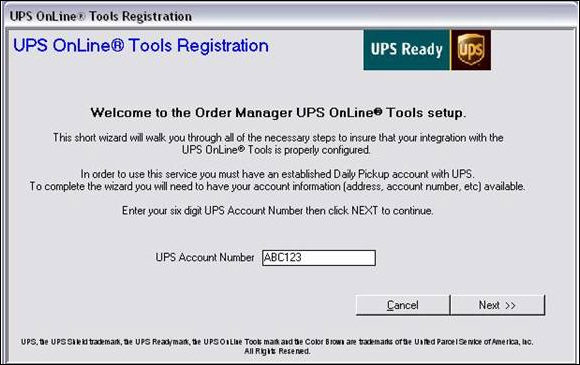
Enter your 6-character UPS Account Number for your Daily Pickup Account in the UPS Account Number field, and then select the Next button to go to Screen 2.
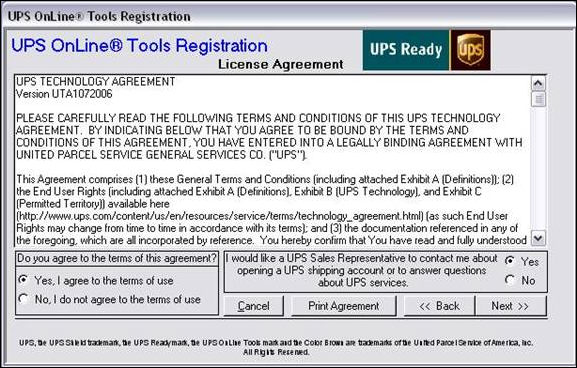
To use the UPS OnLine Tools system you must accept the UPS Licensing Agreement (agreement).
If you do not accept the agreement, you may select the Cancel button to exit the wizard.
If you do accept the agreement, you must also select an option regarding contact by a UPS Representative.
If you wish to have a copy of the agreement, select the Print Agreement button. This will open the agreement in Notepad allowing you to print or save the agreement to file.
Select the Next button to move to Screen 3.
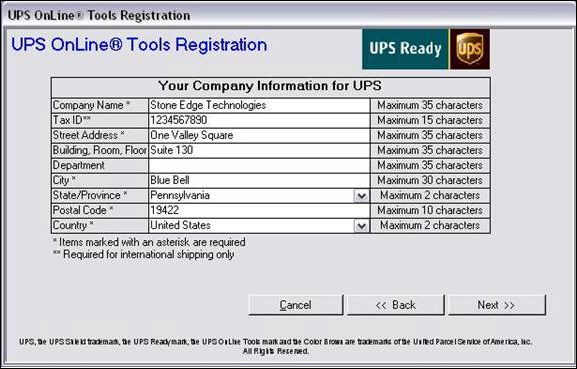
Enter your company's information. This information should match your company's "shipper information" already on file with UPS. An alternate "ship from" address can be entered in Screen 5.
The following fields are required:
Company Name - your company's name
Street Address - Your company's street address
City - City where your company is located
State/Province - State or Province where your company is located
Postal Code - Zip code or postal code where your company is located
Country - Country Code where your company is located
The following fields are conditionally required:
Tax ID - Your company's Tax Identification Number - Required for international shipments
The following fields are optional:
Building, Room, Floor - Address 2 information - Suite, Floor Number, etc.
Department - Address 3 information - Name of the department to receive the package
Select the Next button to go to Screen 4.
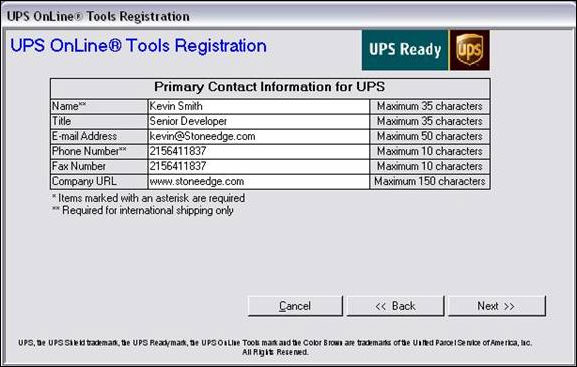
Enter the information for your company's contact person who can answer inquiries regarding UPS shipments.
The following fields are conditionally required:
Name - Name of contact person at your company - required for international shipments
Phone Number - Your company contact's phone number - required for international shipments
The following fields are optional:
Title - Contact person's title
Email Address - Contact person's email address
Fax Number - Contact Person's fax number
Company URL - Your company's website address
Select the Next button to go to Screen 5.
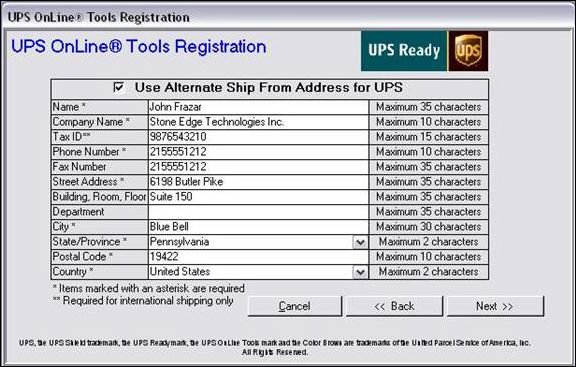
If you are shipping from the address entered in Screen 3 (Shipper Information screen), select the Next button to skip this screen.
If you will be shipping from a location that is different than the location specified on Screen 3 (Shipper Information screen), then select the check box at the top of the screen to use an alternate "ship from" address.
The following fields are required:
Name - Name of contact person at the alternate location
Company Name - Name of company at the alternate location
Phone Number - Phone number of contact person at the alternate location
Street Address - Company's street address at alternate location
City - Name of city at alternate location
State/Province - State or Province at alternate location
Postal Code - Zip Code or Postal Code of alternate location
Country - Country code of alternate location
The following fields are conditionally required:
Tax ID - Alternate company's Tax Identification Number
The following fields are optional:
Fax Number - Contact's fax number at alternate location
Building, Room, Floor - Address 2 information for alternate location
Department - Address 3 information for alternate location
Select Next to go to Screen 6.
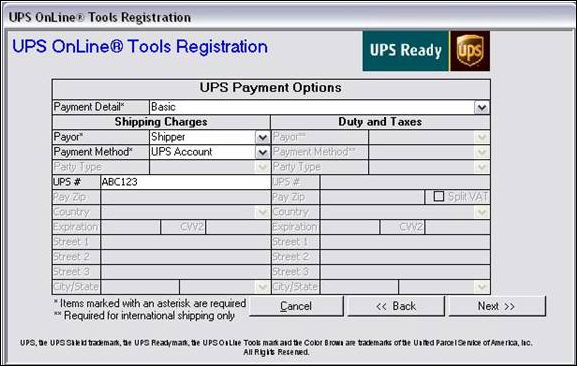
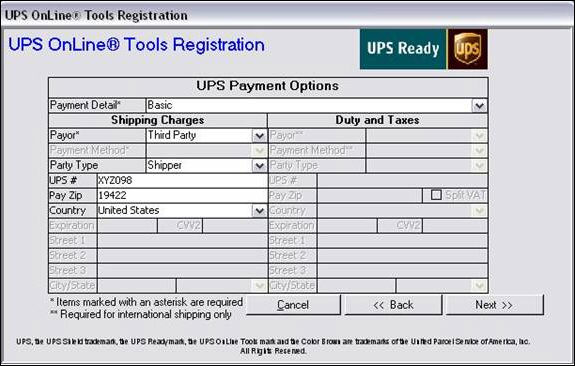
This screen allows you to set the default payment information for a shipment. The program assumes the shipper is the payor, however, you can assign different information if needed.
Select the level of payment detail you want to provide from the Payment Detail drop-down list. Options include "Basic" (domestic and international shipments) or "Itemized" (international shipments only).
Basic allows you to define the payor responsible for all charges for the shipment. The Duty and Taxes section will be disabled if this option is selected
Itemized
allows you to
specify separate payors for shipment fees and duty fees. This option
enables the Duty and Taxes section.
For the Shipping Charges section and, if enabled, the Duty and Taxes section, choose from the following payment options:
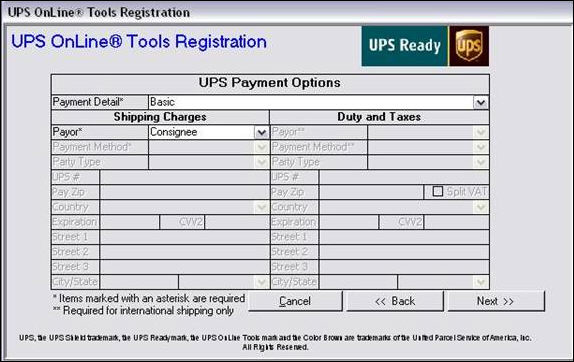
Select the party responsible for payments from the Payor drop-down list. Options include "Shipper", "Receiver", "Third Party" and "Consignee". Depending on the selection made, different data points are required. These fields will be enabled on the screen for you to enter the details.
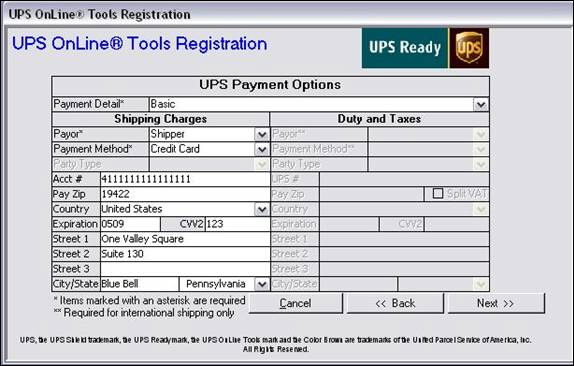
If Shipper is selected from the Payor drop-down list, you have a choice of payment method between the UPS Account Number or credit card in the Payment Method drop-down list.
If the UPS Account option is selected, enter the UPS Account Number in the UPS# field
If the Credit Card option is selected then enter the following data
Acct # - Enter the credit card number without dashes or spaces
Pay Zip - Enter the Zip Code of the card holder
Country - Select the Country of residence of the card holder
Expiration -- Enter the card’s expiration date in "mmyy" format
CVV2 -- Enter the card’s 3 or 4 digit security code
Street 1 -- Enter the card holder’s street address
Street 2 -- Enter any additional address information for the card holder
Street 3 -- Enter any additional address information for the card holder
City/State -- Enter the city and select the state of residence of the card holder
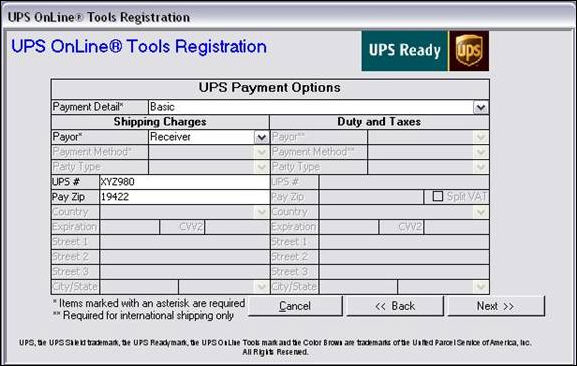
If Receiver is selected from the Payor drop-down list then the only payment option is by UPS Account.
Enter the Receiver’s UPS Account Number in the UPS# field and their Zip Code in the Pay Zip field.
If Third Party is selected from the Payor drop-down list then the only payment option is by UPS Account.
Select the type of party the third party represents from the Party Type drop-down list.
Enter the Third Party’s UPS Account Number in the UPS# field, their Zip Code in the Pay Zip field and select their country of residence from the Country drop-down list.
If Consignee is selected from the Payor drop-down list, no other data points are required.
If you have chosen the Itemized option from the Payment Detail drop-down list, one additional field is available under the Duty and Taxes section.
Select the Split VAT option if the party responsible for shipping fees and the party responsible for duty and taxes will be splitting the payment of any Value Added Taxes (VAT) applied to the shipment.
Select Next to go to Screen 7.
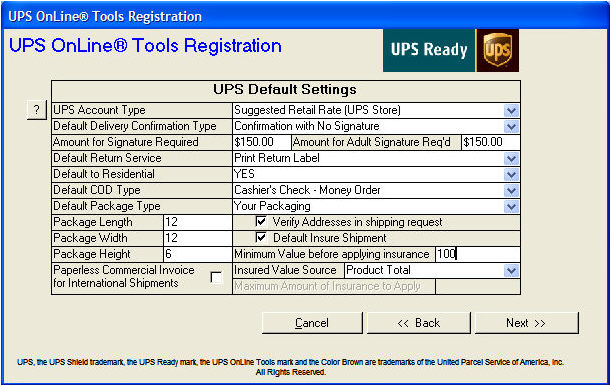
Choose the default settings for all shipments. These values can be changed for any given shipment in the UPS Form. Options include the following:
UPS Account Type -- Select Daily Pickup
Default Delivery Confirmation Type -- Select from one of the following options
No Confirmation -- No delivery confirmation requested on the shipment
Confirmation with No Signature -- Delivery Confirmation request sent with shipment specifying no signature required
Signature Required - Delivery Confirmation request sent with shipment specifying that a signature is required
Adult Signature Required - Delivery Confirmation request sent with shipment specifying that an adult signature is required
Amount for Signature Required -- If you have chosen the No Confirmation or Confirmation with No Signature option from the Default Delivery Confirmation Type drop-down list, you can have the program change the confirmation type to Signature Required when the Insured Value of the order meets or exceeds the dollar amount entered in this field.
Amount for Adult Signature Required - If you have chosen the No Confirmation, Confirmation with No Signature, or Signature Required option from the Default Delivery Confirmation Type drop-down list, you can have the program change the confirmation type to Adult Signature Required when the Insured Value of the order meets or exceeds the dollar amount entered in this field.
Default Return Service -- Allows you to define the default return service (if any) to apply to a shipment. Select from one of the following options:
None -- No return shipment is processed
Print Return Label -- Return Label printed with the shipping label
Print and Mail -- Return Label is printed at UPS and mailed to the customer
Electronic Return Label -- Return Label is emailed to the customer by UPS
Return Service 1 Attempt -- Return Label printed by UPS, given to driver who attempts to pick up package. If the attempt fails, the driver leaves the label for the customer
Return Service 3 Attempts -- Return Label printed by UPS and given to the driver who will attempt to pick up package three times. Label is not left with customer if attempts fail.
Default to Residential -- This option controls the Residential flag on the shipment. Select from one of the following options:
No -- Residential flag is set to false (unchecked)
Yes -- Residential flag is set to True (checked)
YesIfNoCompanyName -- This option will set the Residential flag to True if the shipping party does not have a company name present in their information. Leaves the Residential flag set to false otherwise.
Default COD Type -- If the order shows a balance due at the time the shipment is being processed, the program can set the COD flag to the default option selected here. Choose from one of the following:
Check -- Cashier’s Check -- Money Order -- The three stated forms of payment are accepted
Cashier’s Check -- Money Order -- The two stated forms of payment are accepted
Cash (EU Origins Only) -- Cash accepted -- this only pertains to shipments originating within the European Union
Check -- Money Order -- No Cash (EU Origins Only) -- Only check and money order allowed. No cash accepted -- this option only pertains to shipments originating within the European Union.
Default Package Type -- This option sets the default package type for the shipment. Select from one of the following options:
Customer Packaging
UPS Express Envelope
UPS Express Tube
UPS Express Pak
UPS Express Box - Small
UPS Express Box - Medium
UPS Express Box - Large
UPS 25 Kg Box
UPS 10Kg Box
Package Length, Package Width, Package Height -- If you selected the Customer Packaging option from the Default Packaging Type drop-down list, you can enter the default package dimensions into these three fields. Package Length must contain the largest of the three values. Values are to be entered in inches/centimeters and are used to calculate Dimensional Weight of the package. These fields do accept decimal values.
Paperless Commercial Invoice for International Shipments -- You must contact UPS to set up your account to use Paperless Commercial Invoices with the internal UPS system. By selecting this option, the program assumes the merchant is set up to use the paperless commercial invoice feature with UPS and flags any shipments that may require additional documents (NAFTA, SED, etc.).
Verify Addresses in Shipping Request -- Check this option if you want UPS to perform address validation on the shipping address prior to processing the shipment.
Default Insure Shipment -- This option sets the default value of the Insure check box. If checked, the shipment will include an insurance request.
Minimum Value before applying insurance -- Enter the minimum shipment value required to apply insurance. If shipment value is below this threshold, value is set to 0 so insurance is not applied to shipment. This setting is ignored if the parameter UPSDefaultUseInsurance is false.
Insured Value Source -- If the Default Insure Shipment check box is checked, this option will become available. This allows you to define how the Declared Value is reported for shipping insurance. Select from one of the following options:
Product Total -- Value is set to the total retail value of shippable items on the order
Grand Total- Value is set to the final grand total on the order
Product Cost -- Value is set to the Cost of shippable goods on the order
Product Total to Max Amount- Value is set to the retail value of shippable items on the order up to the maximum amount entered into the Amount field.
Grand Total to Max Amount- Value is set to the final grand total on the order up to the maximum amount entered into the Amount field.
Product Cost to Max Amount- Value is set to the cost of goods of shippable items on the order up to the maximum amount entered into the Amount field.
Flat Amount -- Value is set to the dollar amount entered into the Amount field
Amount -- If you selected one of the options for Insured Value Source that contain the word "amount", this field will be enabled to accept a dollar amount that will act as the declared value (Flat Amount) or "ceiling" (Max Amount) for declared value for shipping insurance.
Select Next to go to Screen 8.
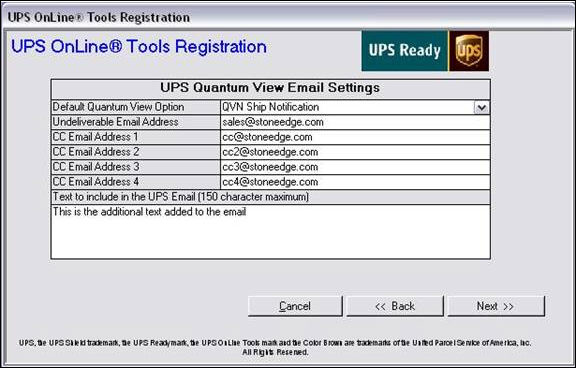
Define the Quantum View Notification (QVN) options added to the order.
Default Quantum View Option - Select from one of the following notification options:
None -- No QVN notifications are sent for shipments
QVN Ship Notification -- Notification of shipment is emailed
QVN Exception Notification -- Notification of exceptions is emailed
QVN Delivery Notification -- Notification of shipment delivery is emailed
Undeliverable Email Address -- Enter an email address to receive any QVN emails that could not be delivered.
CC Email Address 1 - 4 -- Enter up to four additional addresses to also receive QVN notification emails.
Text to Include in the UPS Email -- You can enter up to 150 characters to be added to the bottom of the QVN Notification email.
Select Next to go to Screen 9.
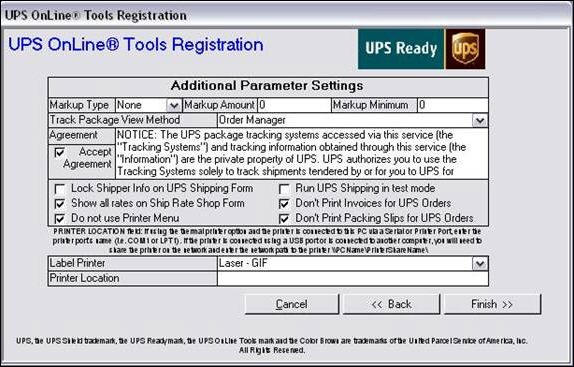
Set some optional parameters and your printer settings. Select from the following:
Markup Type, Markup Amount, Markup Minimum -- If you wish to add additional surcharges (shipping markup) on the rates charged/quoted by UPS, you can set this field to FlatAmount or Percent. If you select FlatAmount then enter the dollar amount to add in the Markup Amount field. If you select Percent, then enter the percentage to add in the Markup Amount field. You can also set a minimum dollar amount to charge in the Markup Minimum field. Should the calculated markup be less than the minimum, the minimum is applied.
If you do not wish to add surcharges then set this field to None.
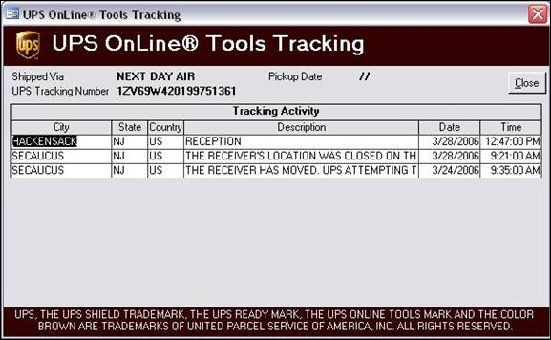
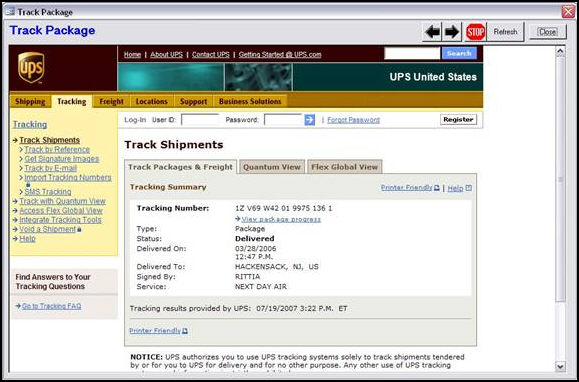
Track Package View Method -- Choose from the following options:
Order Manager -- When you select Track Package in the View/Process Orders screen, the program polls UPS for tracking details and displays the results.
Browser -- When you select the Track Package button in the View/Process Orders screen, the program opens a web browser screen at the UPS website and enter the tracking number automatically.
Tracking Agreement -- If you set the Track Package View Method option to Order Manager then you must read and accept the UPS Tracking License Agreement before completing the wizard.
Lock Shipper Info on UPS Shipping Form -- Checking this option prevents users from changing the "shipper" and "ship from" fields on the UPS Shipping Form when they are processing shipments.
Show all rates on Ship Rate Shop form -- If this option is True, the program displays rates for all UPS shipping methods available between the Origin and Destination addresses. If this option is False, the program only displays rates for UPS Shipping Methods available between the Origin and Destination Addresses that are associated with the shipping methods defined in Stone Edge.
Do Not Use Printer Menu -- If you have the system parameter UsePrinterMenu set to True and you do not want the UPS Shipping System to use the Printer Menu prompt, select this option.
Run UPS Shipping in Test Mode -- Selecting this option allows the user to print shipping labels without being charged. The labels are actually produced by a UPS production server but voided after the label is received.
Label Printer -- This option allows you to specify the type of label printed. Choose from one of the following options:
Thermal -- EPL -- Used for printing 4" x 6" labels on a thermal label printer that supports the Epson Printer Language (EPL).
Thermal -- SPL - Used for printing 4" x 6" labels on a thermal label printer that supports the Samsung Printer Language (SPL).
Thermal -- ZPL - Used for newer Zebra printers that are distributed by UPS and require the Zebra Printer Language (ZPL) instead of EPL. Used for printing 4" x 6" labels.
Laser -- GIF -- This option is used to print a combination label and packing slip on 8-1/2" x 11" paper. This requires the use of a special form.
Note: If the customer has a Zebra Printer and the print is accessible through the network, but they are still not able to print labels from the integrated UPS OnLine Tools to that printer using the Thermal -- EPL setting, try changing the setting it to Thermal -- ZPL. If the customer does not see Thermal -- ZPL as an option and they have a newer Thermal printer, they should upgrade to Version 5.9 or greater.
![]() The integrated UPS OnLine Tools shipping software
does not support the use of STAR printers.
The integrated UPS OnLine Tools shipping software
does not support the use of STAR printers.
Printer Location -- If you selected the Laser -- GIF option from the Label Printer drop-down list, leave this option blank. If you chose one of the thermal label options then you must enter the printer’s location. This is done in one of two ways:
If the printer is connected to the shipping PC using a serial port (COM) or printer port (LPT) then enter the port’s name into this field (i.e. COM1 or LPT1)
If the printer is connected to
the shipping PC using a USB port or the printer is connected to another
PC on the network, you must set up the printer to be "shared"
on the network. Enter the UNC (Universal Naming Convention) path to
the shared printer
(i.e. \\ComputerName\PrinterShareName). This
setting can also be established per workstation in the User, PC &
Cart Based System Parameters so each shipping PC on your network can
be set up with a different printer if needed.
Don’t print invoices for UPS orders -- If you selected the Laser -- GIF option from the Printer Location drop-down list, you can checkselect this option to tell the program not to produce an invoice for the order since the shipping label will already have the packing slip.
Don’t print packing slips for UPS orders -- If you selected the Laser -- GIF option from the Printer Location drop-down list, you can check select this option to tell the program not to produce a packing slip for the order since the shipping label will already have the packing slip.
Select the Finish button to send your registration information to UPS. Please be patient as this can take up to 30 seconds to complete the exchange. If your information is accepted Screen 10 is displayed, otherwise you’ll receive an error and have to correct your information.
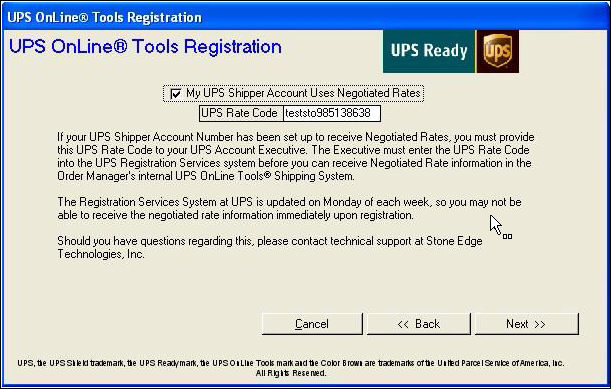
Optional - If your UPS account is set up to receive negotiated rates, select the box labeled Use Negotiated Rates to have the program receive those rates when requesting rate lookups and printing shipping labels.
Refer to UPS Negotiated Rates for additional requirements before attempting to use negotiated rates.
Select Next to go to the last screen.
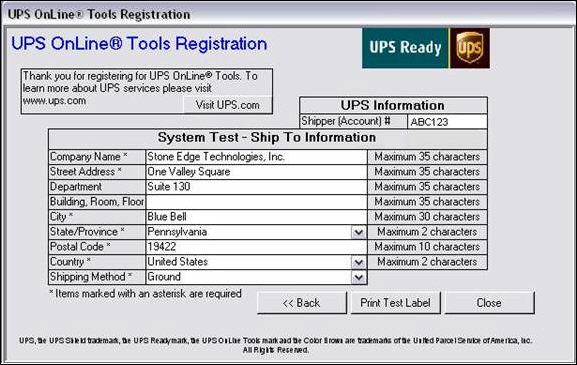
Optional - If you want to test the printer, you can enter a shipping destination in the System Test - Ship To Information (the fields are populated with the old Stone Edge office address by default).
Select Print Test Label.
If your setup is correct, a label is produced.
Note: The test label may throw an error depending on the defaults selected earlier in the wizard; not all defaults are acceptable for this test shipment. (For example, the default "Print Return Label" button is known to cause an error from the UPS side when printing a test label.) If you receive an error, please test with a live shipment before contacting Stone Edge Tech Support.
Select the Close button to exit from the UPS OnLine Tools Setup Wizard.
Created: 2/1/12
Modified: 11/3/14