Galaxy Ship by Endicia can be used as a bridge between the Order Manager's database (data file) and DAZzle, Endicia's label and postage printing application. The merchant must have an Endicia Professional service plan to use Galaxy Ship.
This article assumes that Galaxy Ship has been installed on a workstation where the Order Manager is also installed. The installation of Galaxy Ship is outside the scope of this document. For more installation information, please refer to the vendor's documentation, http://endicia.com/endicia-usa/hot/galaxyusersguide.cfm.
Galaxy Ship reads shipping address data from the Order Manager database and allows the merchant to select the desired weight, mail class, and optional services. When the label is printed, Galaxy Ship passes the information to DAZzle, which processes the postage transaction via the Endicia servers.
The Order Manager is capable of interfacing with Endicia's DAZzle without the need for Galaxy Ship. Refer to the Setup Wizard 5.9 or the Legacy Setup Wizard as well the knowledge base article about DAZzle.
The instructions in this article for creating the Source Data Map and Post Back Data Map to transfer data between the Order Manager and Galaxy Ship show the minimal requirements for each map. The user can map additional fields as needed and may be able to exploit other features of Galaxy Ship that are not within the scope of this document. For more detailed information, please refer to the vendor's documentation, http://endicia.com/endicia-usa/hot/galaxyusersguide.cfm.
An ODBC connection must be created on each workstation that will use an external shipping software application, such as Galaxy Ship.
An ODBC connection will have already been created if the Enterprise Edition of the Order Manager is being used with an SQL data file. It is acceptable to utilize the same ODBC connection to integrate with external shipping applications. Go to the Switch Stores screen to identify the connection name so that it can be used later in this process.
If a Microsoft Access data file is being used, and any other external shipping software has already been setup to use an ODBC connection, it is acceptable to use that same connection, as well. Check the import and export maps of the shipping software to determine the ODBC connection that is being used.
Otherwise, create a new ODBC connection.
If the Order Manager is using a Microsoft Access database as its data file, skip this section and proceed to Create the Source Data Map in Galaxy Ship.
Enterprise users that have implemented an SQL database as the Order Manager's data file must follow the instructions in the article, Using Galaxy Ship with an SQL Data File. Once those steps have been completed, continue with the next section, Create the Source Data Map in Galaxy Ship.
The Source Data Map is the connection between the Order Manager's data file and Galaxy Ship's fields.
Open Galaxy Ship's Preferences dialog (File menu | Preferences). Click the Database tab.
Click the Edit Source Data Map button. A new dialog opens where you can connect Galaxy Ship's fields to the fields in your database:
First, click the Select button at the top, next to the ODBC Data Source box. On the dialog, select the DSN that connects to the Order Manager's data file. (It was identified or created in the previous section of this article.)
Click OK to close the dialog.
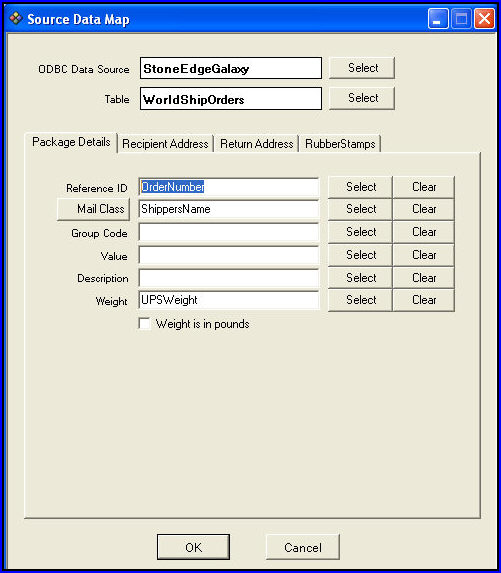
Next, click the Select button next to the Table box. Select WorldShipOrders
Click OK to close the dialog.
Click the Select button next to the Reference ID box:
Select OrderNumber.
Connect other fields as needed. Many of the fields are optional; the only required fields are Reference ID and the address fields. Refer to the vendor's documentation for more information.
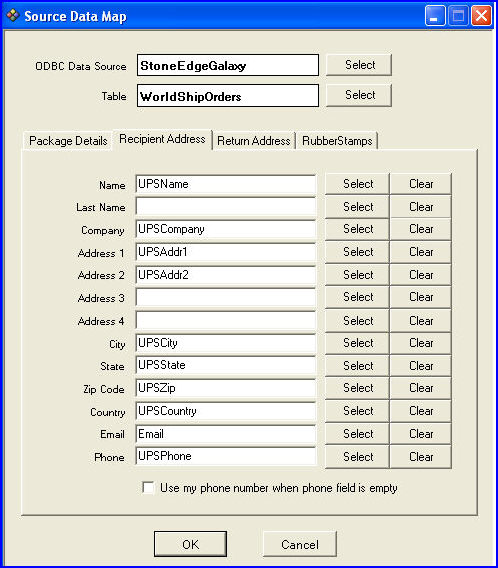
The following two figures demonstrate an example of how to map some of Order Manager's address fields to some of Galaxy Ship's address fields that appear on the Package Details and Recipient Address tabs of the Source Data Map screen:
Click OK when finished mapping fields, and then click OK on the Preferences dialog to close it. Proceed to the next section.
Enter an order number on the main Galaxy Ship window in the Reference ID box. Hit the Enter key or click the Process button. If all is well, Galaxy Ship will pull the shipping address from the Order Manager's data file and ZIP+4 verify it. The verified address will appear in the Shipping Address box. Proceed with the next section.
The post-back feature updates the Order Manager's data file (database) with shipment data, such as tracking data. The post-back map controls which fields Galaxy Ship will write back to the Order Manager's data file after a shipping label has been printed.
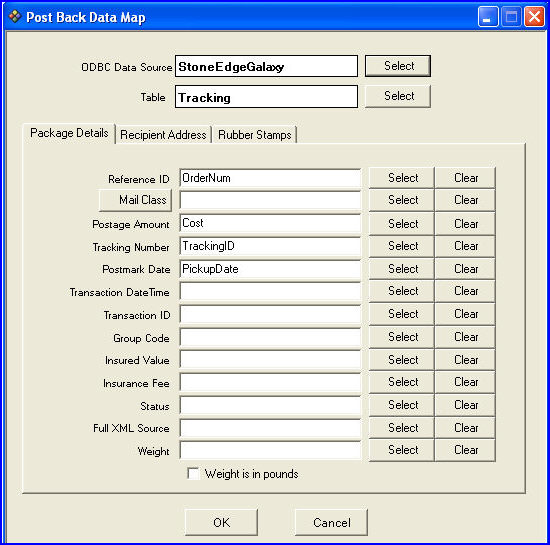
Click the Edit Post-Back Data Map button. The process for connecting the fields is similar to the Source Data Map above.
Click the Select button at the top, next to the ODBC Data Source box. On the dialog, select the appropriate DSN for the Order Manager's data file.
Click OK to close the dialog.
Next, click the Select button next to the Table box. Select Tracking.
Click OK to close the dialog.
Click the Select button next to the Reference ID box:
Select OrderNum.
Connect other fields as needed. See the vendor's documentation for more information.
Click OK when done, and then click OK on the Preferences dialog to close it.
|
Galaxy Ship field |
Order Manager Field |
|
Reference ID |
OrderNum |
|
Tracking Number |
TrackingID |
|
Postmark Date |
PickupDate |
|
Postage Amount
|
Cost |
Verify the post-back feature by printing a test label and manually posting it back to the Order Manager's database.
Before verifying the post-back feature, do the following:
Select a default shipping label for the mail class that will be test printed. For more information, see Specify Default Label Setup.
Set up a test shipping transaction in the Order Manager's database that includes an order number and a shipping address. To perform the test, record the order number from the test shipping transaction.
The following steps describe how to verify the Post-Back feature:
Display a shipping address:
On the Order Lookup tab, enter an order number in the Order Number field. The field that is to the left of the Retrieve Order button is the Order Number field.
The order number can be an order number, invoice number, or something else, depending on which database field was connected to the Galaxy Ship Order Number field. The order number must be unique.
Click the Retrieve Order button. The shipping address appears.
Select File > Test Print Label.
Open the Post-Back Data window by selecting Tools > Post-Back Data.
Click the left edge of the grid to highlight a record, or click the Select All button.
Click the Post Selected button.
Select Tools > Post Back Data.
Select Options.
The Post-Back Options dialog box appears.
Select the Automatically post-back data check box.
Click OK.
The instructions in this article for creating the Source Data Map and Post Back Data Map to transfer data between the Order Manager and Galaxy Ship show the minimal requirements for each map. To map additional fields or for more detailed information about Galaxy Ship, please refer to the vendor's documentation, which can be found at http://endicia.com/endicia-usa/hot/galaxyusersguide.cfm.
Updated: 12/21/09
Modified 4/29/10