
Version 5.9
In this Topic: Show
The Scan Inventory (Inventory Scanner) screen is accessed via the Scan Non-PO Items activity in the Inventory & Suppliers tab of the Maintenance Menu. This screen is used to "receive" inventory into the Order Manager that was not part of an Order Manager-generated Purchase Order.
![]() If products are obtained from a vendor via the Purchase Order system, the merchant must use the Receive Inventory button on the Purchase Order screen to enter those items into the Order Manager's inventory system.
If products are obtained from a vendor via the Purchase Order system, the merchant must use the Receive Inventory button on the Purchase Order screen to enter those items into the Order Manager's inventory system.
The Scan Inventory screen offers a better alternative to updating non-purchase order inventory's QOH via the Receive button on the Inventory screen, which is a record by record process. The Scan Inventory screen provides the ability to enter incoming QOH data for more than one SKU at a time at a single screen. Even more time can be saved by scanning the barcodes of the products when receiving inventory at this screen.
![]() Click the Show
link next to "In This Topic"
at the top of this page to see a series of links in outline form,
which can be used to quickly jump to that section of the topic.
Click the Show
link next to "In This Topic"
at the top of this page to see a series of links in outline form,
which can be used to quickly jump to that section of the topic.
In addition, major topics may provide a brief synopsis of a field's purpose or direct the reader to the appropriate section of the topic by scrolling over the image. To return to the previous location within the same page, right-click the mouse and select [Back].
If clicking a field directs the reader to a different Knowledge Base topic, it will open in a new tab or window, leaving the currently viewed topic open. The browser's settings determine whether a new tab or window is opened.
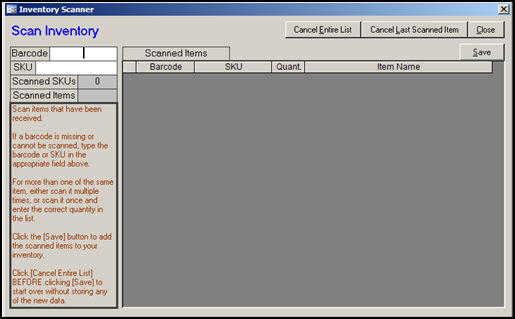
Figure 1: Scan Inventory (Inventory Scanner) screen when initially opened
enter the Stock Keeping Unit that represents the product in the Order Manager's inventory system
if a barcode is scanned, the SKU field will be completed by the program; otherwise, type in the SKU
displays the number of units of each scanned item that has been "received" in the current session
this field can be manually edited, unlike the other fields in this grid
if there are many units of a single product to be received, scan it once and update this column with the total number of units
the value of this field is added to the existing value in the # On Hand field of the product's inventory record when the [Save] button is clicked
use this button to erase all of the data in the grid and start over
this can only be done prior to clicking the Save button; once that button has been clicked the data has been stored in the program
use this button to un-do the last action taken at this screen, prior to clicking the Save button
despite the label of this button, it does impact manually entered or updated records
once this button has been clicked, it cannot be re-used until another item has been scanned or added; changing the value of the Quant. field of another item in the list does not count as an eligible action
be aware that if adding a SKU (having the Quant. of 1) was the last action performed at this screen, it will be removed from the list entirely; if the SKU has a Quant. greater than one (manually keyed in), its Quant. value will be decremented by 1, not by the unit count that was keyed in
click this button to exit the Scan Inventory screen
the program will prompt the user if they want to cancel all of the currently scanned data (unsaved); respond [Yes] to proceed or [Cancel] to remain at the Scan Inventory screen
click this button to store the data that is currently displayed in this screen into the program
the value of the Quant. field is added to the existing value in the # On Hand field of the product's inventory record when the [Save] button is clicked
Identify the product being received by scanning the barcode label on the product or by typing the product SKU into the SKU field. If a barcode scanner is used, the SKU field will be filled in automatically.
Continue to scan additional units of the same product to increment the Quant. field in the Scanned Items section of the screen, or manually enter the total number of units received into the Quant. field.
Continue scanning other products until finished.
If an error has been made and you want to start over, click the [Cancel Entire List] button; or if you only want to un-do the last eligible action, click the [Cancel Last Scanned Item].
When you are sure the data is correct, click the [Save] button to add the values in the Quant. fields to the corresponding # On Hand fields of the inventory records currently displayed in the grid.
Click [Close] to exit the Scan Inventory screen.
Created: 8/8/2011
Go to Top