
Version 5.9
In this Topic: Show
The Change Suppliers screen can be accessed via the Inventory & Suppliers tab of the Maintenance Menu. It is used to add or change the supplier record(s) associated with inventory items. When making any mass changes, it is advisable to first backup the store data file.
The Primary Supplier for a group of products can also be specified at this screen. To be designated as the Primary Supplier of a product simply means that the program will automatically assume that it should re-order additional stock from that supplier by default. It is possible to override that assumption and instruct the program to generate purchase orders with another secondary supplier when necessary.
It is possible to set the Suppliers SKU to the same value as the Local SKU for a group of products (inventory records) simultaneously, with the click of a button. The Unit Cost of products can also be changed at this screen by manually typing in that data.
The Change Suppliers screen has three logical sections, the top section, the left-hand pane and the right-hand pane. Each section offers different methods by which the user can locate SKUs (inventory records) to be changed. Once identified, the user "builds the list of SKUs" or "adds the SKU" to the list of records in the right-hand pane, indicating that those SKUs (inventory records) are eligible to be changed. Changes are not put into effect until the [Make Changes] button is clicked.
![]() Click the Show
link next to "In This Topic"
at the top of this page to see a series of links in outline form,
which can be used to quickly jump to that section of the topic.
Click the Show
link next to "In This Topic"
at the top of this page to see a series of links in outline form,
which can be used to quickly jump to that section of the topic.
In addition, major topics may provide a brief synopsis of a field's purpose or direct the reader to the appropriate section of the topic by scrolling over the image. To return to the previous location within the same page, right-click the mouse and select [Back].
If clicking a field directs the reader to a different Knowledge Base topic, it will open in a new tab or window, leaving the currently viewed topic open. The browser's settings determine whether a new tab or window is opened.
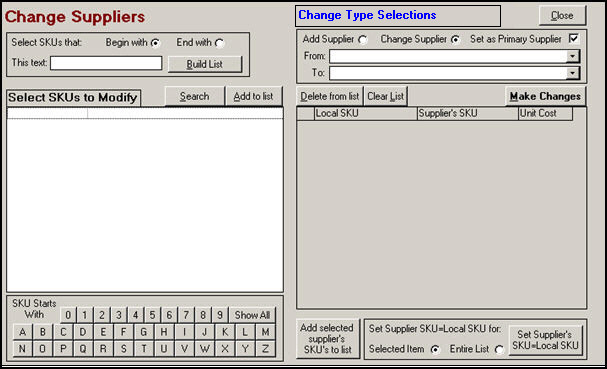
Figure 1: Change Suppliers screen when it is initially opened (default setting is to change the supplier)
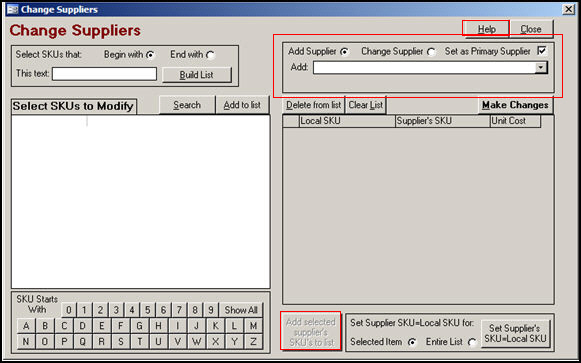
Figure 2: Change Suppliers screen when adding a supplier to inventory records
Choose a combination of the following controls to locate SKUs (inventory records) whose information is to be changed:
click this button, and enter a string of characters that the SKU starts with in the This text: field
mutually exclusive with the End with: radio button
click this button, enter a string of characters that the SKU(s) end with in the This text: field
mutually exclusive with the Begin with: radio button
enter the full or partial "search" criteria in this field, choose the Begin with: or End with: radio button
click this button to move the records that match the criteria specified to the list in the right-hand pane, where changes can be made
the user must have also selected the Add Supplier radio button before clicking this button; or if the Change Supplier radio button is selected, a supplier must also be selected in the From: and To: drop-down lists as seen in Figure 1
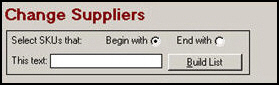
Figure 3
This section of the screen provides another method by which SKUs can be located and selected as candidates for change. While this pane may display more than one SKU at a time, it is not possible to move more than a single SKU to the right-hand pane at a time.
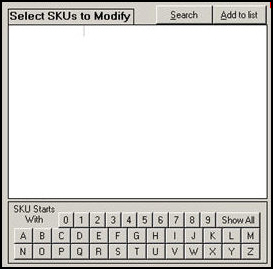
Figure 4
click this button to open the Find a Product (Search Inventory) screen to locate a SKU to be changed
when a SKU has been selected in the left-hand pane, click this button to move it to the right-hand pane, where changes can be made
use one of the following buttons to locate SKUs to be changed; this can result in more than one SKU being listed in the left-hand pane, however, only a single SKU can be Added to the List in the right-hand pane at a given time
click this button to see all of the inventory records currently defined in the program
click on a particular letter or number button in this section to see all SKUs that begin with that character
click this radio button to associate an additional supplier record with the selected group of SKUs (product inventory records); it is possible to have more than one supplier record associated with a single inventory product
this button is mutually exclusive with the Change Supplier radio button
click this radio button to change a supplier already associated with selected SKU or SKUs (product inventory records) to a different supplier
this button is mutually exclusive with the Add Supplier radio button
check this box to assign the supplier selected in the From: drop-down list as the Primary Supplier of the SKUs to be changed
un-check this box if the changes that are being made should not affect the Primary Supplier designation of the SKUs being changed
choose a supplier record from this drop-down list which will be associated with the SKUs to be changed
this field is only visible when the Add Supplier radio button is selected
choose a supplier that is already associated with some or all of the SKUs (inventory records) to be changed
this field is only visible when the Change Supplier radio button is selected
choose a supplier record from the drop-down list which will replace the supplier record specified in the From: drop-down list, for the SKUs to be changed
be aware that if an inventory record is not already associated with the supplier in the From: drop-down list, it will simply add the To: supplier record to its list of suppliers
this field is only visible when the Change Supplier radio button is selected
This section of the screen will contain a list of SKUs (inventory records) that are candidates for change.
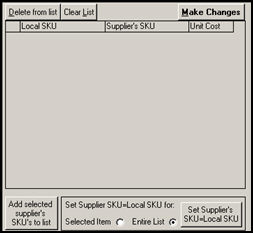
Figure 5
select a SKU from the list and click this button to remove it from the list, making it ineligible to be changed
click this button to remove all of the SKUs from the list in the right-hand pane and start over
when the data in the columns of the right-hand pane is correct, click this button to perform the changes
the program will prompt the user for confirmation before making the changes
this column displays the value that currently exists in the Local SKU field of the inventory record, as well as the item description in the following row
the data in this column cannot be edited
this column initially displays the value that currently exists in the Supplier's SKU field of the inventory record
the data in this column can be manually edited or the values can be changed by using the controls in the Set Supplier SKU=Local SKU for: section of the screen
this column initially displays the value that currently exists in the Unit Cost field of the inventory record
the data in this field can be manually edited
select a supplier record in the From: drop-down list and click this button to have all SKUs (inventory records) associated with that supplier added to the right-hand pane
when this button is clicked, any data specified in the Select SKUs that: section is ignored
this section of the screen is where the user can make mass changes to the data in the Supplier's SKU column for some or all of the records listed in the right-hand pane
if this type of data is to be changed, it should be done prior to clicking the [Make Changes] button
use a combination of the following buttons to make your changes:
click this button to limit the scope of the Set Supplier's SKU=Local SKU button to a single item (inventory record)
to select a single item, click its row
select this button to change the value in the Supplier's SKU field to the value of the corresponding Local SKU field,for every inventory record in the list, when the Set Supplier's SKU=Local SKU button is clicked
click this button to change the value in the Supplier's SKU field to the value in the Local SKU field
the scope of this action is determined by the selection of the Selected Item or Entire List radio buttons
to select a single a item, click its row
click this button to open the Stone Edge Technologies Knowledge Base
click this button to exit from the Change Suppliers screen
Click the [Begin with] or [End with] radio button.
Enter a string of characters to be used as "search" criteria in the This text: field.
If adding a new supplier record to the product, click the [Add Supplier] radio button, and skip to step 5. Otherwise proceed with the next instruction.
The Change Supplier radio button is selected by default when this screen is opened.
Choose the supplier record to be replaced in the From: drop-down list. The selection made here will have no effect on the list of records that will appear in the right-hand pane at this time, the program just requires a value in this field, at this time.
Choose the supplier record that will replace the current supplier record in the To: drop-down list. The selection made here will have no effect on the list of records that will appear in the right-hand pane at this time, the program just requires a value in this field, at this time.
Click the [Build List] button.
A list of records (SKUs) matching the criteria in the This text: field will appear in the right-hand pane.
Continue adding records to the list or proceed with making the desired changes.
Click the [Search] button to open the Find a Product/Search Inventory screen. Refer to its Knowledge Base topic in the previous link for information about using that screen.
When a SKU (inventory record) has been selected at that screen, it will then appear in the left-hand pane in the Change Suppliers screen.
Click on the row of the SKU in the Select SKUs to Modify pane to select it.
Click the [Add to List] button to have that record appear in the right-hand pane.
Continue adding other records or proceed with making the desired changes in the right-hand pane.
Click on the button of a number or letter to see a list of records that start with that character in the Select SKUs to Modify pane.
Click on the row the SKU to be changed.
Click the [Add to list] button to have this record appear in the right-hand pane.
Continue adding other records or proceed with making the desired changes in the right-hand pane.
Click the [Change Supplier] radio button in upper box of the right-hand side of the screen.
Select a supplier in the From: drop-down list.
Click the [Add selected supplier's SKU's to list] button.
All of the inventory records that are associated with the selected supplier will appear in the right-hand pane.
Continue adding other records or proceed with making the desired changes in the right-hand pane.
Backup the store data file.
Build a list of records to be changed by using one of the methods described elsewhere in this topic.
Click the [Change Supplier] radio button in the top right section of the screen (selected by default when this screen is opened).
Choose the supplier record to be replaced in the From: drop-down list.
Choose the supplier record that will replace the current supplier record in the To: drop-down list
If the new supplier record should be designated as the Primary Supplier for the product records that are being changed, leave the check box marked. Otherwise, un-check the box.
Click the [Make Changes] button.
The program will prompt for confirmation.
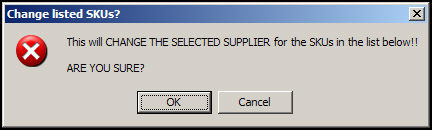
Figure 6
Click [OK] to proceed with the change or [Cancel] to abort the changes.
The program may prompt the user again if it detects other issues:
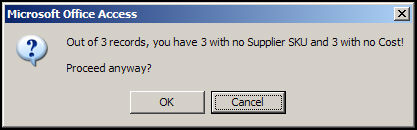
Figure 7
Click [OK] to proceed with the change or [Cancel] to abort the changes and correct the other issues.
Finally, the program prompts the user to acknowledge the completion of the changes.
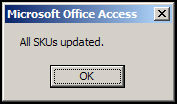
Figure 8
Click [OK] to end the dialog.
Backup the store data file.
Build a list of records to be changed by using one of the methods described elsewhere in this topic.
Click the [Add Supplier] radio button in the top right section of the screen.
Choose the supplier record to be added in the Add: drop-down list.
If the new supplier record should be designated as the Primary Supplier for the product records that are being changed, leave the check box marked. Otherwise, un-check the box.
Click the [Make Changes] button.
Created: 7/12/11
Go to Top