The Order Manager can import orders from Amazon Seller Central shopping carts in two ways:
importing orders directly through the Internet using Amazon's XML interface and Semplice, a third-party software from a company called WrinkleBrain, or
exporting a text file from an Amazon Seller Central cart and importing it into the Order Manager for processing.
To use the Order Manager with Amazon Seller Central's XML interface, you will need the following:
An add-on license to use the Order Manager with Amazon Seller Central. If you purchase the Order Manager for Amazon Seller Central, this license will be included at no additional charge. If you purchased the Order Manager for a different shopping cart system, there is a one-time fee for the Amazon Seller Central add-on license.
A license for Semplice from WrinkleBrain. Through a special arrangement with WrinkleBrain, Stone Edge can offer Semplice to Order Manager users at a small fraction of its regular price.
To purchase the Order Manager for Amazon Seller Central, an Amazon Seller Central add-on license, or a Semplice license at a special price through Stone Edge Technologies, please contact sales by email or by phone at 877-786-6393.
Note: Make sure Semplice is running on the computer where it is installed before you attempt to import orders; otherwise, you get an error indicating that the Order Manager cannot connect to the Internet.
Amazon only generates "Order Reports" once a day for most merchants; it does not generate reports at the time orders are placed by customers. The time of day the order report generation takes place is usually established between merchants and their Amazon representative. Semplice checks with Amazon every few minutes to see if there are any "Order Reports" to download. When the Semplice system retrieves order files from Amazon, the program places them in the Inbound folder specified in the Semplice configuration.
To import those orders, follow these steps:
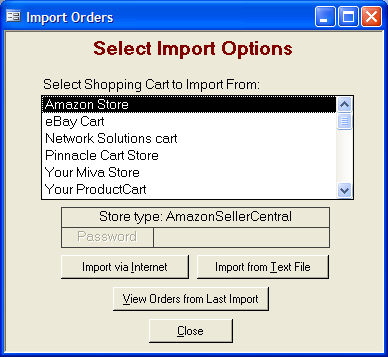
Go to the Main Menu in the Order Manager.
Click on the Import Orders button. The Import Orders dialog box opens:
Select your Amazon Seller Central shopping cart.
Click the Import Via Internet button. The Order Manager will then "ask" Semplice for a list of order files. If any new files are found, the Order Manager will import them from the Inbound folder specified in the Shopping Cart setup form. At the completion of a successful import, the file will also be copied to C:\Semplice\staging.
If this is your first time importing orders into the Order Manager, the Import archival data? dialog box opens. If this is NOT your first time importing orders into the Order Manager, skip to step 6.
Note: You will only see the message boxes in step 5 if you are importing orders for the first time. Later on, if you need to import old orders, go to Main Menu> Maintenance Menu> Import/Export> Import Old Orders.
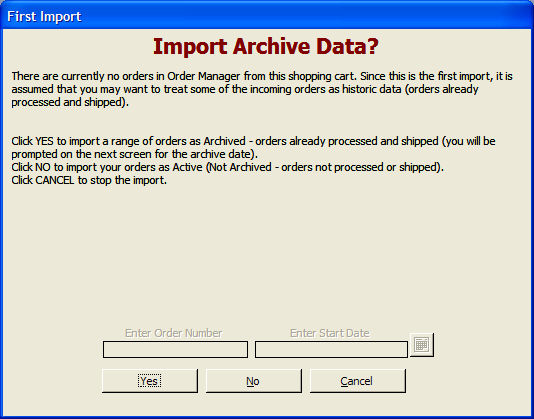
If the orders that you are importing from your shopping cart are new and have not been processed and shipped, click No.
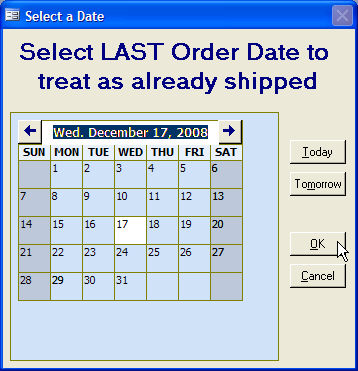
If the orders that you are importing from your shopping cart have already been processed and shipped, click Yes. The Select a Date dialog box opens. Click on the last day on which the Order Manager can assume that all orders have been processed and shipped. Any orders dated afterward will be "unapproved” in the Order Manager after they are imported.
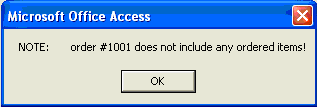
If any records in your shopping cart do not contain line items (e.g., you entered a test order), you may see a message box like the one below. Click OK.
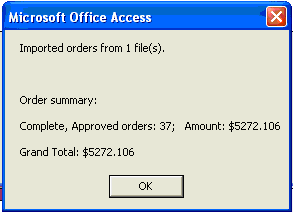
When the Order Manager has completed importing all of the orders in your shopping cart, you will see a confirmation message box. Click OK.
If you selected the option to print an order summary after importing orders in the Store Setup Wizard, the Select Printer for Order Summary dialog box opens:
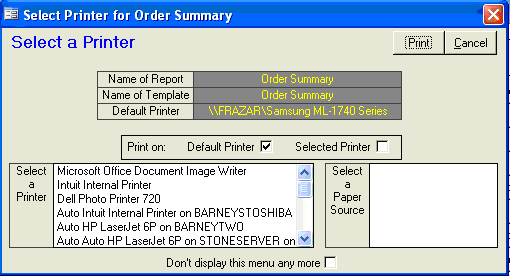
Note: The Select Printer for Order Summary dialog box may not appear if the system parameter UsePrinterMenu (in the Reports group) is set to False.
You can print to the default printer or you can print to a different printer by clicking the Selected Printer checkbox and clicking the name of the printer in the Select a Printer list box. If necessary, click on a printer tray in the Select a Paper Source list box. Click Print.
If you will always print to the same default location, click the Don’t display this menu any more check box, and it will not appear each time you import orders.
Click Cancel to exit the Select Printer for Order Summary dialog box.
Your view returns to the Import Orders dialog box:
Click on the View Orders from Last Import button.
The View Orders dialog box opens, automatically filtered by Orders from Last Import. These are your new orders (not "approved”).
Click Close to exit View Orders.
When you approve an order (either at Order Import, View Orders or the Multi Order Processor), an Order Acknowledgement will be recorded. This does NOT get reversed should you un-approve the order.
Whenever you add a tracking number or set an Actual Ship Date, the Order Manager will generate a fulfillment record for the shippable line items in the order.
When an action requires that a customer be issued a credit (i.e., when you process a return or cancel a back-order), you can have the Order Manager send back an Order Adjustment notification to tell Amazon.com to credit the customer. This is done by clicking on the "Log Credit Issued" button on the Pricing tab of the View Orders form. When the button is clicked, the Order Manager will calculate what needs to be credited, taking into account any other credits that have been issued for the current order, and will display the amounts being credited.
NOTE: The Order Manager assumes that you will be crediting back the "principal" (the whole dollar amount of the price of item(s) being returned minus any restocking fees), the shipping charges for those item(s) (the Order Manager does NOT write a shipping adjustment - that must be done by the user) and any sales tax and/or taxes on shipping for those item(s). The values that are displayed cannot be adjusted by the user at this point. If you DO NOT want to send the displayed credit information to Amazon, choose the NO option on the dialog box. You would then have to issue the credit at Amazon's website. If you DO want the Order Manager to send the credit then DOUBLE CHECK that the numbers in the dialog box correctly reflect the credit amounts (especially shipping which must be credited by the user prior to the issuance of the credit to Amazon). Click on the Yes option in the dialog box and the Order Manager will generate the order adjustment record to send. Click on the Cancel button to avoid taking any action on the credit.
Tip: If you are unsure of the amount of shipping, tax or tax on shipping that is applied to each item, you can view this information on the Custom Detail Fields tab of the View Orders form. To view the data you must first set up the Custom Order Detail Fields for display:
Go to the Maintenance Menu>Maintenance tab>Set System Parameters
Select the Custom Order Details Fields group
Find DetailCurrencyField2 and enter "Amazon Commission" (no quotes) in the Parameter Text box then click [Save] - this field will display the commission you are charged by Amazon for the line item
Find DetailCurrencyField3 and enter "Shipping Charge" (no quotes) in the Parameter Text box then click [Save] - this field will display the shipping charge of an individual unit
Find DetailCurrencyField4 and enter "Tax Charge" (no quotes) in the Parameter Text box then click [Save] - this field will display the taxes charged on an individual unit
Find DetailCurrencyField5 and enter "Shipping Tax" (no quotes) in the Parameter Text box then click [Save] - this field will display the taxes charged against the shipping amount of an individual unit.
When you return to the View Orders form, you should see a new tab called Custom Detail Fields. There you can see the charges for each item on the order as reported by Amazon. Those are the values that the Order Manager will credit when an item is returned or a backorder is cancelled.
Should you charge a restocking fee against an item (for returns only), the Order Manager will reduce the principal of the item to account for the fee.
Should you offer the customer a discount, the Order Manager will add that amount as a promotional discount against the item being credited.
Currently Discounts cannot be sent to Amazon without a line item adjustment.
See Also
Setting Up An Amazon Seller Central Cart
Importing Orders from Amazon Seller Central (Text)
Troubleshooting Integration with Amazon Seller Central
Training Video - Configure Semplice to Import from Amazon.com
Updated 12/18/08
Modified 1/4/10