![]()
Version 7.5
![]()
Version 7.5
Contents of this Topic: Show
The UPS WorldShip Setup task found at Main Menu > Settings > Shipping Functions performs several basic steps that must be completed before an external ODBC shipping software solution can be configured to directly exchange shipping and tracking information with SEOM. There is no user interface, the process is immediately started when the function is selected.
While the name states it is for UPS WorldShip, this function must also be run prior to configuring FedEx ShipManager, DHL's DBConnect, or any other ODBC external shipping application that wants to directly exchange shipping and tracking information with SEOM
The process involves the creation of an ODBC definition and the copying of queries that are required to map fields from the external shipping application to the appropriate SEOM fields.
Enterprise users who have implemented SQL databases as their store data files must take additional action to properly implement the exchange of data with an external shipping application. Please refer to the Knowledge Base topic for the specific shipping software that is being used for more information.
Users of 64-bit processors should read Knowledge Base topic, Windows 64-Bit Operating System Considerations, for more information about how this process is affected by 64-bit environments.
If a 64-bit processor is being used, refer to Knowledge Base topic, Windows 64-Bit Operating System Considerations, for more information about how that affects this process.
Go to Main Menu > Settings > Shipping Functions > UPS WorldShip Setup.
Enter a name for the System DSN and click OK. The name cannot contain any spaces.
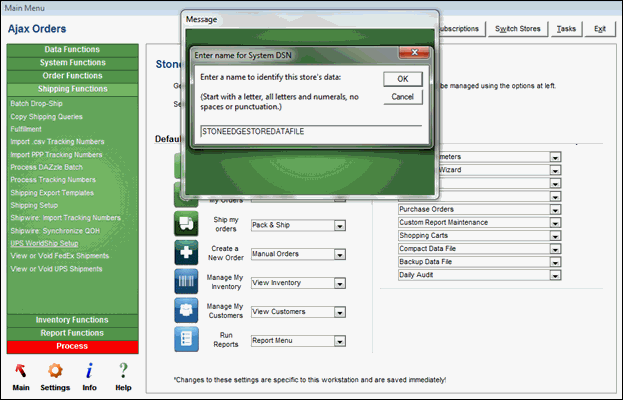
The program creates an ODBC definition on the current workstation in the background, using the name that was provided; there is no user interface.
The program also copies a group of queries from the program file to the store data file. Iff they already exist, the program replaces them with the copies from the program file.
When the process is completed, the program displays a message box stating the name of the ODBC connection that was created, the store data file that it represents, and the fact that the shipping queries were copied to the store data file.
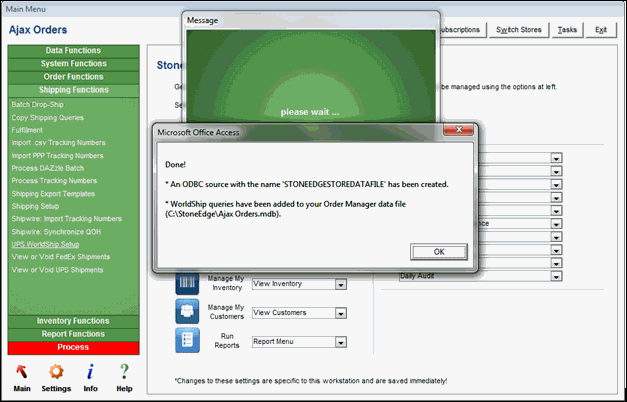
Click OK to close the message box.
To see the ODBC connection that was created, go to the Administrative Tools section of the Control Panel section of the operating system and look for Data Sources (ODBC). Refer to the Windows Help for more information.
This process should be repeated on each workstation that may be used to print shipping labels from external shipping applications that will also attempt to directly exchange data with SEOM (as opposed to exporting shipping information or importing tracking information from a text file).
Proceed with the remainder of the steps for setting up the external shipping application (import and export maps). See the appropriate Knowledge Base page for the shipping application in use.
If problems are encountered during this process and the ODBC connection was created, but the queries were not copied successfully, execute the Copy Shipping Queries function, found at Main Menu > Settings > Shipping Functions.
Windows 64-Bit Operating System Considerations
Created: 4/4/11
Revised: 8/1/12
Published: 04/14/16