
Version 5.9
In this Topic: Show
Tasks are notes that include a follow-up activity assigned to a particular user of the program. Unlike the Notes feature, it is necessary to have the Order Manager's security system enabled to use Tasks, so that the program can distinguish between users. Like notes, tasks can be added to orders, customers, inventory and supplier records, and can be accessed at the following locations:
Main Menu> Tasks icon > View Notes & Tasks screen
Main Menu> Orders section > View > Notes tab
Main Menu> Customers section > View > Notes tab
Main Menu> Inventory section > View > Desc./Notes tab
Main Menu> Inventory section > Suppliers > Notes tab
Main Menu> Maintenance Menu> Inventory & Suppliers tab > Inventory > Desc./Notes tab
Main Menu> Maintenance Menu> Inventory & Suppliers tab > Suppliers > Notes tab
Please refer to the Knowledge Base page, View Notes & Tasks for an explanation of the fields and controls on this screen, which can be found in the Related Topics at the bottom of this article.
The current user's Task List can be displayed at any time by pressing Ctrl+Shift+T keys simultaneously, or by clicking the Tasks icon on the Main Menu.
Upon logging into the Order Manager, if a task has been assigned to the user and it is overdue or due on the current day, a message box will appear, advising the user to check their task list.
Click [OK] and then click the Tasks icon to review the list of tasks that are assigned to the current user which are Past Due & Due Today.
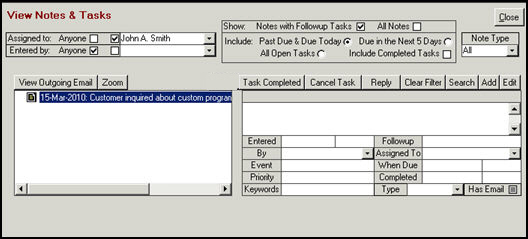
Figure 1: View Notes & Tasks screen
The "tree" view in the left-hand portion of the screen shows the brief description of the note or task
A single note/task with no replies will have the icon that looks like a piece of paper with writing on it.
A note/task that has one or more replies will look like a file folder.
Click the [+] sign next to a folder to "open" the folder (circled in red below) and display additional information about the note or task
Click the [-] sign next to a folder to "close" it and hide the additional information..
Individual Tasks within the list may be color-coded as follows:
Blue or black text on a light blue background: note/task has a follow-up task due on the current date.
Red text on a light blue background: note/task has a follow-up task that is over-due.
Pink text on a white background: note/task was returned as part of the results of using the Search button.
Go to one of the following locations:
Main Menu>Check Tasks button or icon.
Main Menu>View Orders >Notes tab
Main Menu>View Customers>Notes tab
Main Menu>Maintenance Menu>Inventory & Suppliers>Inventory>Description/Notes tab
Main Menu>Maintenance Menu>Inventory & Suppliers>Suppliers>Notes tab
Click the [Add] button. The Add Note screen opens:
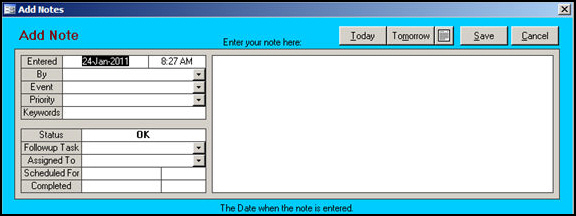
Figure 1: Add Note screen
The date and time are populated according to the internal clock of your computer.
Because the security system must be enabled to use the Tasks feature, the program knows who the current user is and enters their name into the By field automatically. This drop down list contains the users defined in the security system. It is possible to select another user from the list, but you cannot enter a name that does not appear in the list.
If desired, complete the Event field. An Event describes the reason for the note, e.g. Sales Inquiry or Media Inquiry. You can enter an event that does not appear in the drop down list, however, the use of pre-defined lists is recommended to have consistent data entry. This is important when searching notes or including this field in a query or report. For instructions on how to populate the Notes Events drop down list, refer to the List Maintenance Knowledge Base page.
If desired, complete the Priority field, e.g. 1, 2, or 3 or High, Medium or Low. You can enter a priority that does not appear in the drop down list, however, it is recommended that pre-defined lists are used for data consistency. This is important when searching notes or including this field in a query or report. For instructions on how to populate the Notes Priority Codes drop down list, see the List Maintenance Knowledge Base topic.
If desired, complete the Keyword field. Although it would be helpful to use a standard list of keywords, the program does not manage them in the List Maintenance function, as it does for the Event or Priority fields. Keywords are searchable and can also be included in queries or reports.
Enter the text description of the task in the Enter your note here: box.
Complete the Followup Task field. You can enter a task in the Followup Task field that does not appear in the drop down list, although it is not recommended. For instructions on how to populate the Notes Actions drop down list, review the List Maintenance Knowledge Base topic.
Complete the Assigned To field. The Assigned To drop down list contains the users set up in the security system. You cannot enter a name that does not appear in the list.
Complete the Scheduled For field by entering a date manually, selecting a date using the Calendar icon, press the Ctrl+D keys simultaneously, or by clicking the buttons labeled [Today] or [Tomorrow].
Click [Save].
Tasks can be completed in one of two ways:
Select a Task from the list, click [Edit], and enter the Completed date and time fields (time is optional). Click [Save].
Select a Task from the list and click [Task Completed]. Click [Save].
Select the Task from the list and click [Cancel Task].
Select the Task from the list and click [Reply].
The program opens the Add Note screen. Enter any applicable information into the form.
Click the [Save] button. The program will add the reply to the Task list, and it will be visible in the folder (tree structure) of the associated Note/Task.
![]()
Created: 1/27/11
Go to Top