
Version 5.9
The Order Manager's security system controls what users see and how they use the program. You can restrict what users can do by job type, for example. Packers and Sales People do not necessarily need access to the same components of the program. The security system can be used to tailor the permissions of each group according to the functions that their jobs require. If a user is a member of more than one security group, they will be governed by the least restrictive permissions assigned to either of the groups.
Note: This is not a high security system. It will not prevent a knowledgeable Microsoft Access user from disabling or working around the system.
The basic concepts are:
Security - Enabling the security system requires users to log into the Order Manager with a username and password.
Permissions - If the security system is enabled, users' ability to use certain features of the program such as the Maintenance Menu, Enter Orders Manually, reporting, etc. can be restricted. Permissions are assigned to groups only.
Users - "Users" refers to each employee that works in the Order Manager as part of their job. Individual users "inherit" the permissions assigned to the group to which they belong.
Groups: "Groups" refers to a category of one or more users that are assigned permissions to use certain features of the program according to job function. Examples of groups are Customer Service, Packers, or Salespeople. The default Administrator group has permission to use all of the program's features; its permissions are not restricted in any way.
To use the Tasks feature of the Order Manager, you must enable its security system and create User IDs (login IDs) for all workers. User IDs are defined at the Users tab of the Security System dialog box. When the security system is enabled, the program can track tasks and display reminders when users login to the program.
Important Note: If you enable the security system, you must create users and you must assign those users to groups. If you fail to do so, the only way to log in to the program is to use the default Admin account. The first time you login with the Admin userid, you are prompted to create a password. We highly suggest that you establish a strong password for the Admin account and write down the password and store it in a secure location for future reference.
Go to the Main Menu>Maintenance Menu>Setup Functions tab>Security Options button.
The Security System dialog box opens:
Only the Users tab and the Settings tab are visible when the security system is disabled. To enable the security system, click in the Use Security System checkbox.
Select a Log-In Option from the list box; we strongly recommend using the Order Manager option.
Click the Save button. The Groups, Group Permissions, and Object Permissions tabs appear.
Click on the Users tab.
If the Packers and Sales People list have been populated with the names of those users via the List Maintenance function, the program can import them. Click the Import Order Manager Packers & Sales People button, which will be visible if Order Manager has been selected as the Log-In Option on the Settings tab.
Otherwise, click the New button under the User ID drop-down list. The User Info dialog box opens:
Enter a User ID. While this field will accept up to 20 characters, we recommend using short User IDs.
Enter the first name and last name of the user in the User's Full Name field.
Enter a Password. It is possible for the user to change their password at a later date. See Change Password for directions.
Enter the password again in the Repeat Password field to confirm the spelling.
Click Save.
Your view returns to the Security System dialog box.
To edit the user's full name or password, click the Edit button.
To delete a user, click the Delete button.
Select the user from the User ID drop-down list at the top of the Users tab.
Select (click on) a group from the All Groups list box.
Click Add. The selected group is displayed in the Member Of: pane.
Select the user from the User ID drop-down list at the top of the Users tab.
Select a group from the Member Of list box.
Click Remove.
When assigning object permissions to forms (i.e. dialog boxes or "screens"), you cannot hide tabs, only the controls (i.e. checkboxes, drop down lists, text fields, etc.).
Click on the Group Permissions tab:
Click on the Select Group drop down list and choose a group.
Then select one of the Object Type radio buttons as described in the chart below. The options that are visible on the Group Permissions tab depend on the Object Type you select.
|
Object |
Example |
Permissions |
|
Form |
Main Menu, Maintenance Menu, Enter Orders Manually, Multi-Order Processor, View Inventory, View Orders, Point-of-Sale, Pack & Ship Orders |
No Access Normal Access |
|
Form Control |
buttons, drop down lists, list boxes, etc. on a form |
No Access Visible-Disabled Visible-Enabled Enable All Buttons Hide All Buttons |
|
Report |
Account Summary, Sales Analysis Report, Aged Receivables, etc. |
No Access Print (Normal Access) |
Click the Enable All Buttons to allow this group access to all buttons on the selected form. Click OK when prompted. This will also change the Permissions: radio button from No Access to Normal. A permission level of No Access means that the program will not allow the user to open the form and a message to that effect will be displayed.
Click Hide All Buttons to have the program change the controls on the selected form to be invisible. Click OK when prompted. The Permissions: radio button will change from No Access to Normal. In this case, the form will open, but none of the controls will be visible to the user, effectively accomplishing the same result as No Access. The administrator can selectively enable individual controls on that form for a particular group.
To grant a group permission to access a Form Control, click that radio button and select the form and its control(s) from the drop-downs as shown in the figure below. Choose the appropriate Permissions: No Access, Visible - Disabled or Visible - Enabled and then click the Save Permission button.
Click Remove Permissions for Current Form, Report or Object to remove all permissions for the selected object from the current group.
Click Copy Current Group and Permissions to all Forms to copy the current group's permissions to all forms. This button is only visible if the Object Type is Form, as shown in the previous screenshot.
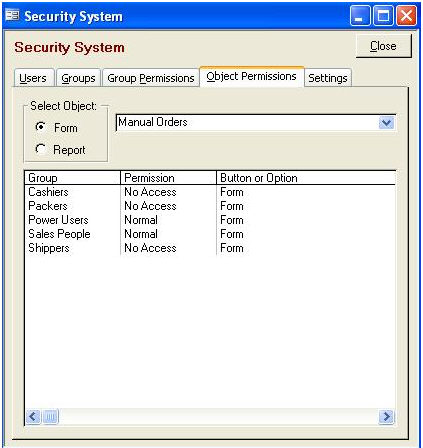
Click on the Object Permissions tab.
Click the appropriate radio button under Select Object.
Choose the form or report from the drop-down list to see a summary of the object's permissions by group.
Updated 3/15/10
Go to Top