
Version 5.9
In this Topic: Show
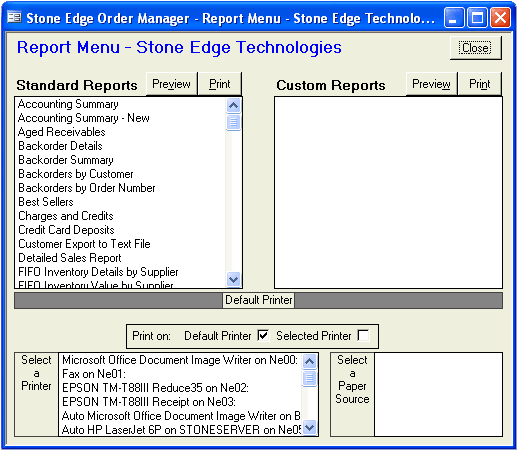
Prior to the Order Manager 5.8XX Beta series, the Report Menu button on the Main Menu was called Print Reports.
When you click on the Report Menu button from the Main Menu the Report Menu dialog box opens. Select the report you wish to view and click on Preview if you want to see the report on the screen. Click on the Print button to send the report directly to the printer.
This document contains the following sections. Click a link to jump to that section:
Setting the Reports group system parameter UsePrintMenu to True activates this feature. The Print Menu allows you to specify the printer used to print reports such as Invoices and Packing Slips. First, select the printer and then select the paper source (tray). To use the default printer for your PC, select the Default Printer option. Note: The UsePrintMenu system parameter does not affect the Print Reports menu, it only applies to printing reports elsewhere in the program, such as Invoices and Packing Slips from the View Orders screen, etc.
These are the reports that are included with the Order Manager. They can be used as-is or replaced with modified or totally customized versions. Most of the standard reports also have several versions available. Look at the system parameters in the Reports group to see the available templates for invoices, packing slips, labels, etc.
Some of the standard reports that are included with the Order Manager are:
Charges and Credits. Lists all orders that have pending Charges or Credits. Use to enter charges and credits into your credit card system. Includes order number, name, address and phone number, credit card number and expiration date, credit or charge amount, and room to enter authorization codes.
Packing Slips and Sales Receipts. These are the normal packing slips and sales receipts. You can print them for any range of order numbers.
Physical Inventory. Use for taking inventory. Includes Location, SKU, Name, Description, Expected Quantity, and spaces to enter actual quantity and notes.
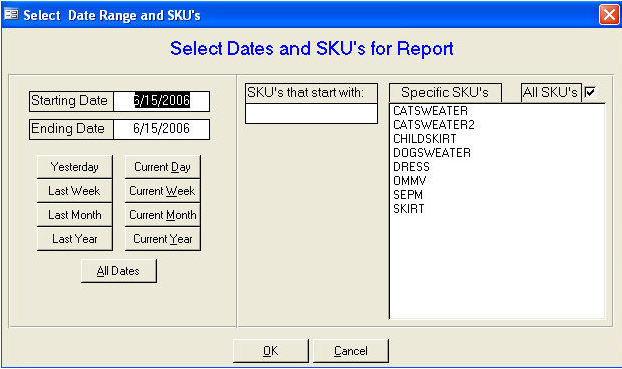
Sales by Product. Click on Sales by Product in the Standard Reports list and click Preview. The Select Dates and SKU's for Report dialog box opens. Enter a date range and either enter a value in the SKU's that start with: field or click on a SKU in the Specific SKU's list box. You can also leave the All SKU's checkbox checked. Click OK. Report lists SKU, Item Name and quantities for Ordered, Shipped, Returned and Net.
Available in five different versions:
Sales by Product No Options: Uses the least amount of paper. Does not include any order option fields.
Sales by Product with 5 options: Shows the first five order option fields.
Sales by Product with all options: Shows all ten of the order option fields.
To select the version you want to use, go to Set System Parameters. In the Reports parameter group, set the Reports group system parameter SalesByProductTemplate to one of the names listed above.
Sales By Product w QOH
Sales By Product with Prices
Order Summary - Prints when orders are imported (if the Reports group system parameter PrintOrderSummaries is set to true). Lists order status (Empty if nothing is available to ship, Partial if some but not all can be shipped, Complete if all can be shipped), name and order info, items ordered, back-ordered, etc. Available in six versions:
Order Summary
Order Summary with CC Info - also includes credit card type, account number and expiration date.
Order Summary by Shipping
Order Summary by address and total
Order Summary with CC by Shipping
Order Summary with Totals
This list contains any custom made reports you have added to the system. Select the report you wish to view and click on Preview if you want to see the report on the screen. Click on the Print button to send the report directly to the printer. These are reports that are not supplied as part of the normal Order Manager. They can be created from scratch or by modifying any of the standard reports included with the program. They must be created in the Order Manager. Then, to include them in the Report Menu, use the Custom Report Maintenance feature. For more information on creating reports using Microsoft Access, see the help files provided with Access. Go to the table of contents and search for Working with Reports.
To select the version you want to use, go to Set System Parameters. In the Reports parameter group, select the Report template you wish to change. A drop down menu will list the different templates available.
Pick List. Not available from reports menu. Prints when orders are imported (if Reports Parameter PrintPickLists is set to True). Shows Location, Quantity Needed, SKU and Item Name, all ten order options, and spaced to enter number picked and notes.
Slow Movers/Best Sellers. Supplies information regarding the best and worst sellers in your inventory.
Backorder Reports. Use these reports to view the items currently on backorder (needed). There are four different versions:
Back Order Details – Breaks down the quantity needed for each order organized by SKU
Back Order Summary – Summarizes each SKU and total needed based on a date range
Back Orders by Customer – Lists each customer awaiting backordered products; sorted by customer name.
Back Orders by Order Number – same as the customers report but sorted by Order number.
Detailed Sales Report – This report shows each order with line items. It gives the cost, sales, gross margin, quantity shipped, date entered and date shipped. This report also has an extensive filtering tool to allow you to search based on order date, shipped date or specific SKU. Reports can be sorted on many different fields.
Many different sales reports exist to allow you the opportunity to analyze your store’s performance. Our clients are requesting new reports constantly. If you do not see a report here that provides you with the information you require, contact Stone Edge Technologies, Inc. for additional reports. If you are familiar with Microsoft Access’ report building tools, you are encouraged to add your own reports to the program. Once you build your own custom reports you can move them into the Custom Reports.mdb file (provided with the program) so that you have copies available should you receive an Order Manager update from us. For details on moving reports to the Custom Reports.mdb file see: Custom Report Maintenance.
Modified 11/12/08
Go to Top