
Version 5.9
Stone Edge Technologies, Inc. has only internally tested the program with the APG Series 100 Cash Drawer. While the program may work with other cash drawers, it is the responsibility of the user to obtain and review the manufacturer's documentation to determine which method to use and what the appropriate settings are for the device(s). Stone Edge Technologies, Inc. is not familiar with other vendor's hardware.
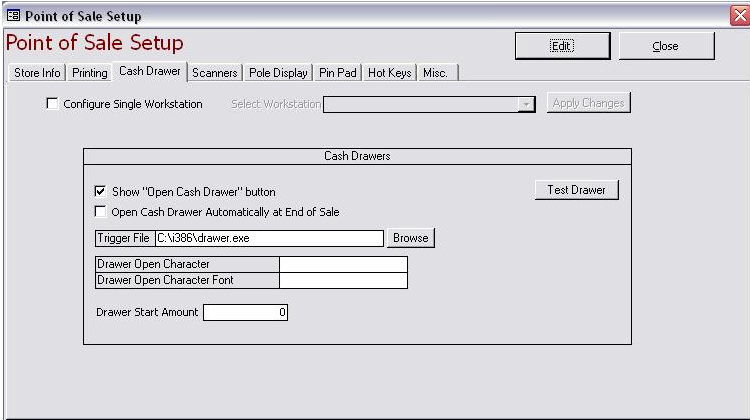
The Cash Drawer tab is used to configure the POS interface to work with a cash drawer. The cash drawer can be opened by the use of an executable trigger file (recommended) or when a receipt is printed, depending on the installed hardware and how it is attached to the workstation. The user can also set other parameters to control whether or not the POS interface will show the Open Cash Drawer button, open at the end of a sale (depending on the hardware in use) or what is the default starting amount of cash that will be in each drawer at the beginning of a shift.
1. Go to Maintenance Menu > Setup Functions > Point of Sale Setup >Go to open the Point of Sale Setup screen.
2. Before configuring the cash drawer settings, make sure that the Cash Registers list on the Store Info tab has at least one entry, as this list of workstations will be used to populate the Select Workstation drop-down list on the Cash Drawer tab.
3. Select the Cash Drawer tab, and click the Edit button to unlock the screen and make changes to the settings.
4. If all workstations will use the same model of cash drawer/printer hardware, skip to step 5 and enter the cash drawer settings for all workstations.
Otherwise, select the Configure Single Workstation check box to enter settings for a specific workstation(s). Choose the workstation name from the Select Workstation drop-down list and complete steps 5-10 to choose the settings for an individual workstation's cash drawer.
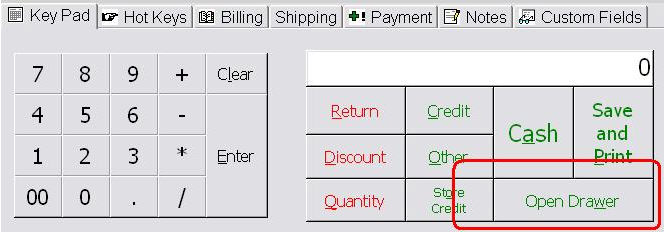
5. Select whether to Show the "Open Cash Drawer" button on the Key Pad of the POS screen. If checked, the cash drawer can be opened without a making a sale. If this option is unchecked, the Open Drawer button is not displayed on the Key Pad tab and the cash drawer can only be opened when the user completes a sale, quote, layaway or return.
Click the check box of the same name to have the system Open the Cash Drawer Automatically at End of Sale.
7. If using a printer to trigger the cash drawer to open, skip to step 8. If the cash drawer is connected to the PC via a Serial Port or USB port it requires a Trigger File. The Trigger File is an executable file that prompts the cash drawer to open. It should have a .exe, .bat or .sys file extension. Consult the cash drawer documentation for the file name and how to obtain and install it.
Manually enter the path to the file in the Trigger File field or click the Browse… button to navigate to its location. The Order Manager will execute the file to open the cash drawer after the receipt is printed. Skip to step 9.
Note: If the cash drawer is triggered by a printer driver, this setting is irrelevant and is ignored.
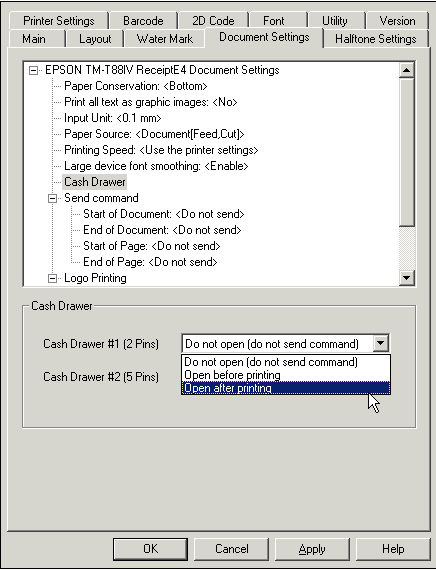
8. If the cash drawer will be connected to and opened by a printer, there are two possible scenarios:
The printer driver triggers the drawer to open, as is the case with the Epson TM-88IV receipt printer that is sold at our web site. In this scenario, there is a tab on the Printer Properties form of the Windows printer definition that allows the user to specify if the drawer should open before or after the receipt is printed. Proceed to step 9.
the printer uses a special character and font that is programmatically assigned to an invisible control which causes the drawer to open when the receipt is printed. Enter the appropriate values in the Drawer Open Character and Drawer Open Character Font fields provided. Refer to the printer’s documentation to determine the correct values that should be entered in these fields.
Note: These fields are ignored if the cash drawer is opened by a trigger file.
9. Enter a default amount of cash that will be contained in the cash drawer at the start of a shift in the Drawer Start Amount field. This value should not be changed from shift to shift; it is used by the Daily Audit system for drawer reconciliation.
The value entered in this field will set the Main system parameter DrawerStartAmount. Use the workstation based Special Parameter DrawerStartAmount in the POS group to set different starting values for each register.
10. If a single workstation is being configured, click the Apply Changes button to save the settings for that register; return to step 4 and configure another workstation, if desired. Otherwise, click the Save button to retain the settings that were made for all workstations and lock the Cash Drawer tab.
Note: It is imperative to click the Apply Changes button before selecting another workstation from the drop down list, or the Save Changes button before exiting the dialog box, otherwise all changes that were made will be lost.
11. The Test Drawer button can be used to test the functionality of the cash drawer settings. Click Apply Changes or Save before testing any new drawer settings or else the drawer's original settings will be tested.
Do not click the Test Drawer button to see if the drawer is configured properly unless the device is physically connected to a printer or the workstation.
12. Click the Close button to exit the POS Setup screen.
Created: 1/19/12
Modified: 9/12/13
Go to Top