
Version 5.9
This document contains the following sections. Click a link to jump to that section:
The Purchase Orders screen is used to create and view purchase orders. There are six tabs on this window:
Selected PO Info (only enabled after you’ve selected View PO)
Selected PO Items (only enabled after you’ve selected View PO)
Combined List of Items
Inventory Status
Create New POs
In addition, there are four buttons across the top: Drop Ship Tracking, Receive Inventory, Invoices, and Exit. Refer to the sections below for more information on these functions.
The general workflow for regular (restocking) purchase orders is the following:
Create POs> Receive Inventory> Enter Invoices.
The workflow for drop-ship purchase orders is the following:
Create POs> Enter (or import) Tracking Data> Enter Invoices.
Once invoices have been entered, they can be exported to QuickBooks as bills to be paid. Unfortunately, the whole purchase order process can be sloppy for a lot of merchants:
POs may need to be changed between the time they are placed and the time they are received.
After a purchase order is placed, you may find that your costs are different from what you expected.
The actual products and quantities you receive may differ from what you ordered.
Invoices may include all or portions of multiple POs.
To accommodate issues like these, we developed the concept of "loosely connected data." For each purchase order, the Order Manager stores what was originally ordered, what is currently expected (if not already received), what is received and what has been invoiced. Each stage is "loosely connected" to the other stages, so almost anything can be changed until the items have been received and invoiced.
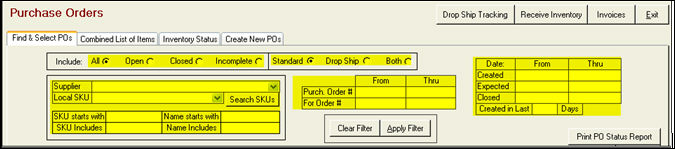
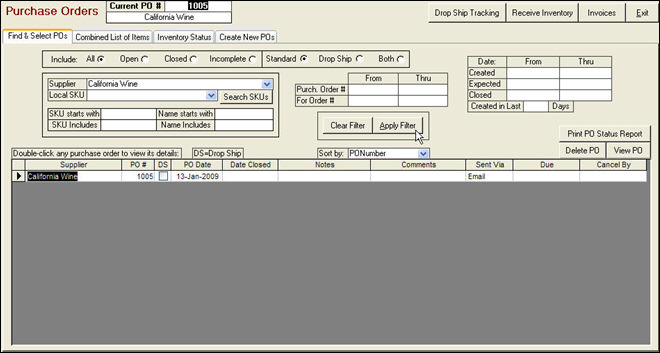
The Find & Select POs tab is the default tab you will see when you open the Purchase Orders window. Use this tab to locate and select purchase orders. Once you have selected a PO to view, you will see additional tabs for Selected PO Info and Selected PO Items. Use those tabs to review and edit information about the selected purchase order.
Purchase orders will not display in the view window until you select your filter criteria. You can filter by various criteria, as highlighted in the screenshot below. Once you select your filter criteria, click the Apply Filter button to view the corresponding POs. The Clear Filter button will clear all filter criteria and display all POs.
Note: You will need to click the Apply Filter button EVERY time you change the selection criteria you want to use to filter the list of purchase orders on the Find & Select POs tab.
To view a particular purchase order, select a PO from the lower window and double-click on the purchase order or click the View PO button.

Note that each purchase order’s original details are "locked" once it has been added to a purchase order invoice. You can still modify "expected" and "received" information for the PO, but not the original details.
Complete the following steps to find and revise a PO:
Click the Purchase Orders button from the Quick Clicks list on the Main Menu. The system displays the Purchase Orders window.
Note: If you do not have Purchase Orders in your Quick Clicks list, you can navigate to Maintenance Menu> Inventory & Suppliers> Purchase Orders and click the Go button.
Enter any desired filtering options in the top portion of the window. You can filter POs by the following actions:
Select All, Open, Closed, or Incomplete purchase orders. You can also search for Standard or Drop-Ship POs, or Both.
Select a Supplier or Local SKU from a drop-down list. You can also click the Search SKUs button to search your inventory for an item, or enter some text that the product Name Includes.
Enter a range of Purchase Order #s or Order #s to search for. You can also enter a date range for when the PO was Created, Expected to be received, or Closed. Additionally, you can use the Created in Last__Days field to search for POs created after a given point in time.
Click the Apply Filter button. Your system displays your results in the lower half of the window. To remove the filter on the records, click the Clear Filter button. All purchase orders to be displayed in the list.
Select the PO you want to view and click the View PO button. The system displays the purchase order on the Selected PO Info and Selected PO Items tabs, which have options and buttons for editing and viewing the PO.
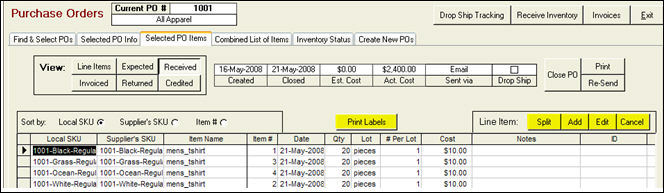
On the Selected PO Items tab, select which details you want to see:
View Option |
Result |
|
Line Items |
View the individual items listed on the initial purchase order. These line items may be edited until the PO is "locked." Once the PO is locked, this option provides a "snapshot" of the original PO placed with the supplier, and the Split, Add, Edit and Cancel buttons are hidden on the Line Items screen. |
|
Expected |
View and edit the quantity of items the merchant expects to receive from the supplier. The information here may or may not match that shown by the line items. This is the actual working area for PO management after the PO has been created and sent, and before you receive your inventory. |
|
Received |
View the quantity of items actually received from the supplier. |
|
Invoiced |
View the quantity of items for which your store has been invoiced by the supplier. |
|
Returned |
View any items on the PO that have been returned. (This feature is not available yet.) |
|
Credited |
View any items on the PO that have been credited. (This feature is not available yet.) |
Depending on the view, you can select a line item and perform one of the following:
Line Item Functions |
Result |
|
Split |
Split one line item from the PO into two line items so you can change the expected cost, quantity, etc., for just a portion of that line. |
|
Add |
Add a line item or a Received or Expected record to the PO. |
|
Edit |
Edit a line item’s cost, expected date, etc. |
|
Cancel |
Cancel the selected line item. This applies only to line items that are not yet “locked” (i.e., expected, received, and invoiced records). |
If you click the Split button, the system splits the selected line item into two line items and displays the Split Purchase Order Line Item dialog box:
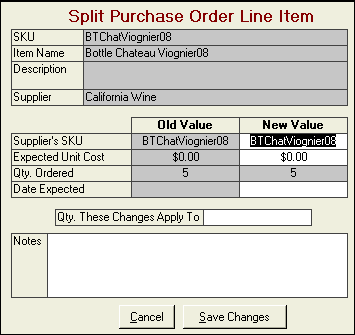
You can then modify the Expected Unit Cost, Supplier’s SKU, and Date Expected and apply it to a portion of the quantity originally ordered.
If you click the Add button, the system displays the Add Purchase Order Line Item dialog box:
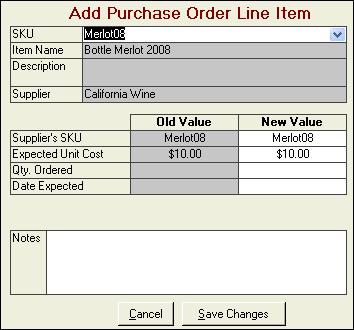
Select a SKU from the list and enter a Qty. Ordered and Date Expected. You can also edit the Supplier’s SKU and Expected Unit Cost, if necessary. Click the Save Changes button, and the system adds the line item to the PO.
To edit an item, select it and click the Edit button. The system displays the Edit Purchase Order Line Item dialog box. Make your edits and click the Save Changes button.
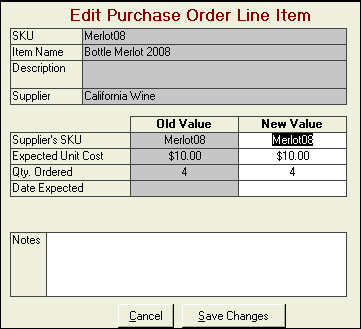
Note: Editing of drop-ship PO items is limited to the expected costs and SKUs; the quantity ordered cannot be modified. To edit a quantity, you must remove the item from the PO, return to the order, modify the detail record, and then reorder the drop-ship item.
If you click the Cancel button, the system displays the following dialog box:

Note: If you cancel a line item from the Received view list for the PO, the system asks if you want to convert the canceled line items back to Expected items. This feature is driven by the POCancelReceivedToExpected parameter. Refer to Setting System Parameters, in Chapter 2, for more information.
The Drop-Ship Tracking button at the top of the Purchase Orders screen opens a screen that enables you to build a list of drop-shipped line items and fill in the tracking numbers for them. You can manually enter tracking numbers for your drop-ship orders or import them from a text file. When you are finished, click the Post Data button to save the data.
![]()
Complete the following steps to enter tracking numbers manually:
Click the Purchase Orders button from the Quick Clicks list on the Main Menu. The system displays the Purchase Orders window.
Note: If you do not have Purchase Orders in your Quick Clicks list, you can navigate to Maintenance Menu> Inventory & Suppliers> Purchase Orders and click the Go button.
Click the Drop-Ship Tracking button. The system displays the Enter Drop Ship Tracking Data screen:
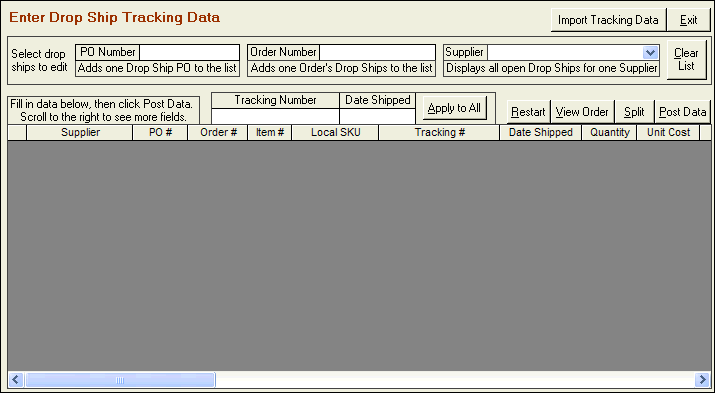
To add the line items from one drop-ship purchase order to the list, fill in the PO Number field and press Tab or Enter.
To add the drop-shipped line items from one Order Manager order to the list, fill in the Order Number field and press Tab or Enter.
To add all open drop-ship orders for a specific supplier to the list, select the supplier from the Supplier drop-down list.
Once you have created the list, you can enter a Tracking Number and Date Shipped to Apply to All line items in the list or you can type, or copy and paste tracking numbers and dates into the list.
To import tracking numbers from a text file, click the Import Tracking Data button. The system displays the Import Tracking Data window:

This screen is used for importing tracking numbers for drop-ship orders and also for tracking numbers for orders that you ship. Make sure that the Import tracking for option is set to Drop Ship POs before continuing.
Click the Browse button to locate the text file with the tracking information you want to import.
For importing drop-ship tracking information, always select Drop Ship PO Number for the Link Field that the Order Manager will use to match the imported tracking information to your PO records.
IMPORTANT: Drop-Ship tracking numbers MUST be accompanied by the Drop-Ship PO Number for the system to properly update the PO and the Order!
Use the drop-down lists to map the information in the text file to the purchase orders in the Order Manager.
It is recommended that you Test Data before you import. The system displays a sample record built from the selected data file and import criteria.
When you are sure that the import options are configured properly, click the Begin Import button. The system enters the drop-ship tracking information from the text file into your purchase order records.
When you click the Receive Inventory button, it opens a window where you log and receive inventory from your suppliers.
Complete the following steps to receive inventory:
Click the Purchase Orders button from the Quick Clicks list on the Main Menu. The system displays the Purchase Orders window.
Note: If you do not have Purchase Orders in your Quick Clicks list, you can navigate to Maintenance Menu> Inventory & Suppliers> Purchase Orders and click the Go button.
Filter the purchase orders to view a list, and select a PO for which to receive inventory.
Click the Receive Inventory button at the top of the window. The system displays the Select purchase orders to receive window:
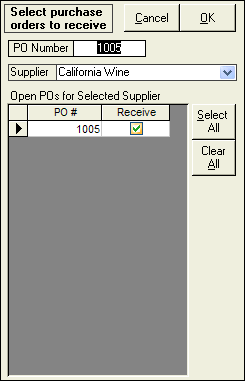
f there are no POs listed, select a Supplier from the drop-down list. The system displays all open POs for the supplier.
Click the Receive checkbox next to each purchase order that you wish to receive items for, or click the Select All button. Note that you can receive inventory from multiple purchase orders from the same supplier at the same time. Click OK.
The system displays the Receive Inventory window:

At this screen, you build a Tentative List of Received Items in the bottom window. When you are satisfied that the information is correct, click the Post Data button to store the information you have entered.
Use one or more of the methods below to select the items to receive:
Click the Receive All Items button to move all Expected Items to the Tentative List of Received Items area.
Double-click the item you wish to receive in the Expected Items list to add it, with the expected quantity, to the Tentative List of Received Items.
Type the SKU of the item you want to receive in the SKU field at the top of the screen, or scan the Barcode. Enter the quantity that has been received in the # Received field. Then, click the Receive button in the Expected Items section of the window. The item information appears in the bottom area of your screen. If you attempt to receive more than was ordered, the system will ask if you want to receive the higher quantity.
If you scan a SKU that appears multiple times in the Expected Items list, the system first looks to see if there is a PO number in the Current PO # field – if so; it receives that SKU from that PO. If the Current PO # field is empty, the system receives the first instance of that SKU found in the Expected Items list.
If you scan or enter an item that is not in the current list of Expected Items, but is present in the Order Manager’s inventory file, and it is assigned to the current supplier, the program will ask if you want to receive that item even though it is not expected.
If you scan an item that is not present in your inventory, the program will give you an option to add it as a new product.
Click Add New SKU if you have to receive an item that is not currently in your inventory data. The program will display a screen where you can enter the basic information about the product:
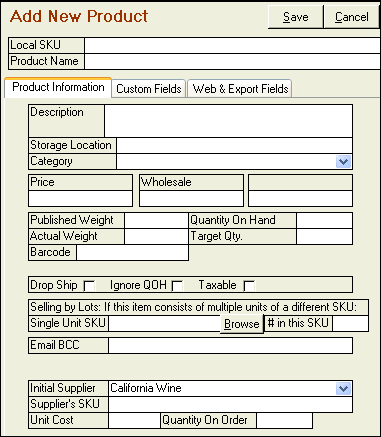
Enter the information about the new product and click Save to return to the Receive Inventory screen.
You can modify the # Received and Actual Cost fields in the Tentative List of Received Items area.
You can also select the Print Labels for all items received checkbox to automatically print barcode labels for the Tentative List of Received Items area. The format of the labels is controlled by the system parameter BarcodeLabelTemplate.
To copy all of the expected items to the tentative list of received items, click Receive All Items.
When all of the data for the items you have received is entered, click Post Data. The system displays the Select a Printer dialog box so that you can print the receiving report.
Select your printing options and click Print. The system marks the indicated items as received and adds the quantity into your store’s inventory.
Note: The system closes the PO automatically if all items are received. You can click the Close PO button if there are Expected Items remaining that will not ever be received. The system will then ask you to confirm the deletion of all remaining Expected records for the PO. Click Yes if you wish to proceed. You should only close a PO manually if you are sure that you will not receive the remaining Expected Items.
Click Exit to close the Purchase Orders screen.
Select a purchase order.
At the Selected PO Items tab, click the Received button.
Use the Split, Add, Edit and Cancel buttons to make changes.
From the Selected PO Items tab, click on Received.
Click on the Print Labels button.
A message box opens asking Print labels for all Received Items on this Purchase Order?. Click Yes.
When you receive invoices from your suppliers, you can enter them into the Order Manager, which can then export them to QuickBooks as bills to be paid. Each invoice can cover part or all of one or more purchase orders, including both regular and drop-ship orders.
The basic process at this screen is:
Enter general information about the invoice (invoice number, date, terms, amounts, etc.) in the Enter Invoice Details section.
Select the purchase orders that are partly or completely covered by the new invoice by checking them off in the List of open Purchase Orders section.
On the Which items were invoiced? tab, indicate which items you were charged for on this invoice.
Reconcile the Allocated Amount shown at the top of the screen, plus any fees and discounts, with the Invoice Total.
Post the data when you are ready.
Complete the following steps to log and work with invoices:
Click the Purchase Orders button from the Quick Clicks list on the Main Menu, or go to Maintenance Menu> Inventory & Suppliers> Purchase Orders and click Go.
Click the Invoices button. The system displays the Invoices for POs window:
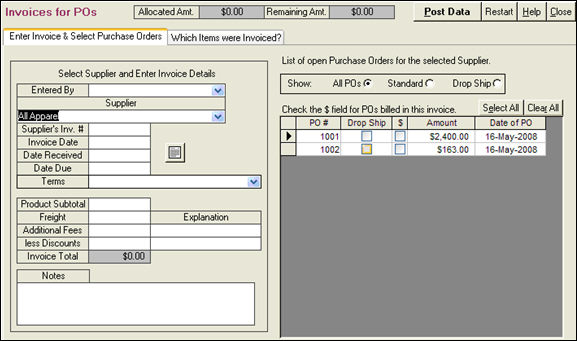
Select the Supplier from the drop-down list. The system displays all of the open POs for that supplier in a list on the right-hand side of the window. If the POInvoiceReceivedOnly parameter is set to True, the list of POs to invoice is restricted to received records only.
Enter general information about the invoice (invoice number, date, terms, amounts, etc.) in the Enter Invoice Details section.
Note: If you want to track Freight and Fees separately in QuickBooks, use the fields supplied. Otherwise, enter the full invoice total in the Product Subtotal field and modify cost per unit for each product to account for the difference in the Allocated Amt. field.
In the List of open Purchase Orders section on the right-hand side, check the $ box for purchase orders that are partially or completely covered by the new invoice.
Go to the Which Items were Invoiced? tab.
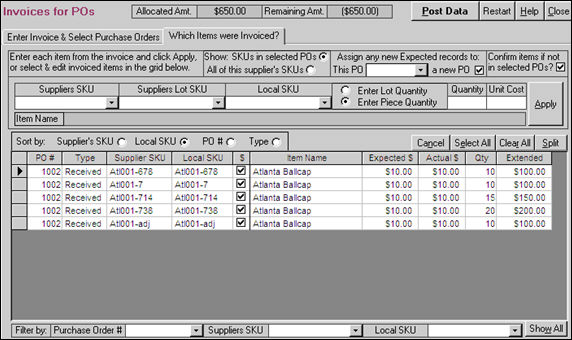
Check off the items that your supplier charged you for on this invoice.
To enter the items one at a time, select a Supplier’s SKU, Supplier’s Lot SKU or Local SKU from one of the drop-down menus, then enter the Quantity invoiced and the Unit Cost, and click the Apply button. The program will find that item in the list below and mark it as invoiced. If the quantity applied does not match the quantity in the first PO record for that SKU, the program will mark multiple records as invoiced and/or split them as needed.
You can also simply check off the $ column for items that have been invoiced and change the Actual $ (the actual unit cost) as needed.
The Select All and Clear All buttons can be used to check off or un-check all of the items in the list.
If you were invoiced for less than the quantity shown for an item, use the Split button to split off a new row with the quantity you need, and then check it as invoiced.
To add an item to the invoice that was not on the purchase order, select a Suppliers SKU or a Local SKU from the drop-down lists. Enter the Quantity invoiced and the Unit Cost. Select a PO from This PO drop-down list or check a new PO. Click the Apply button. The system creates an additional line item for the invoice and adds the item to the PO specified in the This PO drop-down box or to a new PO, if that option is selected.
The items, quantities, and costs that you select or enter must add up to the product subtotal on the invoice. The Allocated Amt. and Remaining Amt. fields at the top of the screen track the amounts for you.
When you are finished, click the Post Data button to save the invoice data in the Order Manager.
WARNING: If you are exporting invoices to QuickBooks or another accounting program for payment, that information is not sent when you click Post Data; it is sent the next time you export accounting data. At this time, invoice data CANNOT BE EDITED after it has been posted. Be absolutely sure that your information is correct prior to posting the invoice information.
Once you have received, logged, and edited your invoices, you can export invoices to QuickBooks or another accounting program.
To export your invoices, navigate to Maintenance Menu> Import/Export> Export Accounting Data and click the Go button. For directions on how to export accounting data, refer to the Knowledge Base online.
The Selected POs Info tab is only enabled when a PO has been selected. This tab displays notes, comments, message, shipping, and additional information about the purchase order.
The Selected PO Items tab is only enabled when you have selected a purchase order to view. This tab displays all of the items in the order. You can also edit purchase order information from this tab.
The Combined List of Items tab displays a list of the items on all POs listed on the Find & Select POs tab.
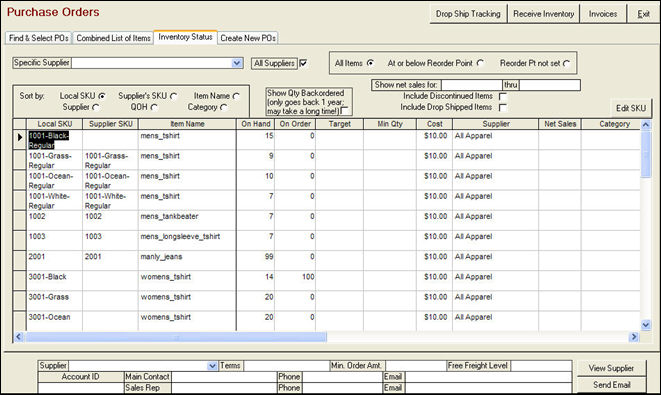
The Inventory Status tab will show you your current inventory. You can view current inventory information from this screen:
Created: 1/17/12
Go to Top