
Version 5.9
It is possible to import orders from multiple shopping carts into one data file. The shopping carts can be of the same type or different types. If you import orders from multiple shopping carts of different types, you must purchase a separate license for each. The ability to track orders by shopping cart was introduced in version 3.001. The Assign Shopping Carts to Orders button is intended to assign shopping cart ids to orders imported into the system before the user enabled the TrackShoppingCartID system parameter to take advantage of this feature.
Be prepared to complete the Cart Association Utility once you begin. The only way to stop the utility is to click Cancel which removes all current cart associations.
Check to see if your web orders are being properly assigned to a shopping cart in the Order Manager. Go to the Main Menu>Maintenance Menu>Setup Functions tab>Assign Shopping Carts to Orders button. If you see a message box that contains the following warning, there are web orders without a shopping cart id in your data file.
--------------------------------------------------------------------------------------------------------------------------------
!!!WARNING!!!
This utility lets you associate existing Order Manager orders with specific shopping carts
(web stores) so you can import orders from multiple stores into the same
Order Manager data file. All Order Manager users must perform this operation to
take advantage of current and future changes in the program. Once you have done this,
it should not need to be done again.
!!!IMPORTANT!!!
The assignment of shopping carts to your orders is not to be taken lightly!
Be aware that if any orders are assigned to the wrong cart, the program may re-import
and re-process duplicates of those orders. PLEASE DOUBLE-CHECK ALL ASSIGNMENTS CAREFULLY!!
Once you begin the process of assigning orders, the process MUST BE COMPLETE
before you can click the Finished button to exit.
If you do not complete the assignments, you can ONLY click the Cancel button to exit, HOWEVER,
the system will CLEAR ALL CURRENT CART ASSIGNMENTS upon exiting the utility!
DO YOU WANT TO RUN THIS UTILITY NOW?
If you would like help with this utility, please contact Stone Edge Technologies, Inc.
at 215-641-1837 weekdays between 9:00 AM and 6:00 PM Eastern Time.
--------------------------------------------------------------------------------------------------------------------------------
Until you assign cart ids to all of your web orders using this utility, you are prompted to perform this task whenever you import orders or add additional shopping carts to the system.
After you configure the system to assign cart ids, you do not receive this prompt. In the future, to see if there are any web orders without shopping cart ids, open the Associate Orders with Shopping cart dialog box (Main Menu>Maintenance Menu>Setup Functions tab>Assign Shopping Carts to Orders button) and click on NONE in the Step 1: Select Cart Type drop down list. Finally, click on either All Unassigned Web Orders or Unassigned Web Orders in Selected Range.
You should only need to run the Cart Association Utility once per Order Manager data file unless you mistakenly import orders under the incorrect shopping cart id, i.e. you Import from Text File and select the wrong cart or there are multiple order files from different carts in the New Orders directory when you import orders. The Import from Text File option imports ALL files in the New Order directory and assigns them to the previously selected cart, regardless of the cart from which they originate.
Go to the Main Menu>Maintenance Menu>Setup Functions tab> Assign Shopping Carts To Orders button.
The Associate Orders With Shopping Cart dialog box opens:
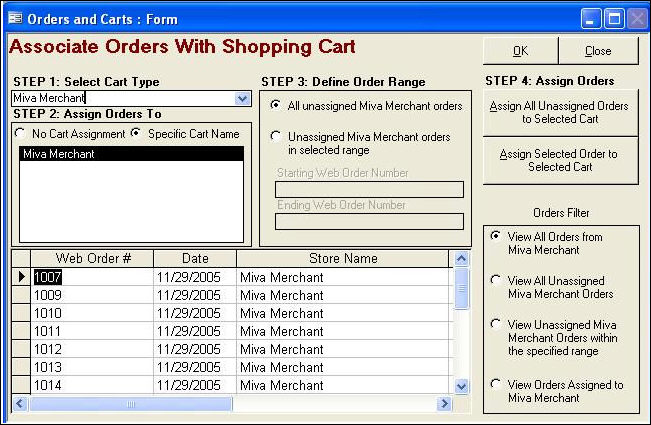
Click on the Step 1: Select Cart Type drop down list and click on the cart type with which you wish to work. Note: The carts that you see listed here depend on the type of license(s) you own. Select None to view all Web orders in the system, regardless of shopping cart type.
Hint: You can further filter your view of the orders in the table by clicking on one of the radio buttons in the Orders Filter section.
In the Step 2: Assign Orders To list box, you see a list of shopping cart names that belong to the cart type you selected in the drop down list above. Click on the cart name to which you want to associate your Web orders. Click the No Cart Assignment radio button to assign 0 (zero) as the cart id, i.e., any cart associations are removed from the system.
In the Step 3: Define Order Range section, click either the All unassigned orders or Unassigned orders in selected range. If you click the latter, enter a Starting Web Order Number (or double-click an order record in the table below) and an Ending Web Order Number (or double-click an order record in the table below).
You can assign a cart id to one or more orders:
Click Assign Selected Order to Selected Cart to assign a cart id to one order.
Click Assign all Unassigned Orders to Selected Cart to assign a cart id to all orders or the selected range of orders.
You may see that message box indicating that duplicate order numbers exist in the system; this means that two or more orders share the same Web order number due to filling backorders into a new order or from performing an exchange into a new order. Either of these actions copy the Web order number to the new order record. Click Yes to assign the orders to the same cart id.
As the order is assigned to a cart id, the cart name appears in the store name column of the table.
When all orders are assigned to a cart type, the Finished button activates.
Click Finished. The program enables the TrackShoppingCartID system parameter and hides it so that the parameter cannot be disabled by the user. It also changes the Associate Orders with Shopping Cart dialog box to allow you to change cart associations in the future but not remove them.
If the Finished button is not activated after performing the steps outlined above:
Click on NONE in the Step 1: Select Cart Type drop down list to see all web orders in the system regardless of cart type and display all existing shopping carts in the current Order Manager data file.
Click on either All Unassigned Web Orders or Unassigned Web Orders in Selected Range.
Assign cart ids to the orders following the steps outlined above.
When all orders are assigned to a cart type, the Finished button activates. If the you follow these steps and the Finished button still is not activated, call or email Stone Edge Technologies, Inc. Tech Support at (610) 994-3699 or http://www.stoneedge.com/mailsupport.asp.
Created: 1/19/12
Go to Top