Note: The information in this article reflects the changes made to the Version 2.4 integration script provided by Stone Edge Technologies, Inc. for osCommerce shopping carts. There is now a single script that supports all osCommerce cart types and the script is downward compatible with all known releases as of August, 2009. The Authorize.net Payment Module is now available as a separate download, it is no longer included in the same zip file that contains the integration script.
The four osCommerce-based shopping carts that the Order Manager supports -- osCommerce 2.2, osCMax, CRE Loaded v6 (minimum version), and Zen Cart v1.2 (minimum version) -- require the installation of a PHP integration script to facilitate order import, inventory import, and quantity-on-hand synchronization. This document describes how to obtain and install the integration script in the shopping cart, how to set up an osCommerce shopping cart in the Order Manager, and how to customize the integration script if necessary.
Click on a link to jump to that section of the article:
Install the Integration Script
Customize the Integration Script (Optional)
Go to the Stone Edge Technologies, Inc. Software Download Gateway page. (Refer to the email from Stone Edge Technologies, Inc. when the Order Manager was purchased. Click the link to the download gateway and put in the username and password that was provided in the email or go to www.stoneedge.net/dlgateway and enter the proper credentials.)
Go to the Other Downloads section of the page; locate and click on the Download button next to osCommerce PHP Integration Script. The file will be named "oscommerce-import.zip".
Make a note of where the file is saved.
If necessary, navigate to the zip file using My Computer or Windows Explorer.
Extract the files by right-clicking on the file name, select Extract All and follow the prompts.
The zip file contains the following files:
- osc-import.php : the import script to be used for all variations of osCommerce carts
- README: release notes and abbreviated installation instructions
- VERSION: revision information about prior releases
Install the integration script in the website's root directory (sometimes referred to as the catalog directory) of your shopping cart using an FTP client or some other file transfer utility. The location may vary based on the type of osCommerce cart being used (osCommerce 2.2, osCMax, CRE Loaded or Zencart). The merchant will need to determine the correct location for the script. Contact the web host for assistance. Once the script has been transferred to the website, make a note of the location of the script, and follow the instructions in the next section of this article to create a "shopping cart" in the Order Manager.
To create an osCommerce Shopping Cart, go to Maintenance Menu>Cart Functions>Create/Edit Shopping Carts or click the Create/Edit Shopping Cart link in the Quick Clicks section of the main menu.
Click the Add Cart button.
Enter a value in the Store Name field. The value entered should easily identify the web site that it represents, but do not include ".com" in the name of a shopping cart.
Select osCommerce from the drop-down list as the Cart Type for any of the cart variations (osCommerce, CRE Loaded, osCMax or Zencart). If the user is only licensed for one shopping cart type, the Cart Type drop-down box will not be visible.
In the CartID/User Name and the Cart Password fields, enter the appropriate username and password combination for the type of shopping cart:
osCommerce 2.2: Enter the Admin username and password that is used to access the osCommerce administrator panel.
osCMax: Enter the Admin email address and password associated with the osCMax account.
CRE Loaded v6: Enter the Admin email address and password associated with the CRE Loaded account.
Zen Cart v1.2: Enter the Admin username and password that is used to login to Zen Cart’s administrator panel.
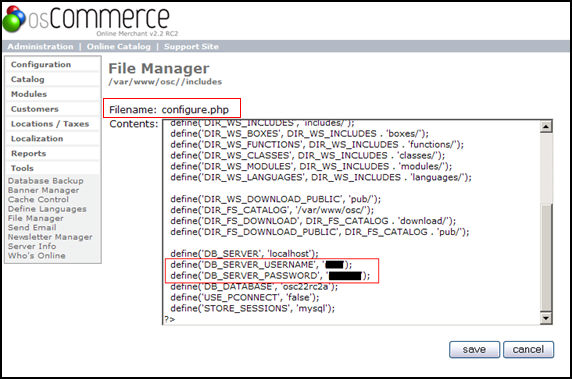
If you are using the correct Admin username/password or correct Admin Email address/password but still receive the message "Access Denied", use the MySQL database username and password combination instead. The database username and password can be found in the Web site's root directory. Find the "Includes" folder and look in the file named "configure.php". The database username and password should be found at the end of the file. Refer to Figure 1 to see an example.
Figure 1: Example of database username and password as seen in the configure.php file
Re-enter the password entered in the previous step.
It is not necessary to put a value in the Store Code field at this time. Skip to the next step.
In the Script URL field, enter the path to the Order Manager integration script. Refer to step 7 in the previous section of this document. For example: www.mysite.com/catalog/osc-import.php
Click the Test Script URL button to validate the accessibility of the script.
A message box will appear to indicate the success or failure of the test.
A successful test will show a message box stating: "Test passed: Script version: [X.XX]" Note: This test does not validate the username and password, merely the accessibility of the script.
If an error message is displayed, verify the location of the script in the web site and ensure that the Order Manager Shopping Cart definition matches exactly.
All connections to the script take place via secure HTTP (https://). If the error message indicates a "404 Not Found" or "Page could not be displayed" error, contact the web host to verify the secure URL and location of the integration script.
Click the Save button to store the cart definition. If changes need to be made in the future, click the Edit Cart button to access the settings.
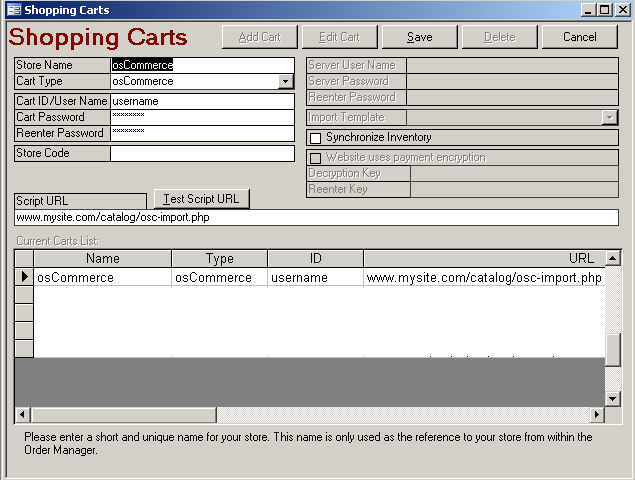
Figure 2: Shopping Carts screen
The standard integration script as provided by Stone Edge Technologies, Inc. can be customized to meet the requirements of the business or those of the website host, but in most cases it is not required. However, if a store (shopping cart) is using a customized version of osCommerce and/or the standard database structure has been changed (either through the installation of 3rd-party contributions or code modifications), the standard Stone Edge integration script may NOT work correctly as provided and therefore may require custom changes to the script to match the custom changes made in the website.
IMPORTANT NOTE: The integration script must be edited using a capable text editor (NOT Notepad) that will preserve the endline formatting. Editing as described in the next section of this article should only be attempted by an experienced PHP programmer and/or system administrator. If you are unsure of whether or not you need to edit the script, do not edit it. Use the script without modifying it at first. If it becomes apparent that changes need to be made, please contact either the web host, a PHP developer, or Stone Edge Technologies, Inc. (at an additional cost for custom coding services) to assist you.
There are several sections near the top of the PHP script that are relevant to customizing the script:
The integration script tries to detect how to parse payment information based on the text of the payment method used at checkout. The language files associated with the payment module that is installed at the website include variables that contain information about the payment transaction, such as the name of the payment method, etc., which is written to a table in the osCommerce SQL database. It is imperative that the $language variable in the integration script matches the language type designated during the setup of the website (shopping cart). Change the value of the variable $language, as shown in the example below, only if the default checkout language of the cart is not English.
Note: The Stone Edge Order Manager integration script currently only supports the use of a single language and it should be set to match the language type that is chosen during the cart setup process at the website, or problems could be encountered when processing payments. It should also be noted that Stone Edge Technologies, Inc. only provides the English language files with the Authorize.net payment module provided for use with osCommerce carts.
// Include the standard payment method language files (if available)
$language = "english"; // name of folder containing local language files
This statement controls whether the integration script treats certain order statuses as "ready" to export. In the example as shown below, the script is set to import orders of any status.
// Limit imported orders to the following status code (-1 = all, default all)
define('USE_STATUS', -1);
The default for taxable goods is Tax Class 1, as shown in the example below. If the tax settings were modified in the website (cart), the script should also be modified to reflect those changes. Otherwise, it is highly recommended that these settings are NOT changed.
// Which tax class should your products have to be considered "Taxable Goods"? (default 1)
define('TAXABLE_GOODS', 1);
Authorize.net - The only credit card gateway that is supported by the Order Manager in conjunction with osCommerce shopping carts is Authorize.net. Stone Edge Technologies, Inc. provides an Authorize.net payment module for licensed osCommerce cart users. It can be obtained at the download gateway, in the Other Downloads section of the page.
Note1: ZenCart supports Authorize.net without the SETI supplied payment module.
PayPal Direct Pay and Paypal Express Checkout (Website Payments Pro) - requires the use of a third-party contribution that can be obtained at: http://www.oscommerce.com/community/contributions,3647. This contribution is REQUIRED for full support of PayPal in Order Manager. The "stock" payment modules provided with osCommerce for PayPal are NOT fully supported by the Order Manager. Stone Edge Technologies, Inc. does not provide support for the installation of this PayPal contribution. Make sure that transactions can be sent successfully from the osCommerce shopping cart to PayPal before attempting to use the Order Manager to import and manage these transactions. Please us the osCommerce community forums and PayPal technical support systems if help is needed for using or installing the contribution.
Note2: ZenCart version 1.3.7.1 or higher is required for PayPal Express / Website Payments Standard support.
ZenCart version 1.3.8 or higher is required for PayPal DirectPay / Website Payments Pro support.
Google Checkout, Check, Money Order, and COD are acceptable payment methods, along with credit cards (using Authorize.net payment module supplied by SETI or the PayPal contribution for osCommerce carts)
See Also
Authorize.net Payment Module for osCommerce Carts
Updated: 7/26/11