This document discusses the three-part configuration process. Click on the links below to jump to that section:
Download the Infopia Transact Integration Library file from the Stone Edge Download Gateway
Obtaining Setup Data from the Infopia Web Site
Configure the cart settings in the Order Manager.
Order Manager 5.807 beta or greater.
.Net Framework 2.0 installed on every workstation that will interact with Infopia Transact.
Go to the Stone Edge Download Gateway and find the Infopia Transact Integration Library in the Other Downloads section.
Click the Download button next to Infopia Transact Integration Library. A dialog box pops us and asks if you want to Open or Save the Zip file that contains the script. Choose Save.
Select a location for the Infopia Transact Integration Library. (Saving the file to your desktop is fine.) Click Save.
Open the Stone Edge-Infopia Transact Integration Library. msi file and click Run.
Go through the InstallShield Wizard. Accept the End-User License Agreement and save the file to C:\StoneEdge\. When the installation is complete, click Finish to exit the wizard.
Note: If the message "Failed to load Infopia utilities - can't continue! (Is the Infopia integration properly installed?)" is received, the Infopia Transact library has not been installed correctly. Verify that .Net Framework 2.0 is installed and re-run the installer.
Log into your Infopia Transact account.
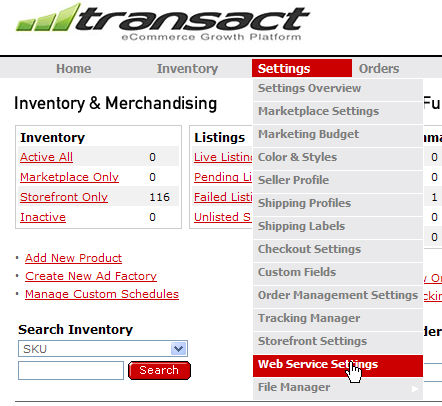
On your Transact account Home page, select Settings> Web Service Settings.
On the Web Service Settings page, copy the string of characters beside Production Token. Keep this string of characters copied to your Clipboard; in the next part of the setup, you will paste it into a designated field in the Order Manager Shopping Carts page.
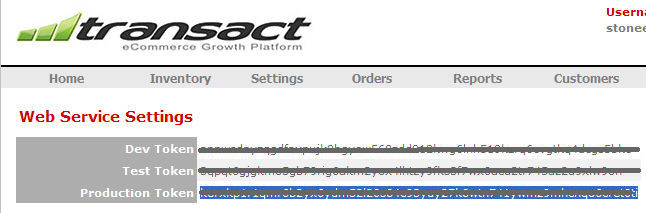
Note: Leave this web page open in case you need to refer back to these settings in the next section.
You can access the Shopping Carts dialog box one of four ways:
Main Menu> Maintenance Menu> Cart Functions tab> Create/Edit Shopping Carts
Main Menu> Maintenance Menu> Setup Functions tab> Store Setup Wizard> Shopping Carts> Create and Edit Shopping Carts
Quick Clicks> Create/Edit Shopping Cart
Quick Clicks> Setup Wizard> Shopping Carts tab> Create and Edit Shopping Carts
The Shopping Carts dialog box opens.
Click Add Cart.
Click on the Cart Type drop down list and select Infopia Transact. If you are only licensed to use one shopping cart, you will not see a drop-down list; Infopia is your default cart type.
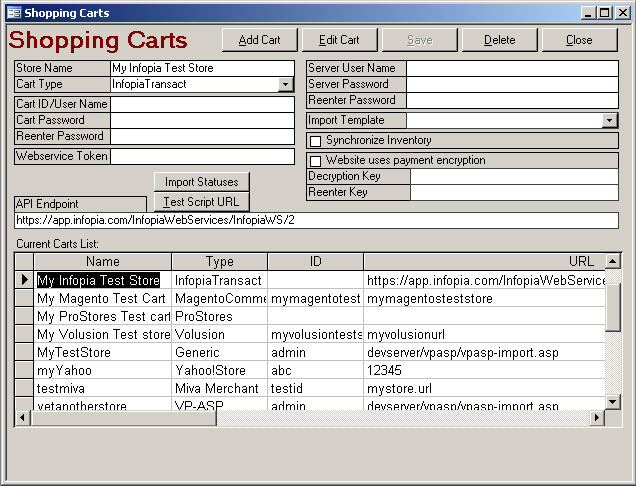
Enter the Store Name. The store name is for internal Order Manager purposes only; it can be anything you want it to be as long as it is easily distinguishable from any other stores you may have.
In the Webservice Token field, paste the Production Token string of characters, which you copied from the Web Service Settings page of your Transact account.
The API Endpoint field is automatically populated.
Click on the Import Statuses button to select which Infopia Transact order status' that Order Manager will use to determine which orders should be imported.
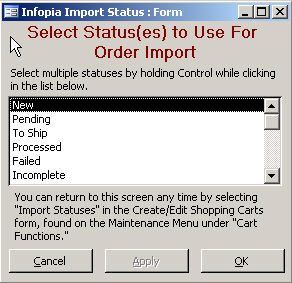
List of Possible Order Status'
New Pending
To Ship Processed
Failed Temp
Flagged Returns
Fraud Incomplete
Click on the desired status or statuses and then click the Apply and OK buttons to save your choices and return to the Shopping Cart form.
Click Save.
Click Close to exit the Shopping Carts dialog box.
Symptom: Unable to connect to the web site.
Possible Resolutions:
The production token is not correct. Obtain the correct token according to the documentation above and re-enter it into the Shopping Cart definition.
If the message "Failed to load Infopia utilities - can't continue! (Is the Infopia integration properly installed?)" is received, the Infopia Transact library has not been installed correctly. Verify that .Net Framework 2.0 is installed and re-run the installer.
Updated 4/25/09
Modified 2/25/10