Note: The Stone Edge Order Manager only supports the "Pro", "Advanced", and "Enterprise" versions of ProStores.
There are three parts to setting up a ProStores shopping cart in the Order Manager:
1) obtaining server settings from ProStores Store Administration,
2) setting up the shopping cart in the Order Manager, and
3) testing the script URL.
Follow these directions for all versions of the Order Manager.
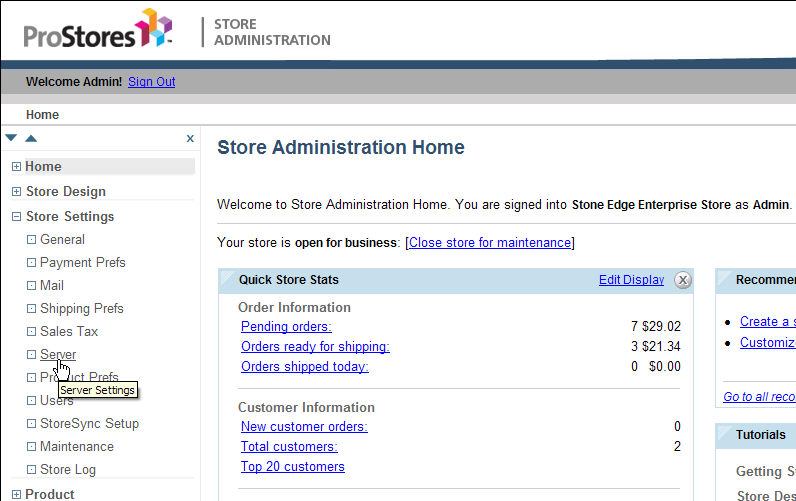
Log into your ProStores Store Administration Home page.
Click Store Settings on the left navigation bar to expand the menu, and then select Server.
Leave your browser open to the Server Settings page; you will need to copy information from it into the Order Manager. (The information you will need is highlighted in the screenshot below.)
Open the Order Manager and proceed to the next section. ![]()
Choose the directions that pertain to the version of the Order Manager that you are running.
Open the Shopping Carts dialog box:
Main Menu> Maintenance Menu> Cart Functions tab> Create/Edit Shopping Carts
Quick Clicks> Create/Edit Shopping Cart button
Quick Clicks> Store Setup Wizard> Shopping Carts tab> Create and Edit Shopping Carts button
Main Menu> Setup Functions> Store Setup Wizard> Shopping Carts tab> Create and Edit Shopping Carts button
The Shopping Carts dialog box opens.
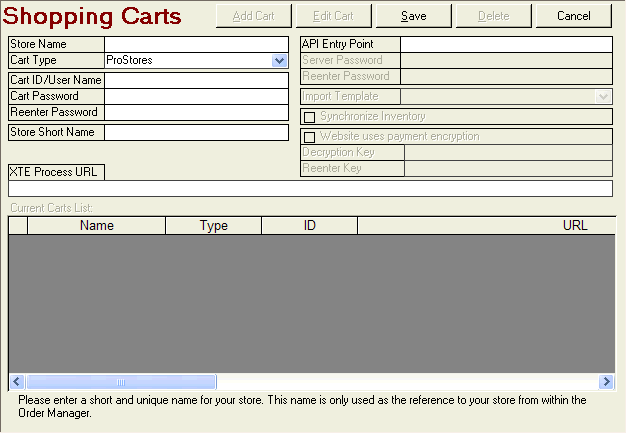
Click Add Cart.
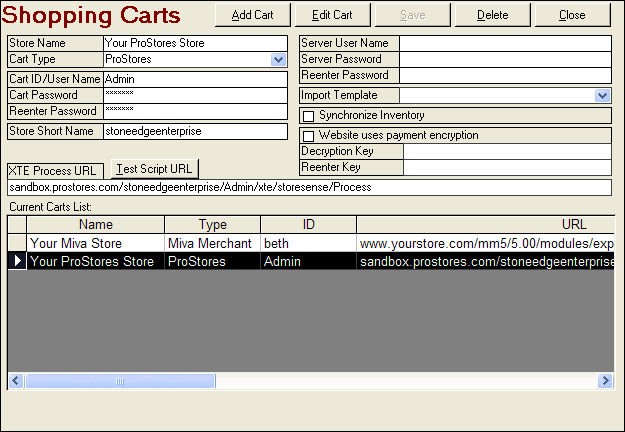
Enter a Store Name. Note: You can name the store anything you wish as long as it is easily distinguishable from other shopping carts you may have.
Click on the Cart Type drop down list and select ProStores. Note: If you are licensed to use only one type of shopping cart you will not see a drop down list; ProStores is your default cart type.
Enter your CartID/User Name and Cart Password. This is the user name and password that you use to log into your ProStores Store Administrations page.
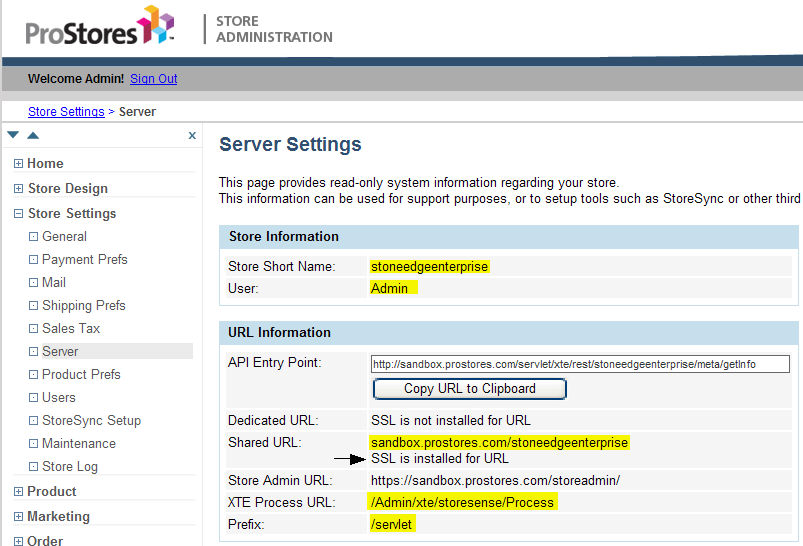
Go to the Store Information box in the middle of the ProStores Store Administrations page and copy your Store Short Name.

Enter your Store Short Name into the Order Manager.
Next, determine your XTE Process URL and paste it into the Order Manager.
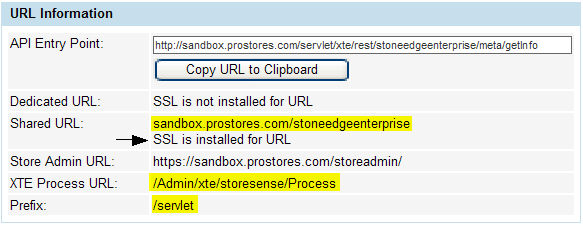
To get your XTE Process URL, go to the URL Information box in the middle of your ProStores Store Administrations page.
To create your XTE Process URL, you must combine the Shared URL or Dedicated URL + Prefix +XTE Process URL (see the higlighted fields in the screenshot below). To determine whether to choose Shared URL or Dedicated URL, check to see if "SSL is installed for URL". You must choose the URL with SSL installed. If neither URL has SSL installed, contact ProStores to obtain it. If both URLs have SSL installed, chose the Dedicated URL.
Based on the screen shot example below, the XTE Process URL would be the following:
sandbox.prostores.com/stoneedgeenterprise/servlet/Admin/xte/storesense/Process
Paste the XTE Process URL into the field in the Order Manager.
Under the URL Information box on the ProStores Store Administrations page, click Copy URL to Clipboard button to save the API Entry Point URL to your clipboard. Paste the API Entry Point URL into the designated field in the Order Manager.

Click Save. Go onto the section below, Test the Script URL.
Go to Quick Clicks> System Parameters. In the Parameter Group box, select ProStores. In the Parameters in Selected Group box, select ProStoresUseXTE, and set the Parameter Value to TRUE. Click Save.
Open the Shopping Carts dialog box:
Main Menu> Maintenance Menu> Cart Functions tab> Create/Edit Shopping Carts
Quick Clicks> Create/Edit Shopping Cart button
Quick Clicks> Store Setup Wizard> Shopping Carts tab> Create and Edit Shopping Carts button
Main Menu> Setup Functions> Store Setup Wizard> Shopping Carts tab> Create and Edit Shopping Carts button
The Shopping Carts dialog box opens:
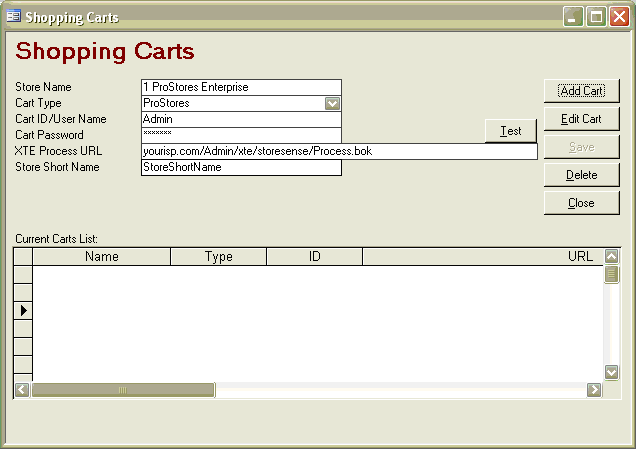
Click Add Cart.
Enter a Store Name. Note: You can name the store anything you wish as long as it is easily distinguishable from other shopping carts you may have.
Click on the Cart Type drop down list and select ProStores. Note: If you are licensed to use only one type of shopping cart you do not see a drop down list; ProStores is your default cart type.
Enter your CartID/User Name and Cart Password.
Go to the Store Information box in the middle of the ProStores Store Administrations page and copy your Store Short Name.
Enter your Store Short Name into the Order Manager.
Next, determine your XTE Process URL and paste it into the Order Manager.
To get your XTE Process URL, go to the URL Information box in the middle of your ProStores Store Administrations page.
To create your XTE Process URL, you must combine the Shared URL or Dedicated URL + Prefix +XTE Process URL (see the higlighted fields in the screenshot below). To determine whether to choose Shared URL or Dedicated URL, check to see if "SSL is installed for URL". You must choose the URL with SSL installed. If neither URL has SSL installed, contact ProStores to obtain it. If both URLs have SSL installed, chose the Dedicated URL.
Based on the screen shot example below, the XTE Process URL would be the following:
sandbox.prostores.com/stoneedgeenterprise/servlet/Admin/xte/storesense/Process
Paste the XTE Process URL into the field in the Order Manager.
Click Save.
Go onto the section below, Test the Script URL.
Open the Shopping Carts dialog box:
Main Menu> Maintenance Menu> Cart Functions tab> Create/Edit Shopping Carts
Quick Clicks> Create/Edit Shopping Cart button
Quick Clicks> Store Setup Wizard> Shopping Carts tab> Create and Edit Shopping Carts button
Main Menu> Setup Functions> Store Setup Wizard> Shopping Carts tab> Create and Edit Shopping Carts button
The Shopping Carts dialog box opens:
Click Add Cart.
Enter a Store Name. Note: You can name the store anything you wish as long as it is easily distinguishable from other shopping carts you may have.
Click on the Cart Type drop down list and select ProStores. Note: If you are licensed to use only one type of shopping cart you do not see a drop down list; ProStores is your default cart type.
Enter the CartID/User Name and Cart Password.
Next, determine your XTE Process URL and paste it into the Order Manager.
To get your XTE Process URL, go to the URL Information box in the middle of your ProStores Store Administrations page.
To create your XTE Process URL, you must combine the Shared URL or Dedicated URL + Prefix +XTE Process URL (see the higlighted fields in the screenshot below). To determine whether to choose Shared URL or Dedicated URL, check to see if "SSL is installed for URL". You must choose the URL with SSL installed. If neither URL has SSL installed, contact ProStores to obtain it. If both URLs have SSL installed, chose the Dedicated URL.
Based on the screen shot example below, the XTE Process URL would be the following:
sandbox.prostores.com/stoneedgeenterprise/servlet/Admin/xte/storesense/Process
Paste the XTE Process URL into the field in the Order Manager.
Go to the Store Information box in the middle of the ProStores Store Administrations page and copy your Store Short Name.
Enter your Store Short Name into the Order Manager.
Click Save.
Go onto the section below, Test the Script URL.
Note: To use Direct XML Import of orders for ProStores, set the ProStoresUseXTE system parameter to TRUE.
Click the Test Script URL button.
A Microsoft Access dialog box pops up. Click OK.

A browser window opens to a ProStores login page.
Login to your ProStores site. Click Continue.
The Stone Edge Order Manager Authorization screen appears. Click Agree and Continue to authorize.
ProStores authorization is complete. Close the browser window.
Updated 11/6/08
Modified 5/6/10