These directions pertain to the Order Manager 5.8XX Beta series and higher.
The 5.8XX Beta series of the Order Manager has improved integration with Network Solutions carts, enabling direct import of orders, products, and customers.
Open the Shopping Carts dialog box in one of the following ways:
Main Menu> Maintenance Menu> Cart Functions tab> Create/Edit Shopping Carts
Quick Clicks> Create/Edit Shopping Cart button
Quick Clicks> Store Setup Wizard> Shopping Carts tab> Create and Edit Shopping Carts button
Main Menu> Setup Functions> Store Setup Wizard> Shopping Carts tab> Create and Edit Shopping Carts button.
Click the [Add Cart] button.
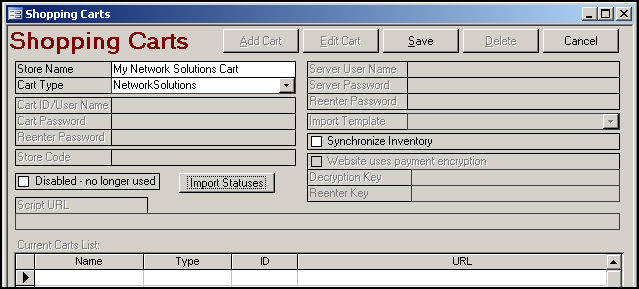
Enter a Store Name. Note: You can name the store anything you wish as long as it is easily distinguishable from other shopping carts you may have.
Figure 1: Shopping Carts screen
Click on the down arrow of the drop-down box next to the Cart Type and select "Network Solutions". If the user is only licensed for one shopping cart type the Cart Type drop-down box will not be visible.
Click the [Save] button. The name of the new shopping cart will be listed in the Current Carts List at the bottom of the window.
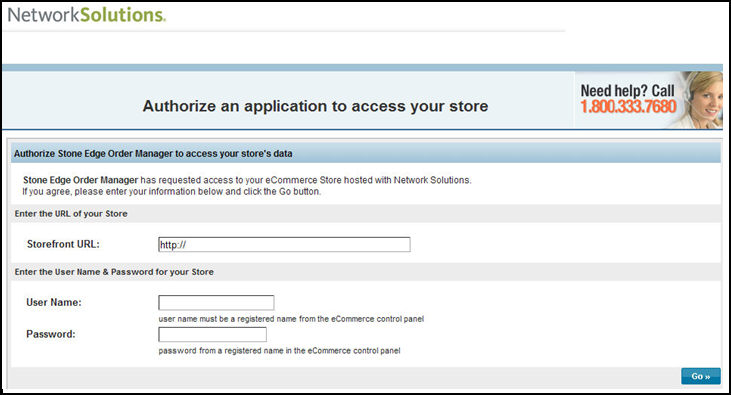
Figure 2: Shopping Carts screen
Click the [Import Statuses] button.
At this point, the Order Manager will open a browser and redirect you to a Network Solutions authorization page. (Meanwhile, a "Redirect" message window will pop up in front of the Order Manager. Leave this message window open until you have completed the confirmation process at the Network Solutions authorization page. Refer to Figure 5.)
In the designated fields, enter your Storefront URL, User Name, and Password to authorize the Order Manager to download order, product, and customer data from your store site.
Figure 3: Network Solutions authorization screen
Click [Go]. A Network Solutions authorization confirmation window will open.

Figure 4: Network Solutions confirmation screen
Click the [Cancel] button in the lower right corner to close the browser window.
Go back to the Order Manager, where you left the Redirect message window open:

Figure 5: Order Manager Redirection to Network Solutions screen
Click [OK].
When the Order Manager has completed importing all of the orders in your shopping cart, you will see a confirmation message box. Click [OK].
Note: Once Network Solutions authorizes the Order Manager, your store token information will be valid for about a year, so you won't be redirected to the authorization page until it expires. Refer to Knowledge Base article, Error 91 when Importing Orders from Network Solutions, at that time.
Select the status of your new orders at Network Solutions. Order Manager will use this value to determine what orders are eligible to import from your Network Solutions cart.
Important Note: An Import Status must be selected or you will receive the message "No Orders to Import" when attempting to import orders via the Internet!
Click [Save]. Close the Shopping Carts screen.
Go to Main Menu> Orders> Import. The Import Orders screen opens.
Select your Network Solutions cart from the list.
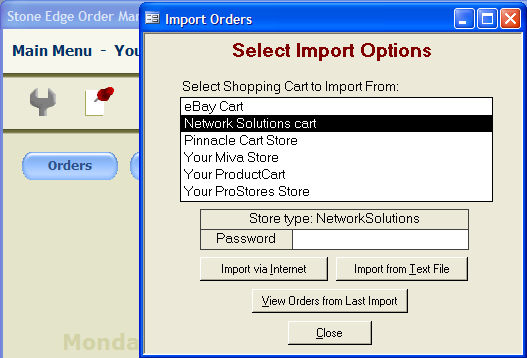
Figure 6: Import Orders screen
In the Password field, type the Password that you use to log into your Network Solutions Control Panel.
Click [Import via Internet].
Since this is the first time you are importing orders into the Order Manager, the First Import screen opens.
Choose [Yes] to import a range of existing orders (i.e., processed and shipped) into your shopping cart as Archived. After you click Yes, select the Last Order Date to Treat as Already Shipped from the calendar box that pops up.
Choose [No] to import all orders as Active.
To restrict the number of orders imported into the Order Manager, type the order number that you want to be treated as the "last order imported" into the Enter Order Number field. The Order Manager will only import orders placed AFTER this order number.
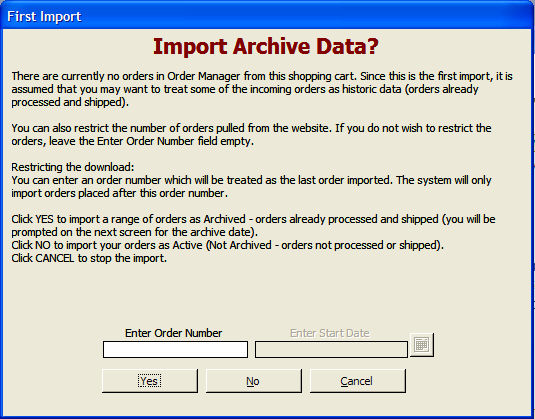
Figure 7: Import Archive Data? (First Import) screen
Created 11/10/08
Updated 11/1/10