

In this Topic: Show
This document outlines the manual steps to create ODBC connections for an Access database and an SQL database in the Windows XP environment as it relates to connecting an Order Manager data file with external shipping software applications or to connect additional workstations to a new SQL data file that was converted from Microsoft Access.
If an SQL data file is being used by the Order Manager, it is preferable to utilize the same ODBC connection that was automatically created by the program when the Microsoft Access database was converted to SQL to avoid errors. Review the settings of the ODBC connection on the workstation or server where the data file was converted from Microsoft Access to duplicate them on additional workstations.
The preferred method to create an ODBC connection for use with an Access data file is by utilizing the Worldship Setup function found by going to Maintenance Menu >Setup Functions >UPS Worldship Setup >Go. This function automatically creates an ODBC connection for a Microsoft Access data file.
If the ODBC connections will be made manually on a 64-bit operating system, please read the Knowledge Base article, Windows 64-bit Operating System Considerations before proceeding.
Click on the Start Menu.
Select Control Panel.
Select Administrative Tools and double click the Data Sources (ODBC) icon.
Click on the System DSN tab.
Click the Add button.
Select Microsoft Access Driver (*.mdb) from the drivers list and click the Finish button.
Enter a meaningful name for the data source, such as OMDataFile or OMStoreNameDataFile, if more than one data file is used. Enter a brief description of the connection, as well.
Click on the Select button (pictured above) to navigate to the location of the Order Manager’s data file.
To determine the name or location of the data file used by the Order Manager, press CTRL+SHIFT+C at the Main Menu. This will bring up a window with details on the file names and locations used by the Order Manager. Look for the entry "Order Manager Data File" to obtain the name and path information for your store’s data file. It should be the first one in the list.
Make sure that the Read Only and Exclusive options are NOT checked (see the figure above) then click on the OK button.
The path for the data file will appear in the ODBC Microsoft Access Setup window:
Click the OK button to return to the System DSN tab.
Click on OK to exit the ODBC Data Source Administrator window.
Click on the Start Menu.
Select Control Panel.
Select Administrative Tools and double click the Data Sources (ODBC) icon.
Click on the System DSN tab.
Click the Add button.
Select SQL from the drivers list and click the Finish button.
Click Next.
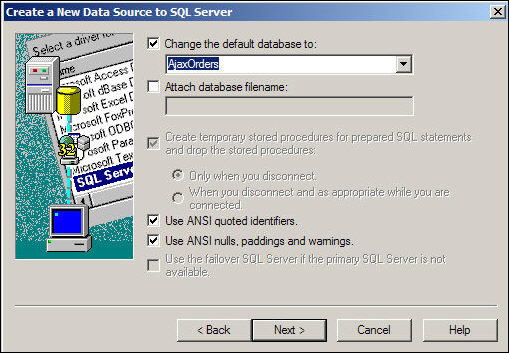
Click Next again.
Click the Finish button.
Click the Test Data Source button to verify the connection. It should say "TESTS COMPLETED SUCCESSFULLY!".
Click the OK button twice to return to the System DSN tab of the ODBC System Administrator screen.
Click on OK to exit the ODBC Data Source Administrator window.
Ported: 2/7/12