
Order information is imported directly from the website
Product records can be imported directly from the website
Customer records can be imported directly from the website
Custom order fields can/not be imported from the website - no information about this
Manual Inventory Synchronization is supported in both directions (Get/Send)
Real-time Inventory Synchronization is supported at the product/attribute/sub-SKU level
Order Status Updates are not supported. If the vendor chooses to make this option available in the future, it will be necessary to set system parameter UseGenericStatusUpdates to TRUE.
Log in to the Administrative Control Panel of the shopping cart.
Select Setup and Tools.
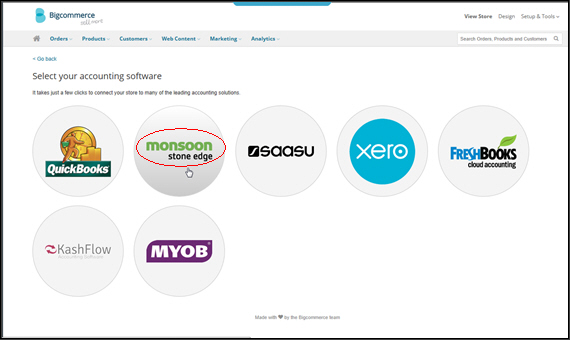
Under the Integrations heading, select Accounting.
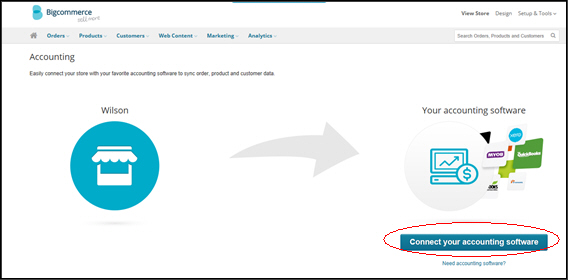
Select Connect your accounting software.
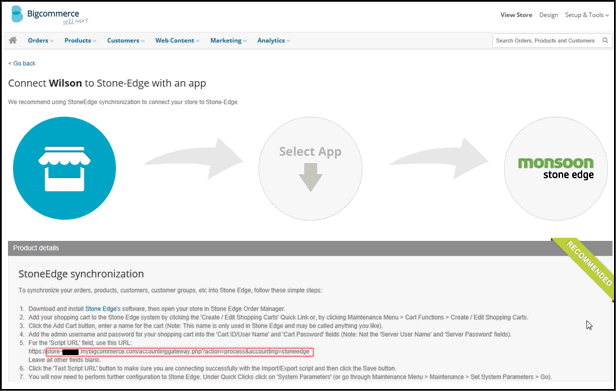
In StoneEdge synchronization instructions, step 5, copy the portion of the URL after "https://" to the clipboard, or make a note of it as it is the value to put in the SE Script URL field in the next section of instructions.
For example, copy "store-xyz.bigcommerce.com/accountinggateway.php?action=process&accounting=stoneedge", where xyz = the URL of your specific BigCommerce store.
Ignore step 7 of the Stone Edge synchronization instructions, which only apply to users running Stone Edge V5.912 or lower who are using a Generic Shopping Cart License to connect to their Big Commerce store.
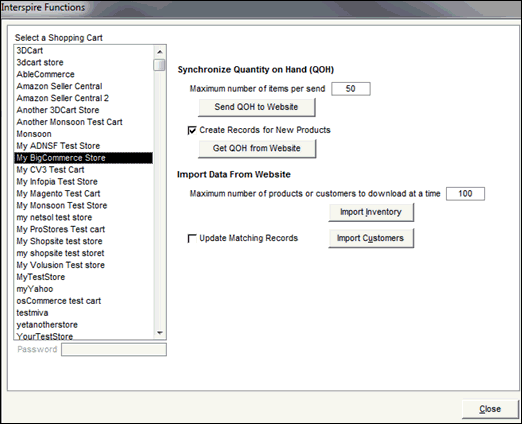
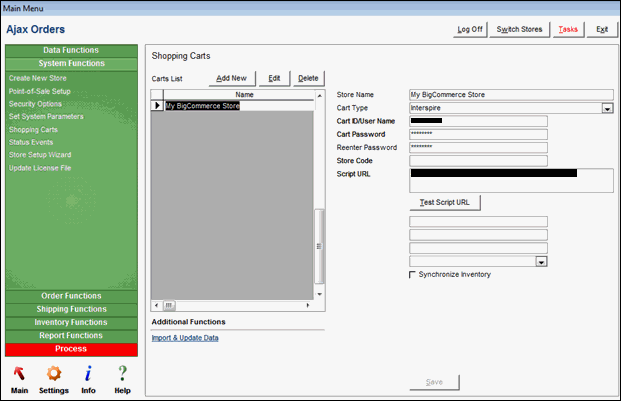
Go to Main Menu>Settings>System Functions>Shopping Carts. The Store Setup Wizard can also be used to open the Shopping Carts screen.
Select Add New.
Enter an arbitrary name for the BigCommerce web store in the Store Name field. It can be anything you like, but it must be unique. This value is only used internally in Stone Edge.
Select Interspire from Cart Type. If the user is only licensed for one shopping cart system, Cart Type displays the name of that system rather than a drop-down list.
Enter the CartID/Username and Password combination used to log into the Control Panel of the cart in the Cart ID/User Name and Cart Password fields, respectively. field names change based on scs
Re-enter the Cart Password in the Reenter Password field. Refer to step ? in the previous section
Leave the Store Code field blank. Contact BigCommerce to request your BigCommerce store reference number, which is entered into the Store Code field.
Enter the value copied in step 6 into the Script URL field.
Select Save to create the shopping cart definition.
Select Test Script URL to validate the path to the script. This button is not visible until the shopping cart definition is initially saved. If successful, the program pops a message box stating "Test passed" and the script version. This test does not validate the Username and Password credentials, merely the accessibility of the script.
A successful test will show a message box stating: "Test passed: Script version: [X.XX]" Note: This test does not validate the username and password, merely the accessibility of the script.
If an error message is displayed, verify the value that was entered in Script URL field exactly matches the URL on the Stone Edge tab of the Stone Edge Order Manager settings at the website.
All connections to the script take place via secure HTTP (https://). If the error message indicates a "404 Not Found" or "Page could not be displayed" error, contact the web host to verify the secure URL and location of the integration script.
The shopping cart definition is complete! Continue with other configuration tasks listed below, if they are supported by your shopping cart system.
BigCommerce supports/does not support product attributes/options.
Before importing product records from the shopping cart, decide how product attributes are handled. Details...
Customer records can be imported directly from the website. Follow the directions below.
Customer records are also created as orders are imported if the program does not find a matching customer record in the store data file. Refer to Matching Customer Records to Existing Customers, for more information about that process.
This feature is not supported.
For more information about using custom fields in Stone Edge, review the Knowledge Base topic, Configuring Custom Fields.
Go to Main Menu>Import My Orders>Import My New Orders.
Choose the appropriate shopping cart definition from Select Shopping Cart.
Select Import via Internet. Refer to Knowledge Base topic, Import Orders, for general instructions.
Cancelled
Payment Received
Shipped
Order Received
Select Edit.
Select Save.
Matching New Records to Existing Customers
Status Updates Feature: Basic Requirements
Created: 9/5/13
Revised: 1/22/15
Published: 12/10/2015