This shopping cart's capabilities:
Orders can be directly imported from the web site
Product records can be directly imported from the web site
Customer records can be directly imported from the web site
Custom (order) Fields can cannot be imported from the web site
Manual Inventory Synchronization is supported with the web site
Real-time Inventory Synchronization is supported at the product attribute level
Order Status Updates are supported
Shopping carts can be defined during the Setup Guide when the program is first installed, or you can enter them at a later date by following these instructions.
ADNSF Version 9 users should use the ADNSF-Import.ashx script
ADNSF Version 8 users should use the ADNSF8-Import.aspx script
Go to Main Menu>Settings>System Functions>Shopping Carts.
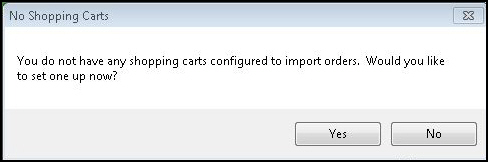
If you have not yet setup a cart, the program asks if you want to do so now? Respond Yes.
Select Add New. The fields displayed on this screen vary based on the cart type.
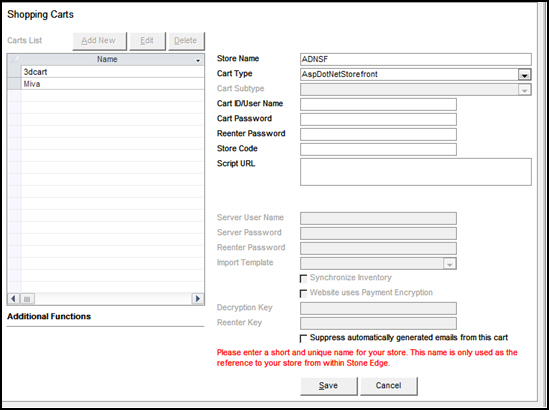
Enter a value in Store Name.
Select AspDotNetStoreFront from Cart Type.
Enter your CartID/UserName.
Enter your password in Cart Password and in Reenter Password.
Enter the Store Code.
Enter the location of the integration script in Script URL (the shopping cart URL, followed by a forward-slash and the name of the script you placed the root directory).
Choose whether to Select automatically generated emails from this cart.
Select Save and the definition is added to the Carts List.
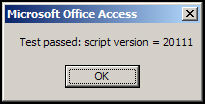
Select Test Script URL to validate the path to the script. This button is not visible until the shopping cart definition is initially saved. If successful, the program pops a message box stating "Test passed" and the script version. This test does not validate the User Name and Password credentials, merely the accessibility of the script.
You should see a message similar to the following image. Select OK to acknowledge the script is accessible.
The shopping cart definition is complete!
If you have not yet entered or imported supplier information, do that before you import products or all of your products are assigned to the Default Supplier record.
Go to Main Menu>Settings>System Functions>Shopping Carts.
Select the appropriate shopping cart definition from the list.
Select Import & Update Data in the Additional Functions section of the screen to open the Shopping Cart Functions screen. The caption of the screen changes to display the cart type.
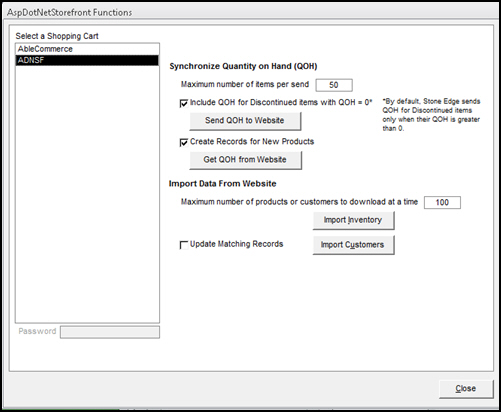
Select Import Inventory.
The program asks for confirmation that you want to import all products from the shopping cart.

Select OK.
The subsequent screen allows you to refine the product record import process. The choices available depend on the shopping cart system.
Choose whether to Start by deleting all existing Inventory? or to retain existing product data.
If existing product data is not deleted, choose whether to replace all existing data with data from the shopping cart, just selected fields, or do not change any existing data. The last choice basically means that only data for product records which do not presently exist in the store data file are imported.
Select OK.
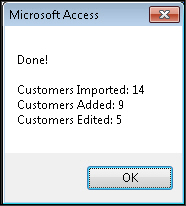
When the product import is complete, the program displays a summary of the results.
Select OK.
Select Close to exit the Shopping Cart Functions screen.
Customer records can be imported from the shopping cart.
Customer records are also created as orders are imported if the program does not find a matching customer record in the store data file. Refer to Matching Customer Records to Existing Customers, for more information about that process.
Some shopping carts let you collect additional information from the customer at checkout and include them in the order XML files so you can import them into Stone Edge custom order fields.
This feature is not supported by this shopping cart.
For more information about setting up custom order fields in Stone Edge, review the Knowledge Base topic, Configuring Custom Fields.
Go to Main Menu>Import My Orders>Import My New Orders.
Choose the appropriate shopping cart definition from Select a Shopping Cart.
Select Import via Internet.
If this is the first time you are importing orders from this cart, you are asked if any of the orders have already been shipped. If so, specify the cut-off date. Refer to Knowledge Base topic, First Import, for general instructions.
If this is not the first time you are importing orders from this cart, select an existing batch or create a new batch of orders to import.
Refer to Knowledge Base topic Import Orders for general instructions.
This feature is supported. Refer to Knowledge Base topics, Status Events, and Status Updates Feature: Basic Requirements, for more information about configuring Stone Edge to send order status updates to shopping carts.
Set main system parameter UseStatusUpdates to TRUE.
If this is the first shopping cart you are setting up, load the default list of Status Events, otherwise, skip this step.
Define any special status labels the cart uses through the List Maintenance feature.
Choose the status event which triggers the sending of updates to the cart, and select Notify Cart.
Turn on system parameter UseGenericStatusUpdates in Cart Specific Parameters for this cart only.
Ensure that the Local or Shared Stack is up and running.
Cancelled
Payment Received
Shipped
Order Received
This feature is supported at the variant level between a single ASPDotNetStoreFront store and Stone Edge.
In order for synchronization to occur, the inventory items (products) must have been initially created in Stone Edge by using the Import Inventory button on the Shopping Cart Functions screen. If items were entered manually or by importing inventory from another shopping cart type (Yahoo!, Amazon, etc.) the synchronization will not take place. Review Knowledge Base topic, Inventory Synchronization, for more information.
It is best to initialize synchronization during off-hours.
Make sure the QOH values in the shopping cart are correct.
Set system parameter SynchQOH to FALSE.
Backup the store data file before proceeding.
Go to Main Menu>Settings>Shopping Carts and select the ADNSF cart from the list.
In the Additional Functions section, select Import & Update Data.
Select Import Inventory.
Select Yes next to Start by deleting all existing Inventory?.
Choose the Do not modify existing data button.
Select Replace all option lists radio button in the Option Lists section of the screen.
If other shopping cart types exist in the data file, be sure to re-import their inventory items afterward, but select No next to Start by deleting all existing inventory?. Also, select Just add new option lists. Repeat this step for as many shopping carts as necessary.
Once the inventory imports are complete, backup the data file once more.
Change system parameter SynchQOH equal to TRUE. Refer to Knowledge Base article Set System Parameters for instructions.
Go to the Shopping Carts screen and select the ASPDotNetStorefront shopping cart from the list.
Select Edit Cart.
Select Synchronize Inventory. Click Save.
Manually make a change to the QOH of a product in Stone Edge and check the QOH at the shopping cart in a few minutes. Stone Edge has no control over how long it takes the cart to process the inventory updates - some carts take longer than others.
It may be periodically necessary to manually re-sync QOH information. It is highly recommended that this process take place off hours to ensure QOH accuracy across shopping carts. Before doing so, set system parameter SynchQOH to FALSE. Update the QOH correctly in Stone Edge or a shopping cart and then push or pull the correct values to any remaining carts (Shopping Cart Functions screen, Send QOH to Store or Get QOH from Store). Once the values are identical, set SynchQOH back to TRUE.
All valid shipping methods for UPS, FedEx, USPS, both domestic and international
Will Call and Email (for gift certificates) are also supported
Matching New Records to Existing Customers
Status Updates Feature: Basic Requirements
Created: 1/21/15
Revised:
Published: