![]()
Version 7.5
![]()
Version 7.5
Contents of this Topic: Show
![]() This is not a high security system. It will not
prevent a knowledgeable Microsoft Access user from disabling or working
around the system.
This is not a high security system. It will not
prevent a knowledgeable Microsoft Access user from disabling or working
around the system.
The SEOM security system controls what users see and how they use the program. It requires a user to log into the program with a User ID and Password.
To use the Tasks feature of SEOM, you must enable the security system. The program tracks tasks assigned to specific users and displays a reminder at login if there are tasks which are due the current day or overdue. The text color of the Tasks button is red if a task is assigned to a user.
The basic building blocks of the Security System are:
User IDs - Each employee must be assigned a User ID that allows them to access SEOM. Individual User IDs "inherit" the permissions assigned to the group or groups to which they belong. If a user is a member of more than one security group, they are governed by the least restrictive permissions assigned to either of the groups. Do not permit the sharing of User IDs.
Groups - Security groups make it easier to administer the level of program access certain users have, usually based on their job function. Permissions are assigned to the security group and then individual User IDs are assigned to the appropriate group. The program supplies five standard user groups: Admin, Cashiers, Packers, Power Users, and Sales People. The default Admin group has permission to use all of the program's features without any restrictions. This group is active as soon as the Security System is enabled, but the other four groups must be activated manually. Best practices dictate that there should only be one or two users in the Admin group. Create your own user groups or use the pre-defined groups provided with the program for the vast majority of people that will use the program.
Permissions - Control what functions each security group is able to perform by settings their "permissions". Access can be restricted at the form (screens, control or report level. If you need to assign a specific set of permissions for just one individual, create a new group, set up its permissions, and assign that one User ID to the new Group.
Important Note: If you enable the security system, you must create users and assign them to groups immediately. If you fail to do so, the only way to log in to the program is by logging in with default Admin account. The first time you login with the Admin User Id, you are prompted to create a password. If this password is forgotten you will not be able to access the program! After User IDs are setup and tested, it is recommended that you change the password of the Admin User ID to prevent unauthorized users from accessing the program.
Go to Main Menu > Settings > System Functions > Security Options.
The Security System dialog box opens:
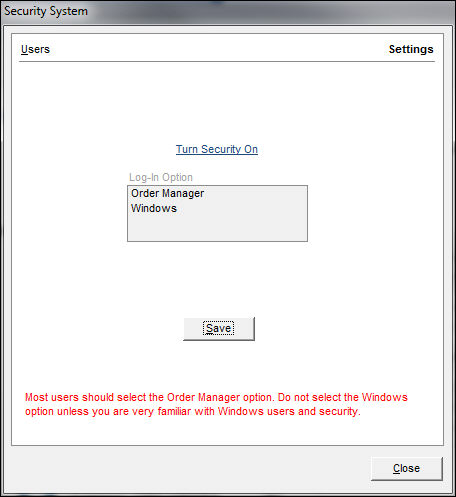
Security screen
Only the Users and Settings tabs are visible when the security system is disabled. To enable the security system, select the Turn Security On link.
Select a Log-In Option. It is strongly recommended to use the Order Manager option.
Select Save. The Groups, Group Permissions, and Object Permissions tabs appear.
Repeat steps 1 - 2 for each group to be used.
Select the Users tab.
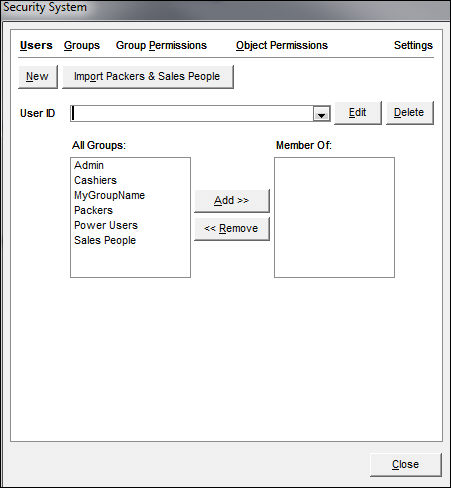
Security screen - Users tab
If Packers and Sales People were added to the program when the Setup Guide was executed, that information can be imported in to the Security System by selecting Import Packers & Sales People, which is only visible if Order Manager is selected as the Log-In Option on the Settings tab.
Otherwise,select New to open the User Info dialog box.
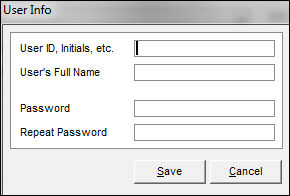
User Info screen
Enter a User ID. While this field will accept up to 20 characters, we recommend using short User IDs.
Enter the first name and last name of the user in the User's Full Name field.
Enter a Password. It is possible for the user to change their password at a later date.
Enter the password again in the Repeat Password field.
Select Save.
Your view returns to the Users tab and the new user is listed in User ID.
Select the Users tab.
Select the User ID.
Select Edit.
Make changes to User's Full Name or Password. The User ID field cannot be edited.
Select Save.
Select the Users tab.
Select the User ID.
Select Delete.
Select OK.
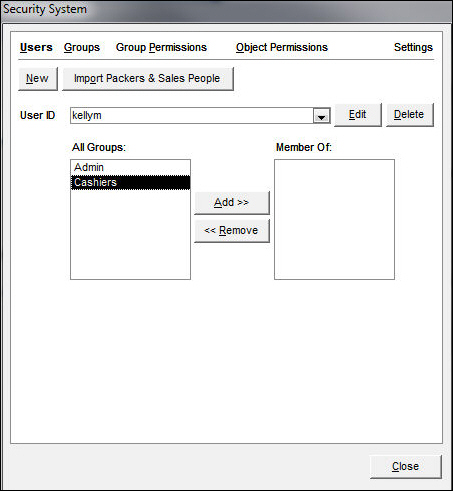
Select an entry from the User ID drop-down list of the Users tab.
Select a group in the All Groups list box.
Select Add. The selected group is displayed in the Member Of: pane.
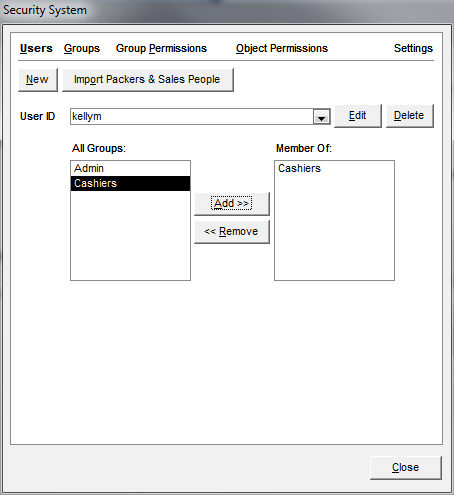
Select the user from the User ID drop-down list at the top of the Users tab.
Select a group from the Member Of list box.
Select Remove.
When assigning object permissions to forms (i.e. dialog boxes or "screens"), you cannot hide tabs, only the controls (i.e. checkboxes, drop down lists, text fields, etc.).
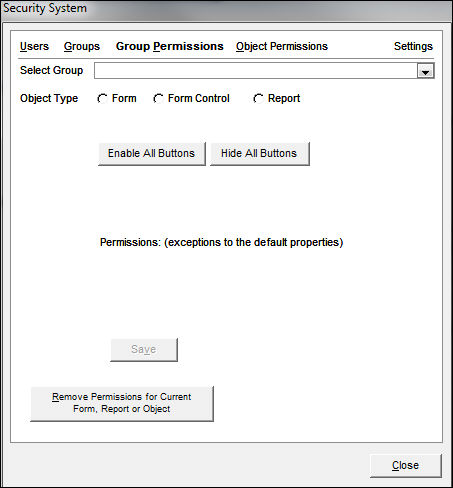
Security Screen - Group Permissions tab
Choose an entry from Select Group.
Then select an Object Type, as described in the chart below. The options visible on the Group Permissions tab depends on the Object Type you select.
Object |
Example |
Permissions |
Form |
Main Menu, Manual Orders, Multi-Order Processor, View Inventory, View Orders, Point-of-Sale, Pack & Ship Orders |
No Access Normal Access |
Form Control |
buttons, drop down lists, list boxes, etc. on a given form |
No Access Visible-Disabled Visible-Enabled Enable All Buttons Hide All Buttons |
Report |
Account Summary, Sales Analysis Report, Aged Receivables, etc. |
No Access Print (Normal Access) |
Select the Enable All Buttons to allow this group access to all buttons on the selected form. Select OK when prompted. This also changes the Permissions: radio button from No Access to Normal. A permission level of No Access means that the program will not allow the user to open the form and a message to that effect will be displayed.
Select Hide All Buttons to have the program change the controls on the selected form to be invisible. Select OK when prompted. The Permissions: radio button changes from No Access to Normal. In this case, the form will open, but none of the controls will be visible to the user, effectively accomplishing the same result as No Access. The administrator can selectively enable individual controls on that form for a particular group.
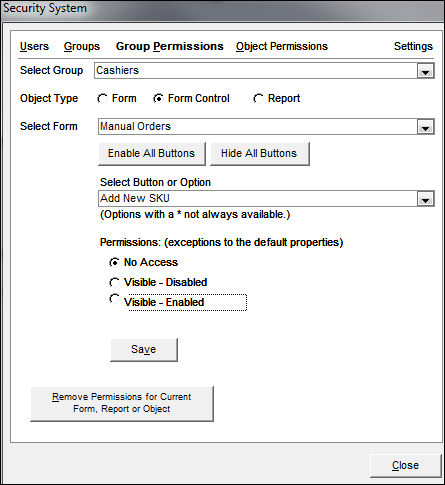
To grant a group permission to access a Form Control, select that radio button and choose the form and affected control from the drop-downs as shown in the figure below. Choose the appropriate Permissions: No Access, Visible - Disabled or Visible - Enabled and then select Save.
Select Remove Permissions for Current Form, Report or Object to remove all permissions for the selected object from the current group.
Select Copy Current Group and Permissions to all Forms to copy the current group's permissions to all forms. This button is only visible if the Object Type is Form.
The best way to view the permissions of a particular group or user is by clicking one of the Print * Report buttons found on the Groups tab of the Security System screen. The report is previewed and then you can send it the user can choose to send it to a printer.
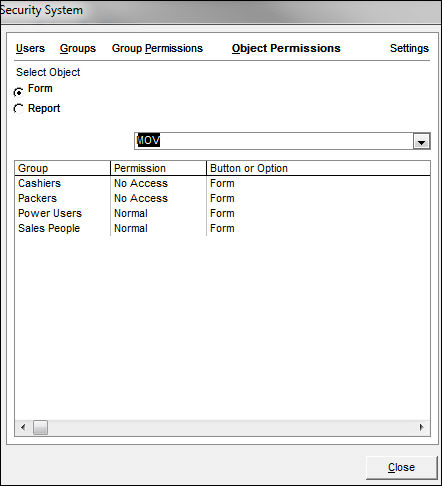
Select the Object Permissions tab.
Choose an object type.
Select the form or report from the drop-down list to see a summary of the object's permissions by group.
Select the Groups tab.
Select New.
Enter a name for the new group and select OK.
The program prompts the user whether to copy all permissions from another permissions group.
Select Yes or No.
If you respond No, the process is complete and the new group is created. You will have to go to the Group Permissions tab and manually set the permissions for this group. It may be best to select the pre-defined group that best matches the level of access that this new group should have and then manually alter the permissions one or two controls rather than recreating an entire group's permissions.
If you respond Yes, the program prompts the user to select the name of the group from which the permissions should be copied.
Select a group from the list and select OK to proceed. The program asks whether to copy all users from another group.
Select Yes or No.
If Yes is selected, the program copies the User IDs of all individuals included in that permissions group into the new permissions group definition. The process is complete, but the program does not display a confirmation message to that effect.
If No is selected, the process is complete, but the program does not display a confirmation message to that effect. You must go to the Users tab, select and edit each User ID and add them to the new group manually.
Select the Group Permissions tab.
Select an entry from Select Group.
Select an Object Type (i.e., the screen or button whose access is being changed).
Select Enable All Buttons to give the selected group the ability to use all buttons on a given form.
Select Hide All Buttons to prevent all of the buttons on a given form from being visible to users assigned to this group. It is possible to enable one or two specific buttons afterwards, if needed.
To change a permission, select an option (i.e., No Access, Visible - Enabled, etc.) and select Save.
To remove all permissions for the selected object from the current group, select Remove Permissions for Current Form, Report or Object.
To copy the current group's permissions to all forms, select Copy Current Group and Permissions to all Forms (only available if the Object Type is Form).
Created: 7/16/12
Revised: 5/18/15
Published: 04/14/16