
Version 5.9
Go to the Main Menu>Maintenance Menu>Setup Functions tab>Point of Sale Setup button. The Point of Sale Setup dialog box opens. To make changes, click the Edit button. When you are in edit mode, click the Save button to save your changes or click the Cancel button to exit edit mode without saving your changes.
The Printing tab is for configuring the format of receipts, the number of copies printed after each transaction, any additional information you want to appear on the receipt and whether or not a separate credit card slip is printed with the receipt.
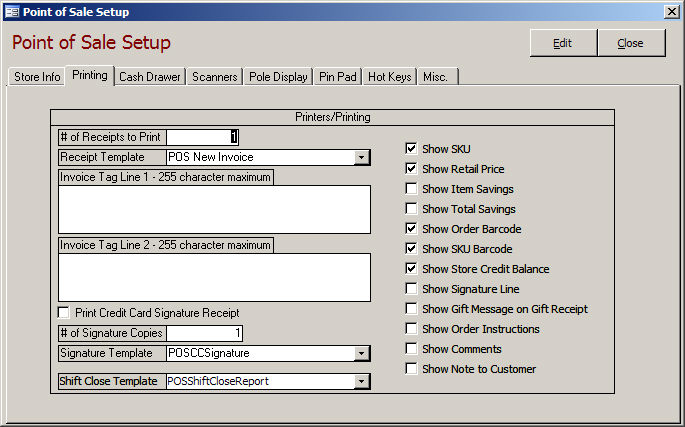
# of Receipts to Print - Enter a numeric value for the number of receipt copies to print after each transaction.
Receipt Template - Select the report from the drop down list (or type a report name) that you wish to use as the POS receipt. The default report is "POSNewInvoice". This receipt is designed to print on 297mm (3.5") roll style paper on a receipt printer. You can use the standard Order Manager 8.5 x 11 inch "Invoice" report if necessary, however, keep in mind that many of the items listed under Items to display on the POS Invoice may not print on the report.
Invoice Tag Line 1, Invoice Tag Line 2 - Enter any information you want printed at the bottom of all receipts. Typically used for things like "Thanks for shopping with us today." messages or your return policy. Each field is limited to 255 characters.
Print Credit Card Signature Receipt - Select this option for the POS to print a separate receipt that the customer signs for credit card payments . If selected, the Show Signature Line option under Items to display on the POS Invoice should not be selected.
# of Signature Copies - Enter a numeric value for the number of signature slips to print after each credit card transaction.
Signature Template - Select the report from the drop down list (or type a report name) that you wish to use as the Credit Card Signature Receipt. The default report is "POSNewCCSignature". This receipt is designed to print on 297mm (3.5") roll style paper on a receipt printer. A custom report can be used instead.
Show SKU - Select this option to print the product SKU on the receipt.
Show Retail Price - Select this option to print the "retail price" of the product as defined in the View Inventory screen.
Show Item Savings - Select this option to print the dollar amount the customer saved on each item in the transaction. The total savings is calculated by subtracting the Actual Price Per Unit from the Retail Price Per Unit multiplied by the quantity ordered.
Show Total Savings - Select this option to print the total dollar amount the customer saved on the entire transaction. The total savings is calculated by multiplying the transaction total by the retail price per unit and then subtracting the transaction total multiplied by the actual price per unit including any adjustments such as discounts or surcharges
Show Order Barcode - Select this option to print a barcode on the bottom of the receipt. You can scan this barcode to look up an order (e.g., for processing returns or layaways).
Show SKU Barcode - Select this option to print a barcode for each line item in the transaction on the receipt. You can scan the barcode to process returns or add the item to another transaction.
Show Store Credit Balance - Select this option to print the balance of a customer’s store credit on the receipt. Not printed for zero balances.
Show Signature Line - Select this option if you use two ply receipt paper and intend to have the customer sign the receipt for credit card processing. If this option is selected, turn off the "Print Credit Card Signature Receipt" option.
Created: 1/19/12
Go to Top