
Version 5.9
In this Topic... Show
This topic provides instructions for adding customer information to a Point of Sale order, which only applies to users of the PlusPOS and Enterprise editions of the Order Manager.
While the program does not require customer information to be entered for POS orders, it is beneficial to the merchant in several ways. It not only allows the merchant to identify their repeat customers for marketing purposes, it is also necessary for the program to issue store credit to a customer, rather than giving the customer cash or crediting a credit card transaction.
Select the [POS] link in the Orders section of the Main Menu of the Order Manager to open the Point of Sale system.
Click the [F5] hot-key in the top center section of the screen to open the Add Customer Information screen. The default setting of the F5 key is Customer Lookup although it may be modified by the user. See the Knowledge Base topic, Hot Keys for more information.
Note: If the F5 Customer Lookup button is clicked on an order that already has customer information associated with it, the Add Customer Information screen will be titled, Edit Customer Information, instead.
The upper portion of the screen is divided into two sections:
Bill To: - enter the customer's billing information
Ship To: - enter the shipping information
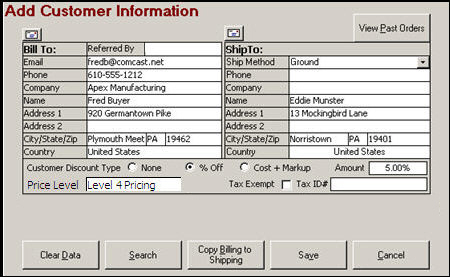
Figure 1
Enter the appropriate address information in both sections of the screen.
If provided, type the name of the referral source in the [Referred By] field of the Bill To: section.
In the Ship To: section, select a [Ship Method] from the drop-down list, if the customer has requested the order to be shipped rather than taken with them directly from the store.
If the email address that is entered in the Bill To: section is already associated with an existing customer record, the program will open the Select Customer screen.
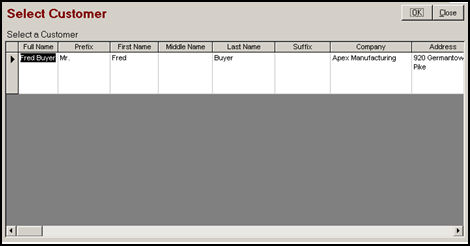
Figure 2
Select the correct record from the list and click [OK]. The program will fill in the existing customer billing information on the Add Customer Information screen.
Click the [Envelope] icon ![]() in the upper left-hand corner of either section to validate the address against the USPS (Endicia) servers.
in the upper left-hand corner of either section to validate the address against the USPS (Endicia) servers.
To view previous orders from this customer, click the [View Past Orders] button in the upper right-hand section of the screen. The Orders from selected customer screen will open and the user can choose to view just the customer's most recent order or view a list of all of the customer's previous orders. Use the navigational arrows at the bottom of the screen to scroll through a group of orders.
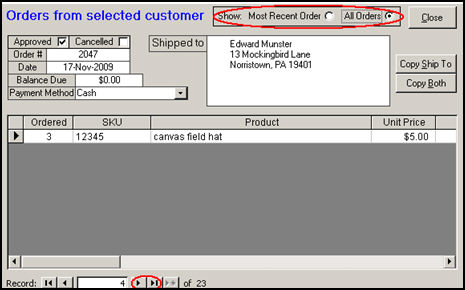
Figure 3
Below the Bill To: and Ship To: sections there are several radio buttons in the Customer Discount Type area that are used to define what discount the customer should receive and if the customer should be exempt from paying sales tax. Additionally, if different Price Levels are defined within the program, it is possible to assign a certain pricing level to a particular customer. Refer to Figure 1.
Choose [None], a percentage off of the item's price ([% Off]) or the cost of the item plus a specific markup amount ([Cost + Markup]). The value entered in the [Amount] field will be converted into a percentage. Do not enter dollar signs or percentage signs, just the numeric value. Decimal points may be entered.
Check the [Tax Exempt] box and optionally, enter the customer's [Tax ID#], if the customer's orders should be tax exempt. The program only stores the Tax ID# for record keeping purposes, it does not perform any functions against this field.
Choose the appropriate Price Level for the customer (only visible if system parameter UseMultiLevelPricing is set to True, and price levels have been defined. See the Knowledge Base article, Price Levels for more information).
At the bottom of the screen there are action buttons that provide a quick method of clearing all data from the screen ([Clear Data]), searching for an existing customer record ([Search]) and/or copying the billing information to the shipping information section ([Copy Billing to Shipping]). Refer to Figure 1.
When all of the pertinent information has been added to this screen, click the [Save] button to retain the changes that have been made or click [Cancel] to abandon the changes.
If not already done, complete the order by adding line items, collecting the payment for the order and printing the receipt. For directions about other POS functions, please refer to the POS articles in the Knowledge Base.
Created: 8/25/10
Modified: 1/17/12
Go to Top