
Version 5.9
In this Topic: Show
The Multi-Record & Price Editor allows you to add and/or edit product information across multiple records at the same time. The Edit Inventory screen, as it is called, has three operating modes. Click a link to jump to that section:
Note: We strongly recommend that you back up your data file before using the Multi-Record & Price Editor. To add Notes to inventory items when they are edited, go to Maintenance Menu> Set System Parameters> Program Parameter Group and set LogMultiRecordEditorChanges to True. The notes will include the field names and the old and new values, except that only the first 100 characters will be included for Text and Memo fields.
Note: The LogMultiRecordEditorChanges parameter was added in the Order Manager 5.8XX Beta series.
Note: It is not possible to use a barcode scanner to enter data into the Barcode field of this screen.
Open the Multi-Record & Price Editor one of three ways:
Go to Main Menu> Maintenance Menu> Inventory & Suppliers tab> Multi-Record & Price Editor.
Click the Multi-Record Editor button at the top of the Inventory screen.
Click the Multi-Record & Price Editor button at the top of the Global Editor screen.
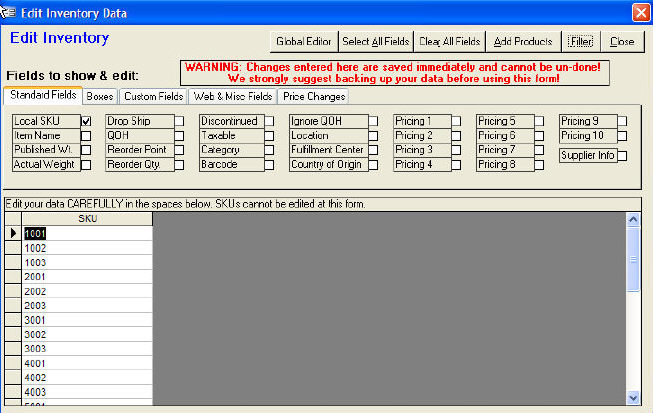
**Important Note** When you open the Edit Inventory dialog box, it defaults to Edit Products mode. To enter Add Products mode, click the Add Products button. When you are in Add Products mode, the button will say Edit Products. To return to Edit Products mode, click Edit Products.
When you open the Edit Inventory screen, the SKUs of all your inventory will appear in the SKU list in the lower view box (e.g., see above screen shot). To build a list of inventory records to edit, click the Filter button.
Enter your filter criteria and click Enter to view your selected inventory items in the Select a Product view.
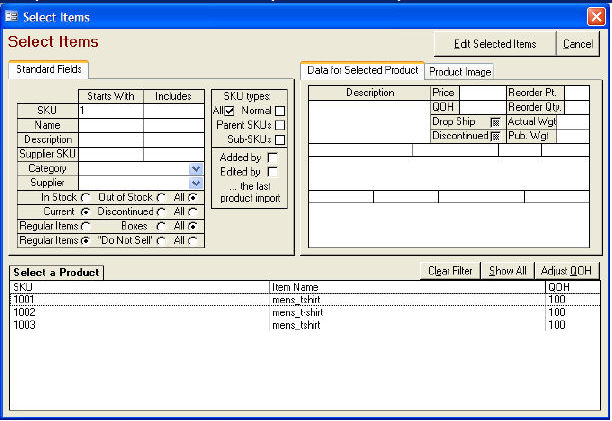
Click the Edit Selected Items button. This takes you back to the Edit Inventory screen where your filtered items are displayed in the lower view box.
To view the fields you wish to edit, click the Select All Fields button to display all of the fields in the item records or click Clear All Fields to display just the SKU field. (The SKU field is always displayed on this form and cannot be edited.)
Click in the check box of any of the fields listed on the Standard Fields, Boxes, Custom Fields and Web & Misc Fields tabs to show or hide those fields.
Click in the cell that contains the data you wish to edit in the bottom half of the screen. Enter your changes. **Please note that changes are saved as soon as you leave the current row and cannot be undone. For Yes/No fields, enter Yes or No, or enter 1 or -1 for Yes and 0 (zero) for No.
When you open the Edit Inventory screen, click the Add Products button.
Check the boxes beside the fields for which you want to add data.
Click in the empty cell to begin entering data. A new record is created as soon as you tab to the next row.
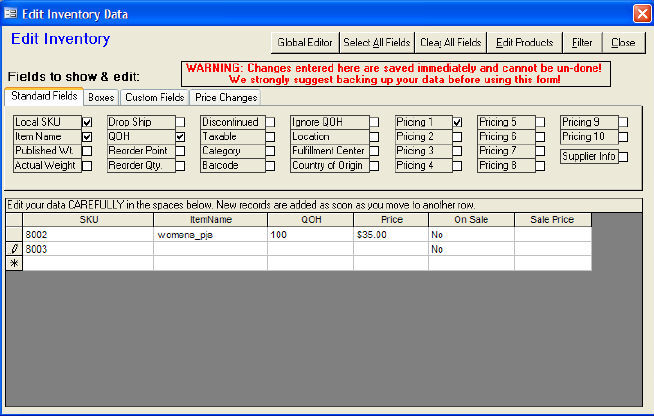
When you are finished adding products, click the Edit Products button to return to the default Edit Inventory screen. Then new products are now included in your inventory list.
Note: All price changes made using the Edit Inventory screen must be tested before you can save the changes. You can manually edit the new values before saving them.
When you open the Edit Inventory dialog box, it defaults to Edit Products mode. If you are in the Add Products mode, click the Edit Products button at the top to change to Edit Products mode.
Click on the Price Changes tab.
Note: The Price Changes tab is not visible if you are in Add Products mode.
When you open the Edit Inventory screen and click the Price Changes tab, the SKUs of all your inventory will appear in the SKU list in the lower view box (e.g., see above screen shot). To build a list of inventory records to edit, click the Filter button.
Select the type of operation to perform. Click Increase or Decrease to change the current prices of the selected items. Click Markup to change the current prices by calculating a markup from your cost. Click Set to change the prices by a specific dollar amount.
Select the price field that you wish to change from the this price: drop down list. The list includes the regular Price field and the Sale Price field. It also includes Price 2 and Price 3, if you use the Stone Edge Product Manager for ShopSite with the Order Manager, or Price 2 through Price 10 if you do not. See Price Levels for more information.
In the by this %: field, enter the percentage by which you want to change the current prices, or in the or this dollar amount: field, enter a specific dollar amount to add or subtract from the current prices. (To subtract a dollar amount, enter a negative number, e.g. -2.) If you selected Set, only the or this dollar amount: field is displayed, in which case you should enter the exact dollar amount to which you want to set the current prices.
Click the Test Results button. The program calculates the new prices but displays only the SKU, Item Name, Cost, Old Price, New Price, and Reg. Price Margin fields for each product.
Note: The Reg. Price Margin field was added in the Order Manager 5.8XX Beta series.
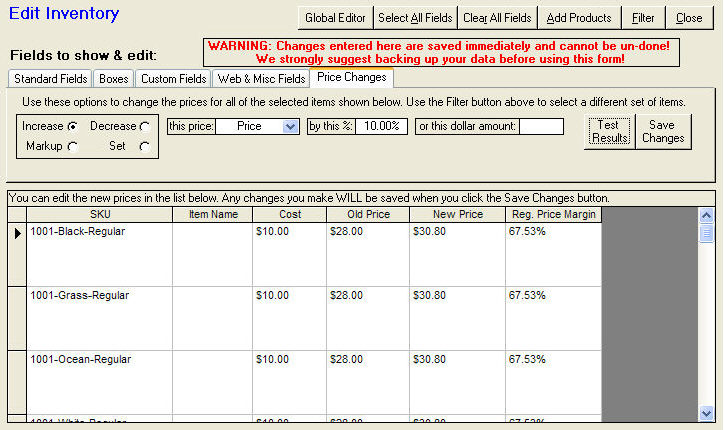
If necessary, manually edit the changes in the New Price column by clicking in a cell and entering your changes.
Click the Save Changes button.
Created: 1/20/12
Modified: 2/6/12
Go to Top