
Version 5.9
In this Topic: Show
The Stone Edge Order Manager can be used on a single workstation or across a local area network (LAN). It was not designed to be used across the Internet, although some of our customers have been able to configure the program for remote access by using MS Windows Remote Desktop Connection (Terminal Services).
Important! Review the appropriate material below prior to installing the Order Manager.
All users: Review the system requirements before installing the program.
Access 2010 users: See the Knowledge Base article Access 2010 Notes for known installation issues.
Access 2007 users: See the Knowledge Base article Access 2007 Notes for instructions on changing macro security PRIOR to installing the program to avoid installation errors.
Support for MS Access 2000, 2002 (XP) and MS Access 2003 has been dropped, as of Order Manager V5.929.
Microsoft Vista Users: Make sure that the latest service packs from Microsoft are applied. See the Knowledge Base article Windows Vista PRIOR to installing the program.
Microsoft Windows 7 Users: See the Knowledge Base article Windows 7.
Before installing the program, create a shared folder called StoneEdgeData on a server or a single host PC that is networked to the other computers in your office, to house what will be the program's shared data file, email templates and custom reports database. Each user/workstation should have Full Control permissions to access the folder. For instructions on how to create a shared folder, refer to your operating system’s Help program.
Continue with the steps in the For single workstation installations section, to install the Order Manager the server and on each client workstation:
For single workstation installations:
Click on the link provided in the order confirmation email from Stone Edge Technologies, Inc., that was received after purchasing the program, or copy and paste the link into the address bar of a web browser.
The link goes to the Stone Edge download gateway. Enter the User Name and Password provided in the email. Click [Continue] to access the download gateway.
Note: Both fields are case sensitive. Enter the user name and password exactly as they appear in the email.
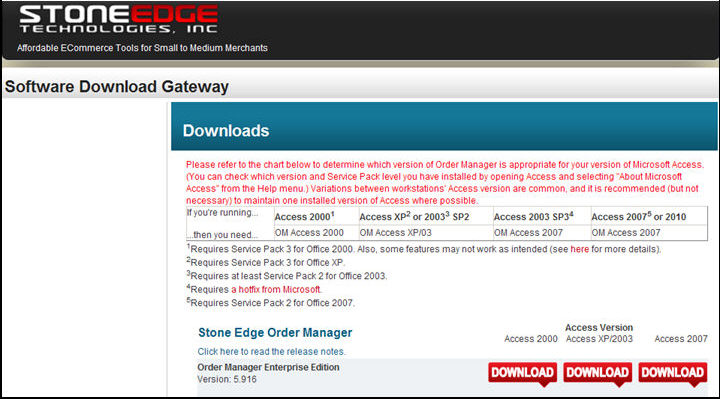
Click on the [Download] button underneath the version of Microsoft Access that is installed on the computer where the Order Manager will be installed. Refer to the chart at the top of the screen to determine the format of the program that corresponds to the version and service level of the MS Access software on each workstation.
Run the installation program immediately or save it to your hard drive and run it later.
If you choose to save the installation program, click [Save] and make a note of where it was saved. The download program has been altered to save the installer file with a more meaningful name than Setup.exe, which was previously the case. The installer programs will be saved with a name that reflects the version of Order Manager, the edition of the program (Standard, PlusPOS or Enterprise), and the format of the Order Manager program file (the service level and version of Microsoft Access software for which it was formatted).
Note: Stone Edge Technologies, Inc. (SETI) highly recommends saving the installation program for future use. If a program file becomes corrupted, it can be replaced by re-running the installer. SETI does not maintain multiple standard versions of the program at the download gateway, only the most current general release. If it becomes necessary to reinstall the program and the user does not have the installer for the version that they currently have installed, they may be forced to upgrade the program to the most current version that is available at the download gateway.
When ready to install the program, navigate to the location of the downloaded installer file and double-click it.
The InstallShield Wizard opens. Click [Next] and go to step 5.
If you select [Open] or [Run], the files are downloaded and the InstallShield Wizard opens. Click [Next].
Review the End-User License Agreement, and if you agree, click [I accept the terms in the license agreement] and click [Next]. If you do not agree, cancel the installation and contact Stone Edge Technologies, Inc.
Click [Next] to install the Order Manager in the default location, c:\StoneEdge. It is highly recommended that the program is installed at the default location, as installing it in another directory can create problems when using third party applications such as Endicia's DAZzle or Altaireon's Communiqué.
Click [Install].
Windows User Account Control will prompt Windows 7 and Windows Vista users to confirm access to their computer. Click [Allow].
Click [Finish] to complete the installation process.
Review the Readme file for information relevant to the current release of the Order Manager. The ReadMe file can be found in the Documentation sub-folder of the installation folder (c:\StoneEdge).
Launch the Order Manager in one of two ways:
Double-click on the Stone Edge Order Manager desktop icon. Windows 7 or Vista users should right-click and select Run as Administrator.
From the Start menu, go to Programs\Stone Edge Technologies, Inc.\Stone Edge Order Manager .
The License Setup dialog box opens. Enter the user name and password provided in the email (the same ones entered to access the download gateway to download the program).
Click [Get License]. A message box will pop-up, stating that the license file has been updated. Click [OK].
Proceed to the next section, Create a Store, if setting up a single workstation or server for the first time. If the Order Manager has already been installed on the server or host PC and additional workstations are being configured, or if the program is being re-installed for any reason, skip to the section For Client Workstations, and follow those instructions.
Create a Store
If the merchant maintains more than one e-commerce site, it is possible to set up separate data files for each site, or orders can be imported from multiple sites into a single data file. For more information on how and why to do this, see Importing from Multiple Shopping Carts into the Same Order Manager Store .
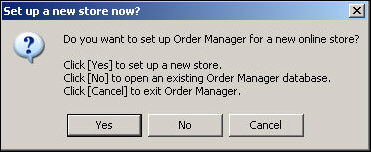
When the program is launched for the first time, it will prompt the user as to whether to create a new store file or use an existing store file. If the Order Manager is being installed for the very first time or to create another store file, follow these instructions:
Respond [Yes] to the Set up a new store now? dialog box:

The Enter name and location for the new store’s data file dialog box opens. The store data file is the Access database that will contain all of the information that pertains to a given store, from order information to the program's settings.
Note: The initial data file must be created as an Access Database, which can later be converted to an SQL database if the Enterprise Edition of the program is being installed. See Using an SQL Database - Enterprise only, for more information.
Specify the location for the new data file, e.g. c:\StoneEdge or \\FileserverName\StoneEdgeData, where FileserverName is the name of the server or host PC.
Enter a name for the store data file, e.g. Ajax Orders.
Tip: Use a name for the store’s data file that includes all or part of your company’s name plus the word "Orders". Do not use ". com" in the file name.
Click [OK].
The Enter company name dialog box opens.
Enter your company’s name.
Click [OK].
Note: The name you enter will appear on screens and reports. Change it any time in the Store Setup Wizard (Main Menu>Maintenance Menu>Setup Functions>Store Setup Wizard).
A message box appears, stating that the store has been opened. Click [OK].
The Stone Edge Order Manager – Setup Wizard dialog box opens. Follow the wizard to complete the initial setup of the program. It is possible to [Save and Exit] from the wizard at any time and return to it later.
Once the store data file has been created and saved, it is possible to connect other workstations in the networked configuration to the same data file. Return to the For Single Workstations section of this document to install the Order Manager on those workstations.
For client workstation installations:
Complete the following steps after the Order Manager is installed on the server (or host PC) and the store data file has already been created.
The Set up a new store now? dialog box opens. Click [No].
The Select Store to Open form appears:

If any data files have been previously opened by this instance of the Order Manager, there will be a list of store files to choose from. Select one and click the [Open] button (or double-click the entry) to open that file. Otherwise, click the [Browse] button to navigate to the location of the shared folder containing the new data file and select it.
A message box appears, stating that the store has been opened.

Click [OK].
This completes the program installation. If necessary, changes to system parameters can now be made from any workstation in the configuration. It is also possible to return to the Setup Wizard from any workstation to continue tailoring the program for your environment.
Backup the newly created MS Access data file using the [Backup Data File] link or button on the Quick Clicks menu or via the Maintenance Menu> Maintenance tab> Backup Data File.
Enterprise Edition users: If an SQL database will be used for the Order Manager data file, refer to Using an SQL database with the Enterprise Edition of the Order Manager for more information about converting from an MS Access store data file to an SQL store file .
Created: 1/31/11
Modified: 12/4/13
Go to Top