
Version 5.9
In this Topic: Show
The Order Manager's fulfillment system is a file-based system that exports order information to a text file as orders are approved in the Order Manager. Before this system can be utilized, the user must define a Fulfillment Center and its associated Fulfillment Template within the Order Manager. Products are then assigned to fulfillment centers, either individually, by category, or by system default (rare). Product settings override category and system-wide settings.
The information contained in the text file includes everything required to pick, pack, print, and ship the orders, however, it does not include any financial information, such as credit card numbers, or any other sensitive information.
When an order is placed for a product that will be shipped by a fulfillment center, depending on how the fulfillment center is defined, the program will either write the order details into a cumulative text file that must be manually sent to the fulfillment center, or the program can automatically send the information to the fulfillment center in a separate email for each order. If the former method is chosen, the user must remember to rename, or delete and reallocate the text file after it has been sent to the fulfillment center or the program will continue to append new data to it, which may result in duplicate information being sent to the fulfillment center.
The program supports the creation of multiple Order Manager fulfillment center definitions, as a single order may contain items that are shipped from different physical fulfillment centers, requiring a different text file to be created for each one.
Many external fulfillment centers require the data that is sent to them to be in a particular format. Create a unique Order Manager Fulfillment Template for each provider to match their specifications.
After the products are shipped, the external fulfillment center will generally send shipping and tracking data back to the merchant via text files that can be imported into the Order Manager.
The text files that are generated by this system can also be sent to drop-ship suppliers (vendors). The program can automatically send a text file via email when drop-ship purchase orders are created, depending on the settings in the Supplier record.
Fulfillment Templates are used to determine the sequence of order information within the text file that is generated by the program to be sent to its associated Fulfillment Center. If multiple fulfillment centers accept data in the same layout, a fulfillment template may be used by more than one Fulfillment Center definition.
Header Templates are optional, and they are created the same way that a fulfillment template is created. Header templates can be specified in conjunction with a fulfillment template to add a row of header information at the top of the text file or before each order row. If the external fulfillment center or drop-ship supplier wants to see the merchant's company name and account number at the top of the file, a header template can be created to do that by using Custom Columns.
The program is presently able to export approximately sixty Order Manager fields, and it also allows the user to create "custom columns" up to a maximum of eighty total fields that can be exported by a given template. Custom columns can be left blank (no data) or each row in the column can contain the same static value that is specified by the user.
To set up the fulfillment center and template definitions, go to the Main Menu > Maintenance Menu icon > Shipping & Fulfillment tab, and select Fulfillment Centers or Fulfillment Templates from the list of activities.
![]() Click the Show
link next to "In This Topic"
at the top of this page to see a series of links in outline form,
which can be used to quickly jump to that section of the topic.
Click the Show
link next to "In This Topic"
at the top of this page to see a series of links in outline form,
which can be used to quickly jump to that section of the topic.
In addition, major topics may provide a brief synopsis of a field's purpose or direct the reader to the appropriate section of the topic by scrolling over the image. To return to the previous location within the same page, right-click the mouse and select [Back].
If clicking a field directs the reader to a different Knowledge Base topic, it will open in a new tab or window, leaving the currently viewed topic open. The browser's settings determine whether a new tab or window is opened.
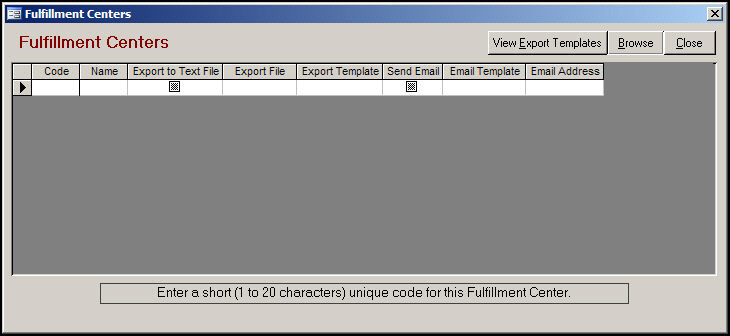
Figure 1: Fulfillment Centers screen
For the sake of demonstration, the fields in this screen have been reduced in size so that they are all visible at the same time. Normally, it will be necessary to use the horizontal scroll bar (not visible in Figure 1) to view the right-most fields.
Click on a field to see a brief description of the field's purpose at the bottom of the screen, as shown for the Code field in Figure 1.
Notice that there are no Edit, Cancel or Save buttons on the screen. Each record is saved upon exiting the row.
Once data has been entered in a new row, the program will not allow the user to close the screen unless it has data in both the Code and Name fields.
To delete a row, right-click on the row and select [Delete].
check this box to have order data exported to a text file, as opposed to sending the order information by email per order
this method is mutually exclusive with the Send Email method
if this field is checked, the user must also complete the Export File field
this field must be completed if the Export to Text File field is checked
enter the fully qualified path to the text file that will contain order information to be sent to this fulfillment center OR use the [Browse] button to navigate to the location of the file
the user must manually send this cumulative file to the fulfillment center or drop-ship supplier, generally at the end of the day
remember to delete the file after it has been sent, or rename it with the date and timestamp if the user wishes to keep a copy of the file for their records; otherwise the potential exists for the duplication of data, as the program will continue to append data to the text file with the name that is specified in the fulfillment center definition; if the file in the definition is not found, the program will create it
check this box to send an email, per order, containing the product and shipping information to the fulfillment center as each order is approved
this option is mutually exclusive with the Export to Text File method of sending data to a fulfillment center
if this box is checked, the user must also select an Email Template and provide an Email Address in their respective fields
from the drop-down list, select the Email Template that should be used when sending the text file to the fulfillment center
this is a required field if the Send Email field is checked
enter the email address of the fulfillment center to which the text file will be sent
this is a required field if the Send Email field is checked
this button is used in conjunction with the Export File field, and is not active unless this field is selected
it is used to navigate to the location of the text file where the program should store the order data, rather than manually typing in the path to the file
Go to the Main Menu > Maintenance Menu icon > Shipping & Fulfillment tab and select [Fulfillment Centers] from the list of activities.
Enter a unique 1-20 alpha-numeric character value in the Code field to identify the Fulfillment Center within the program.
Type in a unique user-friendly name for the Fulfillment Center in the Name field.
Choose the method by which the data should be sent to the Fulfillment Center:
Export to Text File
Check the box in the Export to Text File column if the program should generate a text file containing the order information to be sent to this fulfillment center.
Type in the path to the text file that will contain the order data in the Export File field, or use the [Browse] button to navigate to its location.
Click in the Export Template field and select the template that will be used for this fulfillment center or drop ship supplier from the drop-down list.
If a template has not yet been created, click the [View Export Templates] button to open the Fulfillment Templates screen and define a fulfillment template.
Send by Individual Emails
Check the box in the Send Email column if the program should send the text file by email.
Select an email template from the drop-down list in the Email Template column.
Enter the email address for the fulfillment center in the Email Address field.
Click the [Close] button to exit the Fulfillment Centers screen.
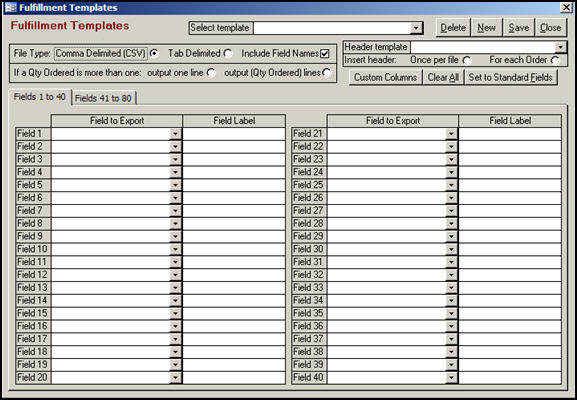
Figure 2: Fulfillment Templates screen
this list is comprised of all of the existing fulfillment or header templates in the current store data file
select one from the list to view or change its mappings or other settings
Output One Line will cause the program to produce a single line of text reflecting the total quantity of the SKU that was ordered
Output (Qty Ordered) Lines when this option is selected, a separate line will be added to the text file, up to the quantity of a given SKU that was ordered; in other words, if someone orders a quantity of five Product ABC's, the text file will show five separate lines for Product ABC
select a template from the drop-down list to indicate that it should be used as a header template for the currently viewed fulfillment template
this drop-down list will contain the same list of templates that are displayed in the Select Template drop-down list
it is not possible to select the currently viewed template as its header template
make a selection to tell the program how often the header template should be inserted into the text file
Once per File means that the program should only insert header template once, in the first line of the file, regardless of the number of orders in the file
For Each Order means that the program should insert the header before each order; therefore, the program may insert the header template multiple times throughout the file, up to the number of orders that are contained in the file
clicking this button will open a help screen with instructions for creating a non-standard column in a template
choose "Custom Column" (it is near the bottom of the list) from the Field to Export drop-down lists in any of the Fields 1-80
enter a label to be used for the Field Name of the custom column; if no label is entered the program will use the name of the field as its label
to produce a column that contains the same value in each row, enter a comma after the value in the Field Label column and append the static value; for example, if we select "custom column" from the drop-down list in Field1 and enter a label of Drop-ship Charge,Not Applicable, every record in the file would contain the value, "Not Applicable", in the column labeled Drop-ship Charge.
click on this field to see a drop-down list of eligible Order Manager fields that can be exported to a text file
the sequence in which the Order Manager fields are mapped to Fields 1-80 will be the sequence in which the fields appear in the text file
enter a value for the label for the field or fields being exported; if no value is specified, the program will use the Order Manager field name as its label
this can be useful to "translate" the Order Manager field name to the field name that is recognized by the Fulfillment Center staff
Go to the Main Menu > Maintenance Menu icon > Shipping & Fulfillment tab and select [Fulfillment Templates] from the list of activities, or open the Fulfillment Template screen by clicking the [View Export Templates] button on the Fulfillment Centers screen.
To create a new template, click the [New] button and enter a name for the template when prompted by the program.
Choose the type of file to which the data will be exported, by selecting the appropriate radio button:
Comma Delimited - creates a file with the extension .csv, in which each field is separated by a comma; this is best used when the data does not contain commas or special characters
Tab Delimited - creates a text file with the .txt extension and each field is separated by a tab character
If the first line of the text file should include the Field Names, check the box with the same label
Make a selection between the Qty Ordered is more than one section;
Output one line will cause the program to export the total number of pieces ordered on a single line in the text file
Output (Qty Ordered) lines will cause the program to export a line for each product in the order
If a Header Template is to be used:
select the header that should be inserted into the text file from the drop-down list; you may not select the same template to be the header template for the currently viewed fulfillment template
make a selection in the Insert Header: section of the screen by clicking one of the following radio buttons:
Once Per File - inserts the header in the first line of the file
For each Order - inserts the header before each order
Use the [Set to Standard Fields] button to have the program map Fields 1-66 to each of the Order Manager fields in the sequence in which they appear in the drop-down list in the Field to Export column, or manually map fewer Order Manager fields or in a different sequence, by making the appropriate selections from the Field to Export drop-down lists in Fields 1-80.
When all of the settings have been selected, click the [Save] button to retain the template definition.
To start over from scratch, use the [Clear All] button, which deletes all data from the currently viewed template.
To modify an existing template, simply choose it from the Select a Template drop-down list. The attributes of the template will be loaded into the screen where the user may change its mappings or other settings.
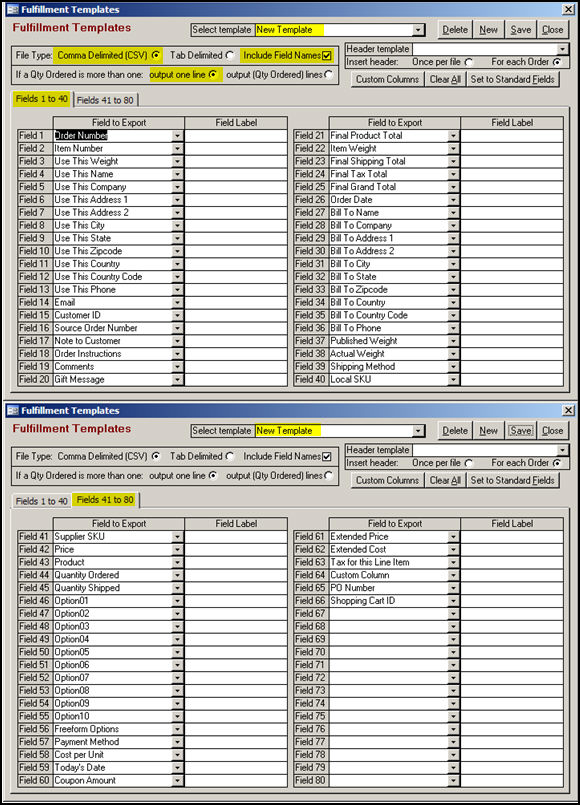
Figure 3: Fulfillment Template screen - New Template settings
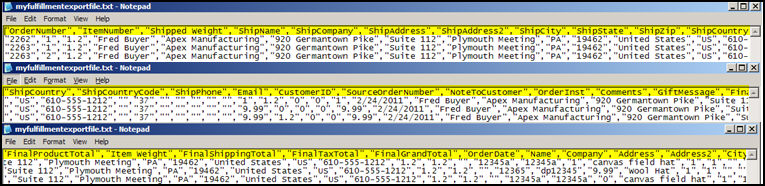
Figure 4: Fulfillment Template screen - Export Text File output
The header row is highlighted and reflects the names of Fields 1-31 in Figure 3. The text file contains data about two orders, 2262 and 2263. The former only contains a single product, while the latter contains two products, one of which had a quantity of 2, and only one line is generated for it in the text file.
If we change the fulfillment template to create a separate line for each unit of the product that is ordered, the data would look like this:
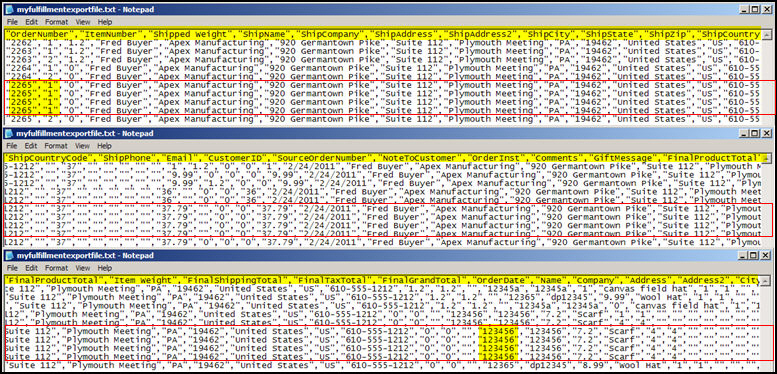
Figure 5: Fulfillment Template screen - Export Text File output when "output (Qty Ordered) lines" is selected
Order number 2265, contains an order for two different SKUs, the first of which had a quantity of four, and the second item had a quantity of one. In Figure 5, outlined in red, we see that there are four separate lines of text for SKU 123456, reflecting the total quantity ordered.
It may be necessary for the merchant to provide their account information at the top of each text file that is sent to them. Creating a header template is an ideal way to provide that data.
Go to the Main Menu > Maintenance Menu icon > Shipping & Fulfillment tab and select [Fulfillment Templates] from the list of activities, or open the Fulfillment Template screen by clicking the [View Export Templates] button on the Fulfillment Centers screen.
To create a new template, click the [New] button and enter a name for the template when prompted by the program.
The type of file to which the data will be exported is controlled by fulfilment center template, not by the header template, so there is no need to change the default selection here.
If the first line of the text file should include the Field Names or Field Labels of the header template in the text file, check the Include Field Names box. When using Custom Columns to insert a row of static data, it is not necessary to include the Field Names or Field Labels in order to have the static data inserted into the file.
The frequency in which the program will insert the header template data in the text file is controlled by the fulfillment template, regardless of the radio button that is selected in the header template.
Map as many of fields as necessary to Custom Column in the Field to Export drop-down list to produce the desired row of header information. For example, map Field 1 to Custom Column. In the Field Label field, enter a label for the custom column, followed by a comma and the static value that should appear in that column. Refer to Figure 6. There should not be any spaces in the Field Label or static value.
When all of the settings have been chosen, click the [Save] button to retain the header template definition.
Select a fulfillment template from the Select Template drop-down list and then select the newly created header template from the Header template drop-down list.
In this example, we have created a header template called New Header Template, which has two custom columns defined. The first custom column is labeled MerchantCompanyName, which is followed by the value, Ajax (not visible in Figure 6, but trust me, that's what's there), and the second field that is labeled MerchantAcctNo, is followed by the value 92360. Since we did not check the Include Field Names radio button, the Field Labels, MerchantCompanyName and MerchantAcctNo, will not be exported to the text file, only the company name, Ajax, and the account number, 92360, will appear in the text file.
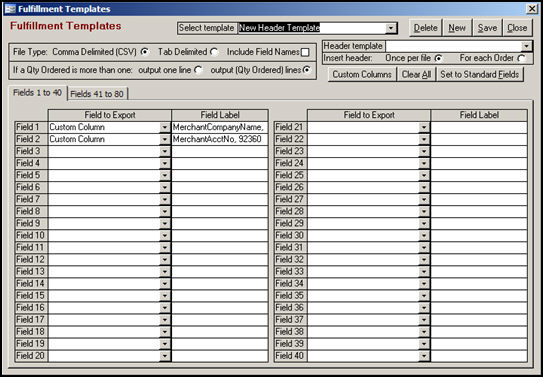
Figure 6: Fulfillment Template screen - example of a header template
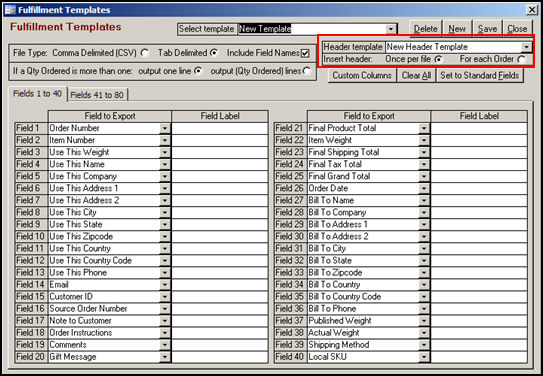
Figure 7: Fulfillment Templates screen - example of a header template being assigned to a fulfillment template

Figure 8: Contents of the designated Export Text file when using a Header Template and Include Field Names is checked on the Fulfillment Template
The values from our header template are displayed in the first line of the text file, while the second line contains the field names or field labels from the fulfillment template. The remainder of the text file will contain the product and shipping information for any orders whose items are assigned to this fulfillment center.
Created: 2/23/11
Go to Top