

In this Topic: Show
This document pertains to UPS WorldShip Version 11.0 and lower. WorldShip does not support 64-bit operating systems. See the minimum requirements for Worldship 11.0
The Order Manager easily integrates with the UPS application called WorldShip. After setting up the two programs to work together, you can enter the Order Manager order number into WorldShip and the rest of the order information appears automatically. At the end of the day, you can send WorldShip tracking numbers back to the Order Manager.
Before setting up the integration between the Order Manager and UPS WorldShip, set up your shipper profile(s) in WorldShip. A WorldShip profile allows you to set a number of default values that help speed shipment processing.
For questions, refer to UPS WorldShip Help or Support.
Note: Enterprise users, see the article Using UPS Worldship with the Enterprise Edition to begin the UPS WorldShip setup process. Return to this article after completing the steps in the Enterprise Version setup document to finish the setup process, beginning at Creating an Import Map.
The UPS WorldShip Setup function integrates UPS WorldShip software with the Order Manager:
It searches for a local installation of UPS WorldShip,
creates an ODBC (open database connectivity) connection to the Order Manager data file, and
transfers the Order Manager's WorldShipOrders query from the program file (SEOrdMan.mdb) to your store's data file. (If you are using WorldShip version 8.0 or lower, WorldShip will automatically create the import/export map.)
This routine does not create the Orders import or Tracking Number export maps. You must set these up manually.
The programming routine that automates the connection between the Order Manager and WorldShip makes certain assumptions about your installation of WorldShip. It assumes that WorldShip will be used on the same PC as Order Manager and that WorldShip is a standalone installation. If you have WorldShip installed on a computer other than the one on which you run the Order Manager or if WorldShip is set up to operate over a network (with an Admin station and Remote stations), you must set up the ODBC data source on each Remote workstation. The import map must be set up on the WorldShip application on each workstation and the export map should only be set up on the WorldShip application on the UPS Administrator workstation.
The UPS Worldship Setup function initializes the link between Order Manager and UPS. There are several paths to the UPS Worldship Setup function:
Quick Clicks > Store Setup Wizard > Shipping section > Page 1 > Create System DSN/ODBC Connection button
Main Menu > Maintenance Menu > Setup Functions > UPS Worldship Setup
Main Menu > Maintenance Menu > Shipping & Fulfillment tab and click the UPS WorldShip Setup option
The Enter name for System DSN dialog box opens. Enter a name for the ODBC connection between WorldShip and your store's data file. The name cannot have spaces or punctuation in it. Make the name something simple like MyDataConnection. Click on the OK button to save the name. Note: Remember the name you entered in this step because you will need it later.
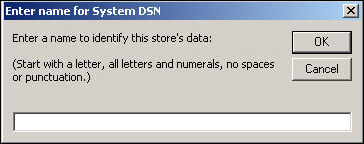
You will see a confirmation message box indicating that the ODBC data source was created successfully. Click OK.
Open UPS WorldShip.
On the Tools drop-down menu, select Profile Editor. The Profile Editor screen opens.
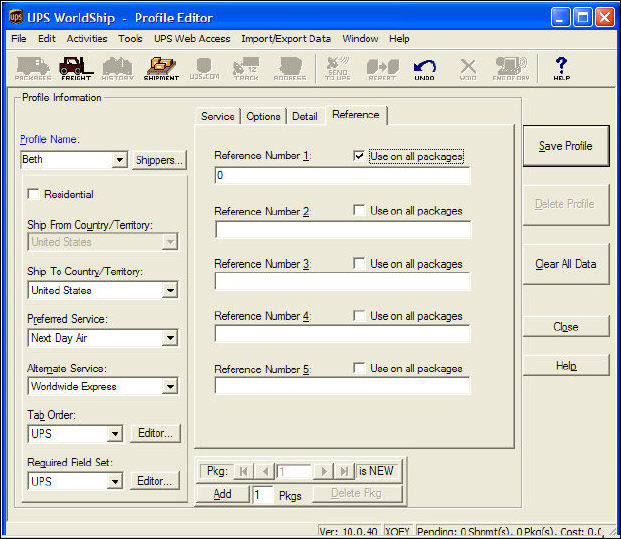
Select your profile from the Profile Name drop-down menu and click the Reference tab. In the Reference Number 1 field, enter 0. Check the Use on all Packages box.
Click the Options tab and ensure the Quantum View Notify box is unchecked. Click Close to return to the main Worldship screen.
Click the UPS Import/Export Data drop-down menu and select Create/Edit Map.

In the New Map area, select Import from ODBC Database.

Select Shipment from the drop-down list for the map type.
Enter a name for the map in the Name field. (Choose any name, e.g. WorldShip Import Map.)
Click the Create button. The Select an ODBC source box opens.
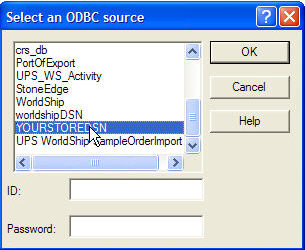
Select an ODBC connection (DSN):
For the Order Manager, Standard Version: Choose the ODBC source (System DSN) you created when you ran the UPS WorldShip Setup function (or Windows ODBC setup)
For the Order Manager, Enterprise Version: This is the ODBC source (System DSN) that you created for the Access database. (See steps 10- 12 in UPS WorldShip Setup with the Enterprise Version.)
Click on the OK button. An ID and Password are not necessary. The Edit (name of your map) import map box opens.
Select WorldShipOrders table from ODBC Tables drop-down list on the left. The list of fields in the table appears in the window below the drop-down list.
Using the UPS WorldShip Field Map table, below, you will now begin mapping fields from the WorldShipOrders table in the Order Manager (on the left side) to corresponding fields in WorldShip (on the right side).
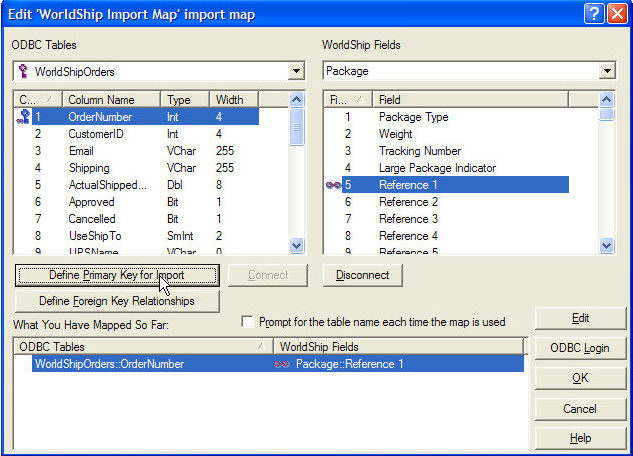
The first field to map is OrderNumber. Before mapping it, you must define this field as the primary key. Select OrderNumber and click on the Define Primary Key for Import button. This sets the order number in the Order Manager as the primary identifier for the order record. A small blue key appears next to the OrderNumber row.
Now, with OrderNumber still selected, map the field. Using the drop-down list under WorldShip Fields, select the category (table), Package. From the corresponding list in the window below Package, select the field, Reference 1. In essence, this relates the Order Manager field, "OrderNumber" to the "Reference 1" field in the "Package" category of WorldShip.
Click on the Connect button to link the fields. A small red infinity symbol appears next to the fields indicating that they are now linked. You can then see the linked fields in the What You Have Mapped So Far list at the bottom of the screen.
Repeat steps 14 and 15 until you have mapped all of the fields listed in the table, UPS WorldShip Field Map, below. (For each field mapping, be sure to select the category listed in the table below from the WorldShip Fields drop-down list).
When you get to the Shipping
field (the fifth Order Manager field in the table below), you must perform a couple additional
steps to map Service Type names in WorldShip to those you have
setup in the Order Manager.
After you map the Shipping
field, highlight the mapping in the lower window, What
You Have Mapped So Far. Click the Edit
button.
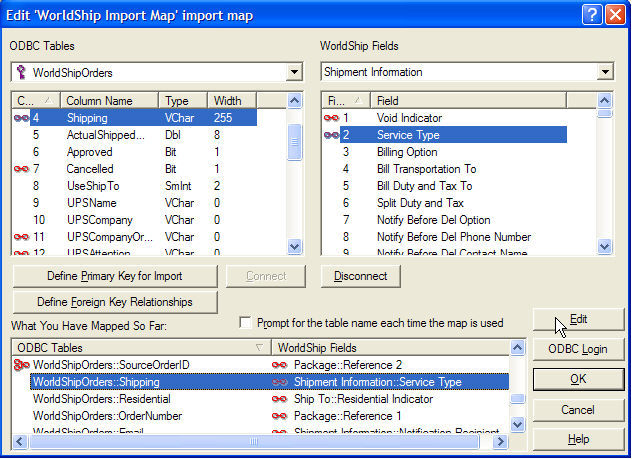
The Mapping Connections into Shipment Information window opens. Click Translations.
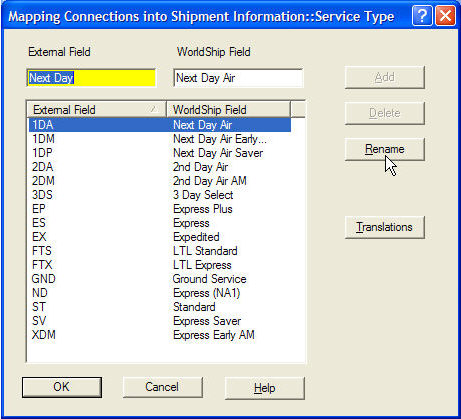
In the Select a common map box, select Service. Click OK. This loads the default service options into the External Field and WorldShip Field lists.
The External Field list represents the Order Manager names for corresponding WorldShip services listed in the WorldShip Field list. (i.e. 1DA is the Order Manager default name for WorldShip Next Day Air.) Highlight each service type (i.e. shipping methods) that you use. In the External Field field, type the name you used in the Order Manager setup for that service type. Click Rename to save each re-named service type. (If you make a mistake, click Translations, and then Service, OK to re-load the default service option lists again.) When you are finished renaming all your service types, click OK.
Continue mapping the fields according to the UPS WorldShip Field Map below. When all of the fields are properly linked, click on the OK button. Your view returns to the Create/Edit Map window.
Order Manager Field |
WorldShip Category |
WorldShip Field |
OrderNumber |
Package |
Reference1 |
SourceOrderNumber
|
Package |
Reference2 |
|
Package |
Weight |
CustomerID |
Ship To |
CustomerID |
Ship To |
Email Address |
|
UPSCompanyOrName |
Ship To |
Company Or Name |
UPSAttention |
Ship To |
Attention |
UPSAddr1 |
Ship To |
Address 1 |
UPSAddr2 |
Ship To |
Address 2 |
UPSCity |
Ship To |
City or Town |
UPSState |
Ship To |
State/Province/County |
UPSZip |
Ship To |
Postal Code |
UPSCountry |
Ship To |
Country/Territory |
UPSPhone |
Ship To |
Telephone |
Residential |
Ship To |
Residential Indicator |
UPSNotification1 |
Shipment Information |
QVN Ship Notification 1 or Return Notification 1 Option |
UPSNotification1 |
Shipment Information |
QVN or Return Notification Option |
Shipment Information |
Notification Recipient 1Email |
|
Shipping |
Shipment Information |
Service Type |
Cancelled |
Shipment Information |
Void Indicator |
Click OK to return to the WorldShip screen.
Open UPS WorldShip.
Click the UPS Import/Export Data drop-down menu and select Create/Edit Map.
In the New Map area, select Export Data from WorldShip.
Select Shipment from the drop-down list for map type.
Enter a name for the map in the Name field (e.g. Tracking Export Map). Click Create.
The Select an ODBC source box opens. Select an ODBC data source (DSN):
For the Order Manager, Standard Version: Select the same ODBC source (System DSN) that you chose when creating an import map in WorldShip. (See Creating an Import Map in WorldShip, step 10, above.)
For the Order Manager, Enterprise Version: Select the ODBC source (System DSN) that points to the Order Manager database (store) file (this was created when you set up the OM Enterprise and points to your OM database on SQL server).
Click OK. The Edit (name of your map) export map window opens.
On the right side, select the Tracking table from the ODBC Tables list.
Using the UPS WorldShip Export Map below, begin mapping the required five fields. On the left side, select the category (table), Package from the drop-down list under WorldShip Fields, and then select the WorldShip field, Reference 1.
Below Tracking (on the right side), select the Order Manager field, OrderNum. In essence, this relates the Order Manager Field, OrderNum to the "Reference 1" field in the "Package" category of WorldShip.
Click on the Connect button to link the fields. A small red infinity symbol appears next to the fields indicating that they are now linked. You can then see the linked fields in the What You Have Mapped So Far list at the bottom of the screen.
Repeat steps 8 through 10 until all the required fields have been mapped.
Click OK twice to return to WorldShip.
Click on the UPS Import/Export Data menu.
Choose ONE of the following options: select Automatic Export at End of Day to run this function once, at end of day OR select Automatic Export After Process Shipment to run this function after processing each shipment. (The Automatic Export After Process Shipment option is ONLY recommended for users with a standalone installation of the Order Manager. If you have a network installation of the Order Manager with multiple users, run this process once, at end of day.)
After selecting your Automatic Export option, click More. In the Select map from list for export window, select the export map that you just created. Click Export. When you return to this menu you will see your export map with a check mark beside it indicating that this export is active.
WorldShip Category |
WorldShip Field |
Order Manager Field |
Package |
Reference 1 |
OrderNum |
Package |
Tracking Number |
TrackingID |
Package |
Void Indicator |
IsVoid |
Choose only one of the following cost fields: |
|
|
Package
|
Package Charge |
Cost* |
|
OR |
|
Shipment Information |
Total Shipment and Handling Published Charges (this is the default; if your business uses Negotiated Rates or Cost Center Calculator, use Total Shipment and Handling Negotiated Rates Charge or Total Shipment and Handling CCC Rates Charge ) |
Cost* |
Shipment Information |
CollectionDate |
PickupDate |
*There are many fields in Worldship that contain cost information and the user should determine which is best for their environment. Some of our customers have had better results using the Package Charge field rather than the Total Shipping and Handling fields.
Open UPS WorldShip.
Click on the UPS Import/Export Data menu.
Select Keyed Import option. From the sub menu that appears, select the name of your Import Map created in Creating an Import Map in WorldShip, step 8 above. Note: If the name does not appear on the menu, select the More option. The name should appear in the list; if the name you entered does not appear in the list, you will need to create the import map manually. This is common for network setups of UPS or if WorldShip was installed on your PC using a path different than the default.
The Enter Import Key window opens. Enter an Order Manager order number for an approved order and press Enter (do not click on the Close button). The data from the sale appears in the form. Process the order as you normally would. Enter a new order number in the Enter Import Key window to process another order.
Note: If you return to Order Manager and make changes to an order (such as approve an order), you will not see the changes in WorldShip until you close and re-open the Enter Import Key window.
"Primary Key cannot contain a null value" error: WorldShip imports each Order Manager order number into its Reference 1 field. When WorldShip generates a tracking number, it exports the tracking number and its associated order number from the Reference 1 field back to the Order Manager. WorldShip can't return tracking numbers to the Order Manager if the Reference 1 field is empty.
Possible causes:
Processing orders in WorldShip that were not imported from the Order Manager: If you process any orders in WorldShip, which were not imported from the Order Manager, the Reference 1 field will be left blank. When you close the batch in WorldShip, the empty Reference 1 field (NULL) will cause the ODBC to generate a Primary Key cannot contain a null value error and it will not return any tracking numbers to Order Manager.
An order has multiple package shipments: If an order has multiple package shipments, the Order Manager's order number is only associated with the first tracking number in the order. When you close the batch in WorldShip, the ODBC will only return one tracking number because only the first shipment in the order will have a value, or order number, in the Reference 1 field. Subsequent shipments within the order have a empty Reference 1 field, causing a Primary Key cannot contain a null value error and the ODBC will not return tracking numbers for those shipments.
Solution: To avoid this error, the Reference 1 field must contain a numeric value such as 0, so that the tracking number will be returned. You can manually type a numeric value into the Reference 1 field for each order OR set up a Shipper Profile in WorldShip that will pre-populate the Reference 1 field with a numeric value. (Note: WorldShip Profile Editor allows you to set up default values for many of the fields in WorldShip when a new order is added.) Using the WorldShip Profile Editor, set up a new profile, add "0" (or any default numeric value) to the Reference 1 field, and select "Use on all packages" option for Reference 1. When processing orders, select the profile with these settings before you begin. (Note: The tracking number will be returned to the Order Manager without an associated order number.)
Tracking numbers form not visible on View Orders screen: If the Reference 1 field contains text-based information (alpha characters), the tracking number is returned but the tracking numbers form will not appear when you try to view the tracking numbers at the View Orders screen. This is due to a conversion error when changing the text-based order number field to a numeric value.
Solution: Go to the Main Menu in the Order Manager and press F11 to open the database window. Click on the Tables section and double-click the Tracking Table to open. Look through the OrderNum field for any values that contain text or non-numeric characters (such as dashes) and remove that record from the table. Once all records containing text are removed, close the Tracking table. Click on the Window menu and choose Hide to remove the database window from the screen. Return to the View Orders form. Tracking numbers should now be visible.
If the following error message is encountered, it is mostly caused by the fact that an SQL database is being used for the Order Manager data file and additional setup must be performed prior to executing the steps in this document.

Created: 2/7/12
Update:11/18/14
 These fields are