

In this Topic: Show
The FedEx Ship Manager software can be utilized with the Order Manager by means of an ODBC connection between the applications. This allows data to pass back and forth between the systems so that the user does not need to manually re-type shipping and tracking information. If you have multiple Order Manager store files, the steps outlined in this topic will have to be performed for each store file, and a different "Integration Profile" should also be created in Ship Manager.
The user can request access to the Ship Manager software at the FedEx Web site, and must already have an established account with FedEx before installing the software and completing the registration process. For each Order Manager store file that is used, create a different "Integration Profile" in Ship Manager. The Integration Profile contains user preferences and field mapping information, as well as the correct ODBC connection to the Order Manager store file.
The images for the FedEx Ship Manager may be slightly out of date, but should provide enough guidance for the user to follow the necessary steps to complete the integration process. If any customers that use FedEx Ship Manager would like to provide current screenshots of that software, we'd be glad to incorporate them into this topic. Contact techwriter@stoneedge.com.
Enterprise users, whose Order Manager store file is an SQL database, must perform some additional steps that are not required when an MS Access database is used.
![]() If you are not an Enterprise user or do not use an
SQL database, skip to MS
Access Store Data File: Define an ODBC Connection and continue
with those instructions.
If you are not an Enterprise user or do not use an
SQL database, skip to MS
Access Store Data File: Define an ODBC Connection and continue
with those instructions.
Launch Microsoft Access.
Create a blank MS Access database (File>New>Blank Database) named OMExternalShipping.mdb, or something similar, in the C:\StoneEdge directory of the workstation where FedEx Ship Manager is installed.
Open the newly created database and go to File > External Data> ODBC Database.
Select Link to the data source by creating a linked table and click OK.
The Select Data Source dialog opens.
Click on the Machine Data Source tab and locate the System DSN for the Order Manager's store data file (which was created when the SQL database was converted from an MS Access database).
![]() It should be noted that the Order Manager is a 32-bit application and
an ODBC connection made through the Order Manager (Convert
to SQL process, Worldship Setup
function ) will not be visible via the default ODBC Data Source Administrator
utility of a 64-bit Operating system. Refer to Knowledge
Base topic, Windows
64-Bit Operating System Considerations, for instructions on
locating the compatible 32-bit ODBC utility.
It should be noted that the Order Manager is a 32-bit application and
an ODBC connection made through the Order Manager (Convert
to SQL process, Worldship Setup
function ) will not be visible via the default ODBC Data Source Administrator
utility of a 64-bit Operating system. Refer to Knowledge
Base topic, Windows
64-Bit Operating System Considerations, for instructions on
locating the compatible 32-bit ODBC utility.
Select the correct DSN and click OK.
The Link Tables dialog opens.

While holding either the Shift or Ctrl keys down, select the tables, dbo.Orders and dbo.ShippingMethods, and click OK.
The OMExternalShipping: Database screen appears, showing the linked tables.
![]() Although, the shipping information query has "Worldship"
in it's name, this same query is also used for any external shipping software
package that supports the use of an ODBC connection, such as FedEx Ship
Manager or DHL DBConnect, etc.
Although, the shipping information query has "Worldship"
in it's name, this same query is also used for any external shipping software
package that supports the use of an ODBC connection, such as FedEx Ship
Manager or DHL DBConnect, etc.
From the MS Access menu (not pictured), select File > External Data > Import & Link > Access.
Click Browse and navigate to the Order Manager's program file (SEOrdManEnt2007.mdb).

Click Browse and navigate to the Order Manager's program file (SEOrdManEnt2007.mdb).
Select Import tables, queries, forms, reports, macros, and modules into the current database. Click OK.
The Import Objects dialog opens, select the Queries tab.
Select WorldshipOrdersSQL, and click OK.
If you want to Save the Import Steps, select that box.
Click Close.
The WorldshipOrdersSQL query is now listed in the Queries section of the OMExternalShipping database.
Create a new System DSN for the OMExternalShipping database, using the 32-bit version of the ODBC Data Source Administrator utility.
Windows XP users simply go to Control Panel> Administrative Tools> Data Sources (ODBC).
If 64-bit editions of Windows Vista or Windows 7 are being used, review the Knowledge Base topic, Windows 64-bit Operating System Considerations, for information about executing the 32-bit compatible utility.
When the ODBC Data Source Administrator form appears, click on the Add button.
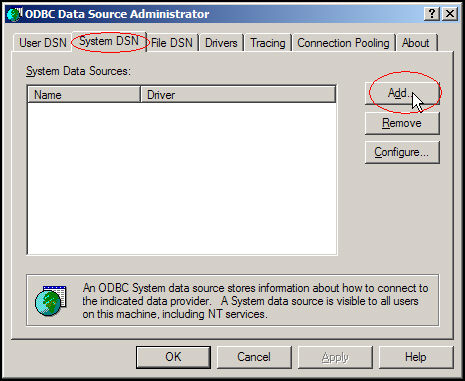
Figure 11: ODBC Data Source Administrator screen - System DSN tab
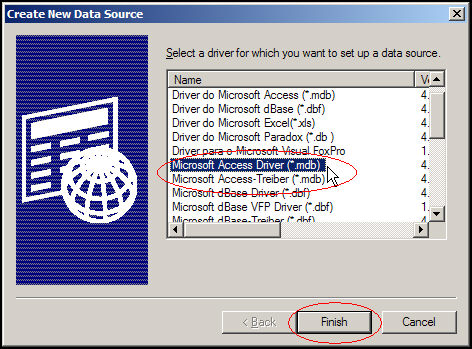
Figure 12: Create New Data Source screen
Click the [Finish] button.
The ODBC Microsoft Access Setup screen opens. Enter a meaningful name in the Data Source Name field, and optionally, a description in the field of the same name.
Click the Select button and navigate to the location of the database that was created in step 2 (OMExternalShipping.mdb) of section, Create an Intermediary Database and Link Tables from the Order Manager's Store File.
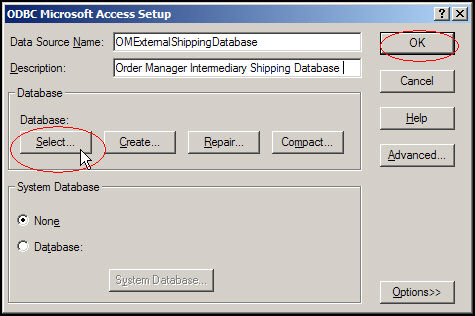
Figure 13: ODBC Microsoft Access Setup screen
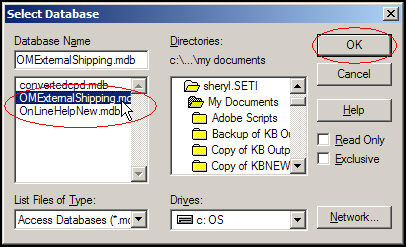
Figure 14: Select Database screen
Click the OK buttons on the Select Database screen and the ODBC Microsoft Access Setup screen.
The user is returned to the ODBC Source Administrator screen, where the new connection is visible.
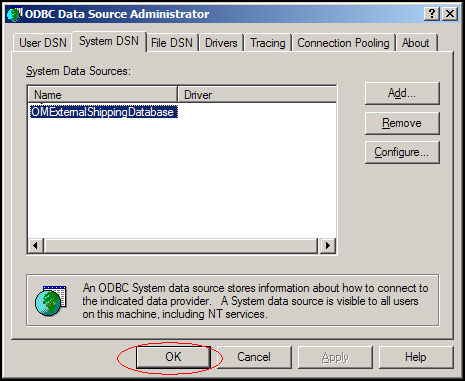
Figure 15: ODBC DataSource Administrator screen, showing newly created System DSN
An ODBC connection to the Order Manager's store data file must be created on each workstation where Ship Manager will be used to print shipping labels for orders contained in the Stone Edge Order Manager.
If an ODBC connection to the store data file has already been defined for some other purpose, such as another external shipping application, it is possible to use that same ODBC definition in conjunction with Ship Manager. In that case, skip to Configuring FedEx Ship Manager and follow those instructions. Otherwise, complete the following steps:
Go to Maintenance Menu> Setup Functions> Store Setup Wizard> Shipping tab.
Click the Create System DSN/ODBC Connection button.
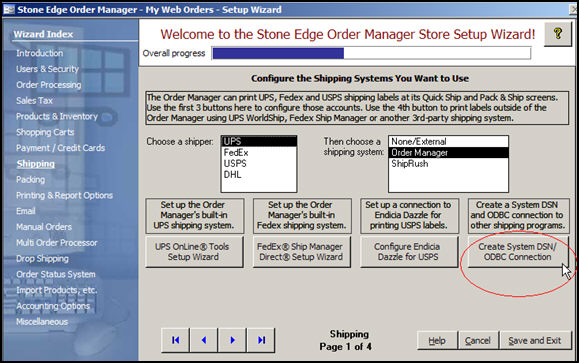
Figure 16: Store Setup Wizard: Shipping section, Page 1
The Enter name for System DSN dialog box opens.
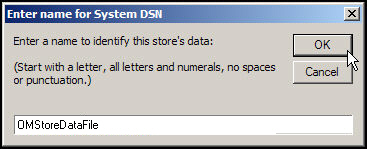
Figure 17: Enter name for System DSN dialog box
Enter a name for the ODBC connection between Ship Manager and your store's data file, such as "OMStoreDataFile". The name cannot have spaces or punctuation in it. If more than one store file is used, and you will be printing labels for orders from both stores through FedEx Ship Manager, it might be helpful to use the store name in the System DSN to easily tell them apart.
![]() Users, with workstations that are running 64-bit editions of a Windows
operating system, must be aware that the ODBC connection should be made
through the Order Manager (Shipping Setup Wizard or UPS Worldship Setup)
and not via the default Data Connections utility in the Administrative
Tools in the Control Panel. Microsoft Access is a 32-bit application and
cannot use an ODBC connection created in 64-bit mode. The Order Manager
utilities will create a 32-bit connection automatically.
Users, with workstations that are running 64-bit editions of a Windows
operating system, must be aware that the ODBC connection should be made
through the Order Manager (Shipping Setup Wizard or UPS Worldship Setup)
and not via the default Data Connections utility in the Administrative
Tools in the Control Panel. Microsoft Access is a 32-bit application and
cannot use an ODBC connection created in 64-bit mode. The Order Manager
utilities will create a 32-bit connection automatically.
Also be aware that the 32-bit ODBC connection created by the Order Manager will not be visible through the default 64-bit Data Connections utility in the Administrative Tools section of the Control Panel. Refer to Windows 64-Bit Operating System Considerations, for more information.
Click on the OK button to create the ODBC connection. Make a note of the name as you will need it later when setting up Ship Manager.
The program pops a message box to indicate the creation of the ODBC connection and the addition of the Worldship (External Shipping Software) query to the Order Manager store data file.
Click OK to acknowledge the end of the process.
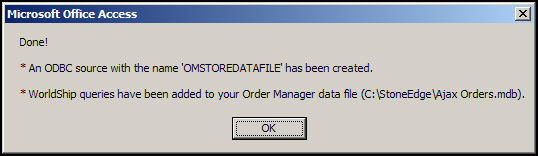
Figure 18: ODBC Process Completion message
Once the FedEx Ship Manager has been downloaded and installed, the user can create an Integration Profile to complete the connection between the Stone Edge Order Manager and Ship Manager.
Launch the Ship Manager software.
Click on the [Integration] heading in the menu bar, and select FedEx ® Integration Assistant.

Figure 19: FedEx Ship Manager Menu
At the Welcome>Introduction screen, click the Continue button (not pictured).
At the Welcome>Before You Begin screen, also click the Continue button (not pictured).
At the Begin>Create screen, select the Create a New Profile radio button and then click the Continue button (not pictured).
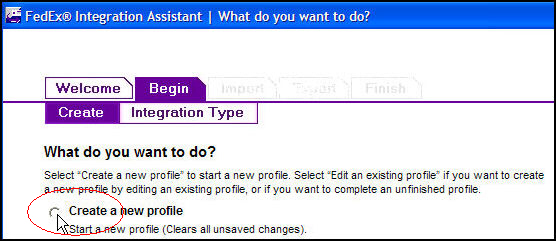
Figure 20: ShipManager Begin>Create screen
At the Begin>Integration Type screen, select the Both Import and Export radio button and click the Continue button, pictured below.
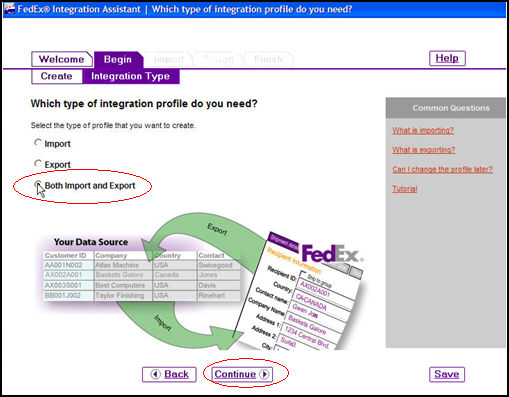
Figure 21: ShipManager Begin>Integration Type screen
At the Import>Source screen, click the ODBC radio button and then select the radio button that represents the proper ODBC Data Source Name (which depends on the type of database is used for the Order Manager store data file):
![]() If you use
an SQL database as your Order Manager store file:
If you use
an SQL database as your Order Manager store file:
the Import Map should point to the intermediary database, OMExternalShipping.mdb, created way back in step 2 of the section entitled, Create an Intermediary Database and Link Tables from the Order Manager's Store File; the name of the ODBC connection is OMExternalShippingDatabase, as seen in the example in section, Define an ODBC Connection to the Intermediary Database
the Export Map should point to the ODBC connection that points to the Order Manager's store data file, created in the section entitled, MS Access Store Data File: Define an ODBC Connection; in that example the ODBC connection is named OMStoreDataFile, which in turn points to the Order Manager store file
![]() If you use
an MS Access database as your store data file:
If you use
an MS Access database as your store data file:
the Import and Export maps created in Ship Manager should both point to the same database (ODBC connection) that represents the Order Manager store data file; there is no need for an intermediary database as there is with SQL store data files
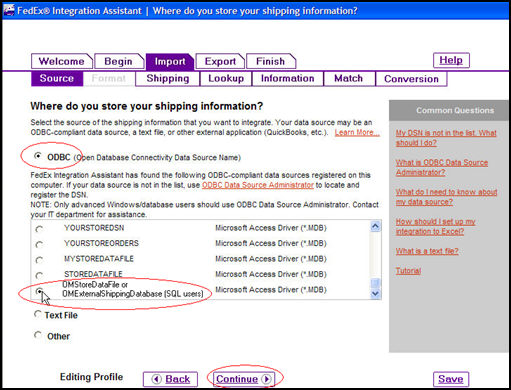
Figure 22: ShipManager Import>Source screen
Click the Continue button.
At the Import>Shipping screen, it is recommended that you select Yes for all of the settings on this page.
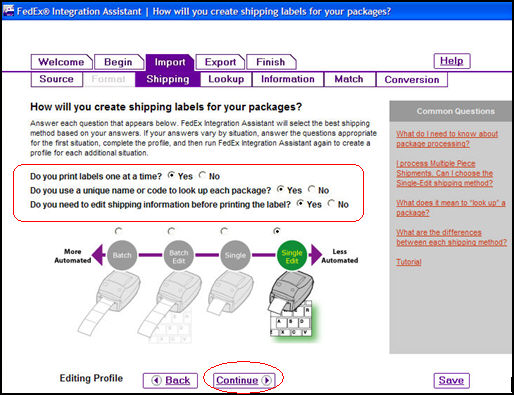
Figure 23: ShipManager Import>Shipping screen
Click the Continue button.
At the Import>Lookup screen, click the radio button next to After I enter a lookup value and click Continue (not pictured).
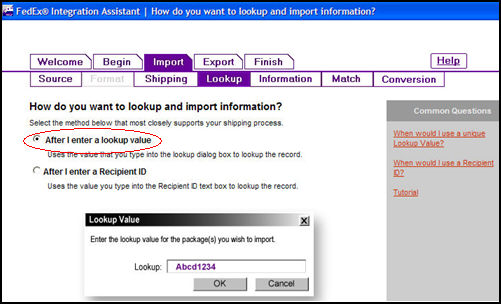
Figure 24: ShipManager Import>Lookup screen
At the Import>Information screen, complete the Recipient and Package field lists.
Click the Recipient link to open the Recipient form and check all of the fields in the table below:
| Address 1 | Address 2 |
| City | Company |
| Contact Name | Country |
| Phone | Postal Code |
| State/Province | ID |
Chart 1
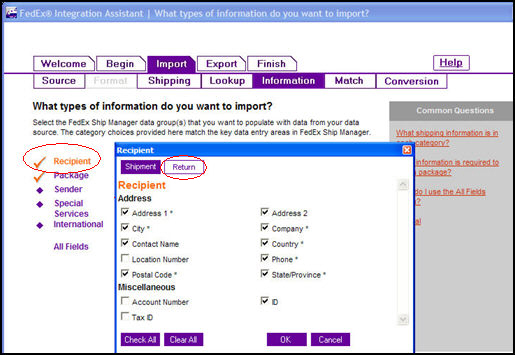
Figure 25: ShipManager Import>Information screen
Select the Package link and select the fields listed in the following table:
| Bill Transportation To | Customer Reference |
| Package Type | Residential Delivery Flag |
| Service Type | Weight |
Chart 2
It is necessary to use the vertical scroll bar to locate some of these fields, which are not all visible in the image below.
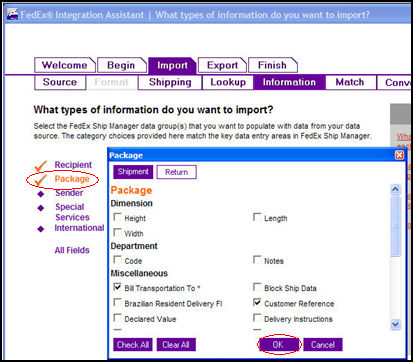
Figure 26: ShipManager Import>Information screen showing the Package selection box
When finished both lists, select OK button.
At the Import>Match screen, map the fields in your store's data file with the corresponding fields in Ship Manager as shown in the table below:
Chart 3
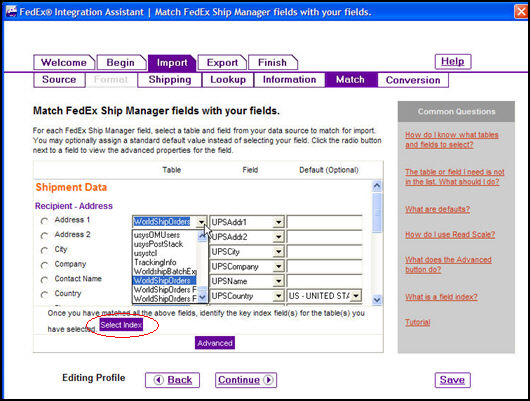
Figure 27: ShipManager Import>Match screen
![]() The WorldShipOrders
table is used for any external shipping software integration, not just
for UPS WorldShip.
The WorldShipOrders
table is used for any external shipping software integration, not just
for UPS WorldShip.
These fields can be mapped on a one-by-one basis or respond Yes to the pop-up box shown below to set all unselected tables to WorldShipOrders. Even though the Bill Transportation To and Package Type fields do not require a table selections, it is OK to leave the WorldShipOrders table selected in those fields.
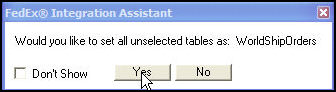
Figure 28: ShipManager Table Selection popup
While still at the Import>Match screen, click Select Index after all of the Order Manager fields have been mapped to the corresponding Ship Manager fields.
The Primary Index screen opens. Click the Tables button at the bottom of the page.
A list of fields that are found in the WorldShipOrders table appears in the Lookup dialog box.
Select the Order Number field from the list and then click OK. A colored line will appear to indicate the relationship has been made.
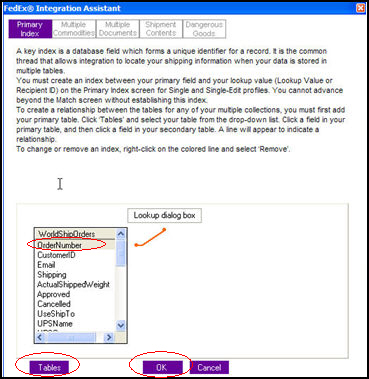
Figure 29: ShipManager Primary Index screen
Click the Continue button and proceed to the Import>Conversion screen.
Click the Service Type link at the side of the screen to map the names of FedEx Ship Manager method names (radio buttons) to your Order Manager shipping methods (drop-down lists). Use the vertical scroll bars to see additional shipping methods.
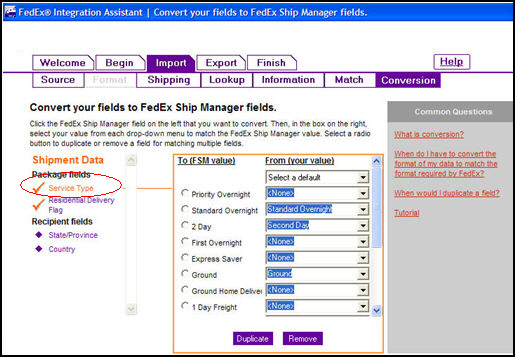
Figure 30: ShipManager Import>Conversion screen
For each FedEx shipping method that you use, click its radio button in the FedEx list, To (FSM value), and select the corresponding shipping method name from the adjacent drop-down list in the Order Manager method name list, From (your value).
Click Continue to proceed to the Export>Destination screen. This is where the export map gets created.
![]() Remember,
if you use an SQL database as your Order Manager store file, the ODBC
connection used for the ShipManager export map should point to the store
data file, not the intermediary database.
Remember,
if you use an SQL database as your Order Manager store file, the ODBC
connection used for the ShipManager export map should point to the store
data file, not the intermediary database.
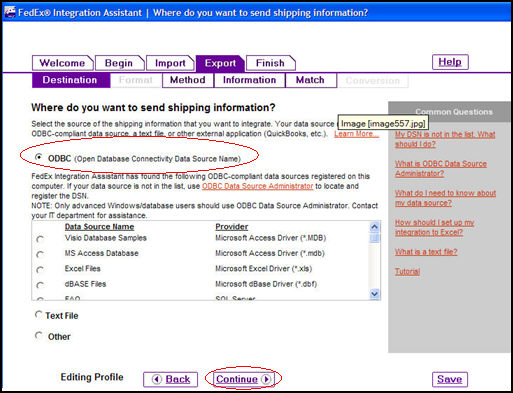
Figure 31: ShipManager Export>Destination screen
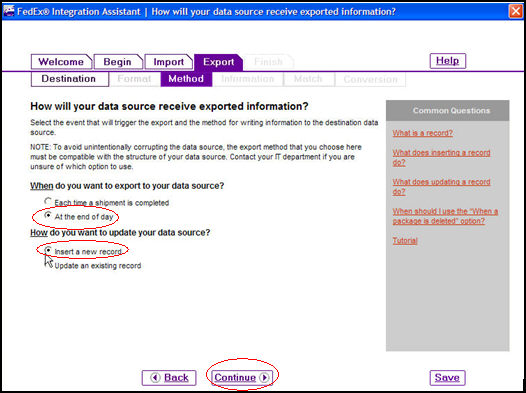
Figure 32: ShipManager Export>Method screen
When do you want to export to your data source?
At the end of day
How do you want to update your data source?
Insert a new record
Click Continue to proceed to the Export Information screen.
Click on the Tracking Number link on the side of the screen and check the field labeled Tracking Number (not pictured).
Click the Return button and then select the Package link.
Check the box labeled Customer Reference.

Figure 33: ShipManager Export>Information screen
Click OK to proceed to the Export>Match screen and map the following fields:
FedEx Field Name |
Select a Table |
Select a Field |
Tracking Number |
Tracking |
TrackingID |
Customer Reference |
Tracking |
OrderNum |
Chart 4
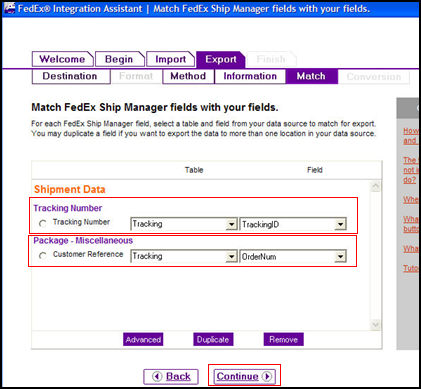
Figure 34: ShipManager Export>Match screen
Click Continue to proceed to the Finish>Summary screen, which shows a summary of the integration profile.
To review or change the settings that have been made, click the Edit]button next to any of the sections.
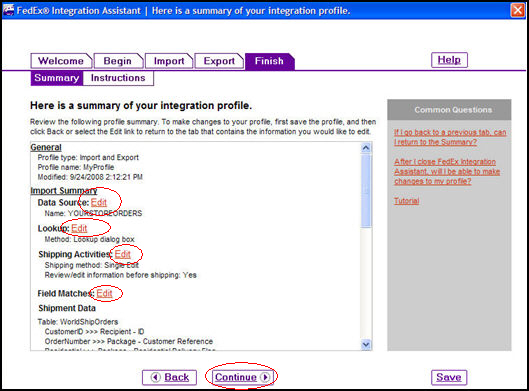
Figure 35: ShipManager Finish>Summary screen
If satisfied with the settings, click the Continue button to proceed to the Finish>Instructions screen.
Click the Finish button. The application will prompt the user to provide a name for the newly created integration profile.
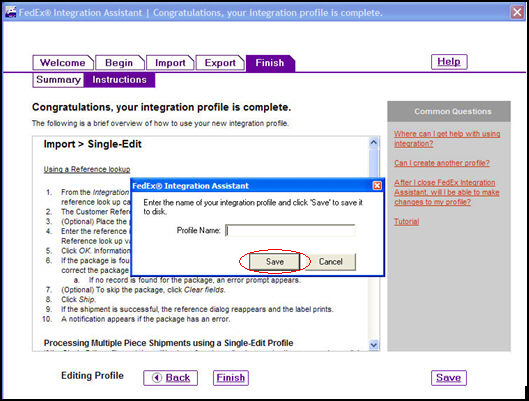
Figure 36: ShipManager Finish>Instructions screen
Enter a name that clearly distinguishes the profile as being related to the Order Manager store data file, and click the Save button.
Click Finish to complete the integration between FedEx ShipManager and the Stone Edge Order Manager.
At that time, the ShipManager software will open the Lookup Value screen.
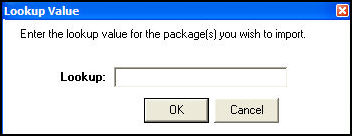
Figure 37: Lookup Value popup
Enter the number of an approved Order Manager order in the Lookup: field and click the OK button.
The ShipManager screen is now populated with the order's shipping information pulled from the Order Manager, ready to print a shipping label.
Once the integration steps have been completed, to print Order Manager shipping labels through ShipManager, follow these steps:
Launch the FedEx ShipManager software.
Click on the Integration menu item and select the name of the profile that was created during the setup process from the drop-down list. Refer to step 32 in the previous section.
The Lookup Value dialog box opens.
Enter the Order Manager order number of an approved order and press OK.
The order information populates the screen.
Review the fields for accuracy and print the label.
Created: 9/26/11
Updated: 11/14/14