

![]() New Monsoon
customers should contact the Monsoon Implementation team before attempting
to configure a Monsoon shopping cart in the Order Manager.
New Monsoon
customers should contact the Monsoon Implementation team before attempting
to configure a Monsoon shopping cart in the Order Manager.
In this Topic: Show
Official integration with Monsoon Commerce commenced with Order Manager Version 5.922.
The user must have a minimum of Monsoon Version 3.6.8 installed and the SEOM Data Exchange Adapter must be enabled at Monsoon in order to use this functionality.
Contact the Monsoon Implementation group before attempting to configure a Monsoon shopping cart in the Order Manager.
Monsoon staff members install and configure their software for their users, therefore, this topic only includes steps that pertain to the Order Manager.
Only the Seller Edge and Seller Pro editions of Monsoon software are compatible with the Stone Edge Order Manager/Monsoon integration.
Monsoon exports order data into XML text files stored in a directory specified by Stone Edge system parameter MonsoonNewOrderFileLocation. The default location is c:\ProgramData\Monsoon\Applications\SeomDataExchange\OrderManager. Orders are imported via the Import from Text File button on the Import Orders screen.
The Monsoon shopping cart can be configured to export order data at regular intervals, and includes all orders whose status has changed. The order files generated by Monsoon have the creation date stamp included in the file name, and may include orders of any status, although the Order Manager only import orders with a status of New. Once an order file has been successfully imported, the Order Manager deletes it.
Payment information is not be received for orders coming from Monsoon. The Order Manager can treat orders as paid or not, depending on the setting of the AssumePaidInFull system parameter. Use the cart-based parameter if more than one shopping cart resides in the store data file and the other cart's orders are not assumed to be Paid in Full.
Monsoon orders should only be processed in the Order Manager, not through the shopping cart. If an item is cancelled or returned, or a line item is revised, the Order Manager does not automatically make those changes at Monsoon. By default, the program displays a pop-up box to inform the user that they must manually make the same changes at Monsoon. If orders are processed in batch mode, at the Multi-Order Processor, and the batch contains a Monsoon order to cancel, the program warns the user and allows them to remove the order from the batch before proceeding. The user can disable those warnings by setting system parameter, MonsoonShowWarnings, to FALSE.
Some changes have been made to several tabs of the Orders screen to reflect additional fields that contain the order's original source, or "Market" (Amazon, eBay, etc.), the original source's order number, or "Market ID", and the current "Web Status" of the item. Line items also has additional fields to indicate if it is fulfilled externally (Fulfillment by Amazon - FBA) and its current status.
The Web Fields tab of the Inventory screen reflects the new fields added for Monsoon support, as has the Purchase Orders screen.
As of Order Manager V5.929, the Global Editor has been modified to include new fields that have been added for Monsoon support, such as MAP and Monsoon Don't Upload.
Introduced in Version 5.929, system parameter SetExtFulfillmentHighlight allows the user to highlight externally fulfilled line items by changing the text color at the Orders and Multi-Order Processor screens. It would be wise to avoid using Red, Blue, Green and Yellow, which the program may use for other purposes, depending on the settings of other system parameters..
Also in the Order Manager V5.929, a new Quick Filter has been added to locate Orders with Externally Fulfilled Items.
Improved functionality was added for the Alternate SKU function in the Order Manager V5.929. Refer to the Knowledge Base topic, Inventory Alternate Barcodes and SKUs tab.
Special, or cart-based parameters, were added for Monsoon shopping carts in V5.929 of the Order Manager, which allows the user to have more than one instance of a Monsoon shopping cart. Refer to the Knowledge Base topic, Monsoon Parameter Group.
As of Order Manager V5.929, the program suppresses sending confirmation emails for Monsoon orders originating at Amazon when system parameter AmazonSendTrackingEmail is set to FALSE.
The program recognizes externally fulfilled items/orders.
The Pack & Ship and QuickShip screens exclude externally fulfilled orders.
Externally fulfilled orders from a direct XML import are not included in text file export files.
Order Import - Order information will be imported via text files that are automatically generated by Monsoon
Product Import - Initially, the Order Manager will not be able to import product information directly from the Monsoon shopping cart, although Order Manager will create inventory records for any new products as orders are imported. Sub-SKU information is provided by the shopping cart, so it is not necessary to build sub-SKUs for Monsoon products once they have been added to the Order Manager.
Product Export - It is possible to export product information from the Order Manager to Monsoon by using the Monsoon Product Export on the Import/Export tab of the Maintenance Menu. As of V5.935, this feature must be enabled by the Monsoon implementation staff member for it to be visible.
Customer Import - The direct import of customer information from Monsoon is not possible, however as orders are imported from Monsoon, new customer records are created in the Order Manager. Refer to Customer Matching for more information about how the program determines if a customer is new or existing.
Manual Exchange of QOH Data - The Order Manager is able to send Quantity on Hand (QOH) information to the Monsoon shopping cart by means of the Shopping Cart Functions screen; inventory synchronization with Fulfillment by Amazon is not supported.
Automatic Exchange of QOH Data - Real-time inventory synchronization is supported between the applications if orders are fulfilled through the user's own warehouse; inventory synchronization with Fulfillment by Amazon is not supported.
Order Manager always sends 9999 as the QOH of drop-ship items or items marked as Ignore QOH.
Status Updates - Support begins in V5.923. The status update process with Monsoon shopping carts varies from the process used with other shopping cart systems in that it relies solely on the new system parameters, MonsoonSendConfirmations and MonsoonSendShippingNotification.
When MonsoonSendConfirmations is set to TRUE, which is the default setting, the Order Manager will send order status updates to Monsoon.
The user can determine the trigger for sending status information to Monsoon by selecting the appropriate setting for system parameter MonsoonSendShippingNotification:
Approving the Order - Orders that are Approved in Order Manager will be marked as Shipped at Monsoon.
Setting the Actual Ship Date - Orders that have an ActualShipDate set in Order Manager are marked as Shipped in Monsoon. If one line item in an order is shipped, the entire order is considered to be shipped. It is not presently possible to set item-level statuses.
Adding the Tracking Number - When tracking information is added to an order in the Order Manager, that order is marked as Shipped at Monsoon and the tracking information is added to the order at Monsoon. This is the recommended choice in order to ensure that the tracking information arrives seamlessly at Amazon.
Orders that are Cancelled in Order Manager must be manually Cancelled at Monsoon at the present time. In the future, if the order is cancelled at the Orders screen, the program will prompt the user to cancel the order at Monsoon as well. If the order is cancelled as a result of a batch process, such as an Approval Rule or the Multi-Order Processor, the program will write a note in the order. The program will also prompt the user about the potential for a Monsoon order to be cancelled during batch processing at the Multi-Order Processor, if system parameter MonsoonShowWarnings is set to TRUE.
Monsoon recognizes a specific list of shipping methods and carriers. If the user changes the shipping method or carrier name to one that Monsoon does not support, the Order Manager will omit that data when sending order status information to Monsoon, and the original shipping method or carrier name will remain intact at Monsoon. Tracking information will still be sent and updated at Monsoon. Refer to Appendix A for a detailed list of shipping methods and carriers. Although the names of the shipping methods and carriers are shown in mixed case, these fields are not case sensitive in Order Manager or Monsoon.
Note: As previously mentioned, this process does not follow the usual Order Manager Status Events feature process, such as choosing/creating Status Labels, selecting Status Events or checking the Notify Cart box. System parameter UseStatusUpdates is not required to be set to TRUE for order status updates to work with Monsoon.
Custom Fields - It is possible to export Custom and Advanced Custom inventory fields to Monsoon.
Customers should contact Monsoon support to arrange to have the software installed and configured to work with the Order Manager.
Define the Monsoon Shopping Cart in the Order Manager by selecting Create/Edit Shopping Carts on the Cart Functions tab of the Maintenance Menu, or via the Quick Clicks on the Main Menu, provided the user has not altered the default menu.
When the Shopping Carts screen opens, select the Add button and select Monsoon from the drop-down list of cart types.
Unlike the majority of shopping carts, there is no need to enter any other data on this screen. Select Save button to create the cart definition.
![]() Prior
to importing orders, please verify that the Order Manager system parameter
MonsoonNewOrderFileLocation is
set to the actual directory where Monsoon places the order files (c:\ProgramData\Monsoon\Applications\SeomDataExchange\OrderManager.)
If you have a networked environment, be certain to use the UNC path to
the desired location (\\ComputerName\FolderPath) and ensure that the folder
is shared and permissions are set to allow other computers/users to read
and write to that location.
Prior
to importing orders, please verify that the Order Manager system parameter
MonsoonNewOrderFileLocation is
set to the actual directory where Monsoon places the order files (c:\ProgramData\Monsoon\Applications\SeomDataExchange\OrderManager.)
If you have a networked environment, be certain to use the UNC path to
the desired location (\\ComputerName\FolderPath) and ensure that the folder
is shared and permissions are set to allow other computers/users to read
and write to that location.
Contact Monsoon technical support for assistance in locating the files, which may change depending on the operating system.
At the Main Menu, select the Import link in the Orders section to open the Import Orders screen.
Choose the Monsoon shopping cart from the list of shopping carts on the Select Cart tab and then select the Import From Text button to start the process.
Refer to the Knowledge Base topic, Import Orders, for more information.
As of Order Manager V5.929, the program suppresses the sending of order confirmation emails to customers that placed an Amazon order through a Monsoon shopping cart, if system parameter AmazonSendTrackingEmail is set to FALSE.
The following email tags are added to the program starting with Version 5.929:
| Tag Name | Tag Group | Order or Item Level |
| SourceMarketCustomerID | Orders | Order |
| SourceMarketLineID | Order Details | Item |
| SourceMarketName | Orders | Order |
| SourceMarketOrderID | Orders | Order |
| SourceWebItemStatus | Order Details | Item |
| SourceWebOrderStatus | Orders | Order |
Go to the Maintenance Menu > Cart Functions tab and click Monsoon Product Export to open the Export Products to Monsoon screen. This feature must be enabled by a Monsoon implementation staff member to be visible.
Click the Configure Export File tab and choose the fields that will be exported by selecting them from the field drop-down lists or select the Load Default List button to use the list supplied with the program.
Optional: If the user elects to create their own Field List, select the Save Field List button to retain those settings. Only one custom list can saved at a time (the most recently entered settings). At least one of the following fields must be selected: ISBN, UPS, ASIN, or EAN. If Advanced Custom fields have been defined in the Order Manager, those fields will appear in brackets [] in the drop-down lists.
Select the Export Products tab and select a radio button to determine which product inventory records will be exported.
By default, the Order Manager creates the export text file at the location c:\Stoneedge\MonsoonInventory\, seen in the Export File field when the screen is initially opened. To select another location, simply over-type the path or use the Browse button to navigate to another existing file. To change the default location of the Export Text File, refer to system parameter, MonsoonProductExportLocation.
Refer to Export Products to Monsoon for more detailed information about this process.
The Order Manager only creates new customer records as orders are imported from Monsoon. There is no way to import customer records directly from the Monsoon shopping cart.
A new field is added to the Purchase Order screen to allow users to instruct the program to ignore the QOH values of inventory being "received", for orders/merchandise being shipped directly to a Fulfilment Center (e.g., FBA).
Select the box labeled DO NOT ADD TO QOH, shown in Figure 1, when generating Purchase Orders for merchandise that will be shipped directly to Amazon.
Data is collected as usual and is available for Accounting/QuickBooks purposes but does not trigger Real-Time Inventory data exchange, nor increment the product's QOH in the Order Manager.
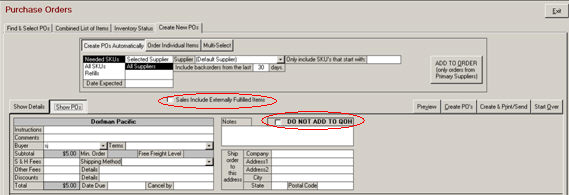
Figure 1: Purchase Order screen - Create New POs tab
By default, orders with items that are fulfilled outside of the Order Manager are omitted from the program's calculations when automatically creating purchase orders or using the Refill function. Backorders are also not included.
Beginning in versions 7.029, 7.5, and 8.010, externally fulfilled items can be included in the calculations for any method of purchase order generation.
The Create New POs tab of the Purchase Order screen has been modified to allow the user to determine if the sales data should include externally fulfilled items. If generating purchase orders by Needed SKUs sold in the last 30 days, the program honors the setting of the Sales Include Externally Fulfilled Items check box.
Ensure that system parameter MonsoonSendConfirmations is set to TRUE. The parameter is set to TRUE by default.
Determine the appropriate trigger for sending status updates to Monsoon by setting system parameter MonsoonSendShippingNotifications.
The choices are:
Approving the order - Orders that are Approved in Order Manager are marked as Shipped at Monsoon.
Setting the Actual Ship Date - Orders that have an ActualShipDate set in Order Manager are marked as Shipped in Monsoon.
Adding the Tracking Number (Recommended) - When tracking information is added to an order in the Order Manager, that order is marked as Shipped at Monsoon and the tracking information is also added to the order at Monsoon.
The Order Manager does not send status update information for Cancelled orders to Monsoon, the user must manually cancel the order at the Web site.
If inventory synchronization is already configured, set system parameter SynchQOH to FALSE before manually pushing or pulling QOH information to or from a shopping cart to reset the QOH counts. For instructions, refer to Set System Parameters.
Ensure that the QOH count in Order Manager is correct and then manually send that information to the Monsoon shopping cart, as well as to any other carts that might be sharing the inventory. Refer to Manually Sending Quantity on Hand Information from Order Manager to Monsoon for more information.
When all carts reflect the same QOH for all products, set system parameter SynchQOH to TRUE.
If this is the first time that inventory synchronization is being turned on, edit each affected shopping cart definition and select the Synchronize Inventory box. To do this, go to the Shopping Cart Functions page, which is accessed through the Cart Functions tab of the Maintenance Menu.
System parameter MonsoonQOHTimerInterval controls the frequency in which the Order Manager sends QOH adjustment feeds to Monsoon (every 5 minutes by default), when real-time inventory synchronization is enabled.
QOH text files are created in the same directory where product export files are created (MonsoonProductExportLocation) and are picked up automatically by the SEOM Data Exchange Adapter at Monsoon.
Manually adjust the QOH of an item in Order Manager, and then in a few minutes, review the QOH at all affected Web sites (where the product is listed) to confirm that the value has changed there as well.
Refer to the Knowledge Base topic, Inventory Synchronization, for more information.
Refer to the Knowledge Base topic, Monsoon Parameter Group, to review all the parameters that pertain to Monsoon shopping carts.
For assistance with setting system parameters in the Order Manager, review the Knowledge Base topic, Set System Parameters.
Introduced in Version 5.929, system parameter SetExtFulfillmentHighlight allows the user to highlight externally fulfilled line items by changing the color of the text at both the Orders and Multi-Order Processor screens.
System parameter MonsoonSuppressFBAOrders controls whether Fulfillment by Amazon orders are imported into the Order Manager. All items on the order must have been fulfilled by Amazon. Introduced in V5.929.
System parameter MonsoonSuppressFBAPaperwork controls whether invoices, packing slips, etc. for Fulfillment by Amazon orders are automatically added to the batch queue upon import. Introduced in V5.929.
If Real-Time Inventory Synchronization is enabled, do not use the Send QOH to Monsoon button before disabling the on-going synchronization. Refer to Real-Time Inventory Synchronization for more information.
Go to the Shopping Cart Functions page, which is accessed through the Cart Functions tab of the Maintenance Menu.
Select the Send QOH to Monsoon button to push the initial Order Manager quantity on hand counts to the Monsoon shopping cart system.
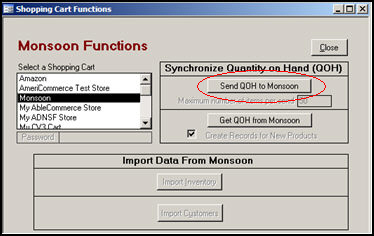
Figure 2: Monsoon Shopping Cart Functions screen
OneDay
Standard
StandardInternational
TwoDay
ExpeditedInternational
Economy
Airborne
CanadaPost
CityLink
DeutschePost
DHL
Eagle
Fastway
FedEx
FedexSmartPost
GLS
GO
Hermes
Multiple
NippinExpress
other
Parcelforce
Parcelnet
PFI
RoyalMail
SagawaExpress
Smartmail
target
TNT
UPS
UPSMI
USPS
YamatoTransport
Figure 3: Stone Edge Order Manager and Monsoon Integration with Monsoon/FBA inventory transfer steps
Created: 6/8/11
Modified: 11/6/14